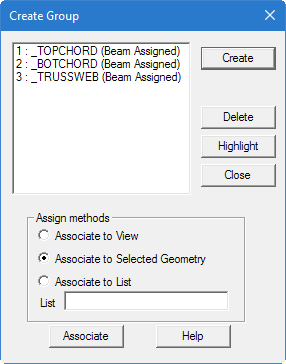
Create Group dialog
Used to cluster a set of joints, beams, plates or solids into a single entity identified by a distinct name.
Opens when the Groups tool is selected in the Geometry Tools group on the Utilities ribbon tab.
The group name may be subsequently used instead of a joint, member, or element list to specify properties, supports, loads, etc. This prevents the need for you to repeat the same list of objects within your model. Additionally, group names can be used to highlight geometry using the Group Selection tool.
For example, the top chord members of an
truss can be grouped into a name called
_TOPCHORD
.
| Setting | Description |
|---|---|
| Create |
Opens the Define Group Name dialog, which is used to assign a group name and specify Node, Beam, Plate, Geometry, or Floor from the drop down list, as shown below. 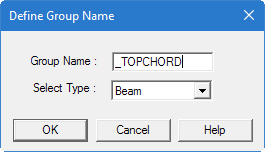
Caution: Group names must begin with the
underscore
_character. |
| Delete | This button allows us to delete any group that has already been created. The names of all available groups are displayed along with a reference number in a list box. Select the one we wish to remove and click on the Delete button. That group will be removed from the list. |
| Highlight | This button allows us to highlight the structural components which comprise a given group. From the list box where the available group names are displayed with a reference number, select the group we wish to highlight. |
| Close | Click group specification is complete. |
| Assign Methods | Options:
|
| Associate | Click to add the joints, members, or elements to the
group.
Note: Only the objects in the current view, selection set, or list
will be added to the selected Group name. Any objects previously in that group
that are not in the association method will no longer be contained in that
group.
|