Adding Locations to Projects
Locations are used to define shortcuts to various source and destination folders used by the project. For example, if you want to publish a document to some destination folder, you first need to create a publish location in the project that points to that destination folder. The locations you create can point to either ProjectWise folders or local folders.
Add a Publish Location
A publish location is a folder in the advanced integration project that is linked to some destination folder that you can publish your Revit project files (RVT) to. You can add as many publish locations to your project as you need, in case you need to publish to more than one location. For example, you might create one publish location just for PDF publishing, and another publish location just for DWG publishing.
- Open your project in the ProjectWise browser.
- On the
Documents tab, right-click the project and
select
Create Folder.
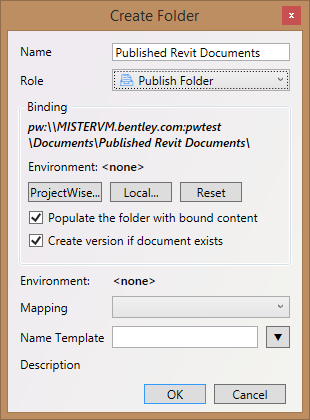
The Create Folder dialog opens.
- Set Role to Publish Folder.
- Click the
ProjectWise or
Local button, then select the
ProjectWise or local folder that will be the
destination folder for publishing and click
OK.
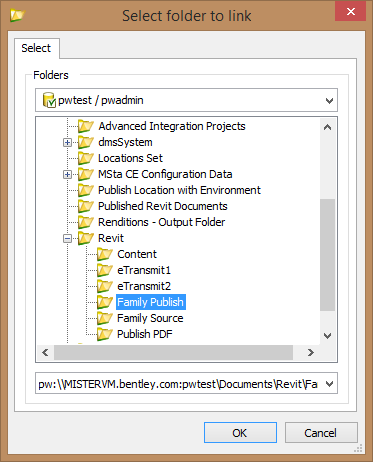
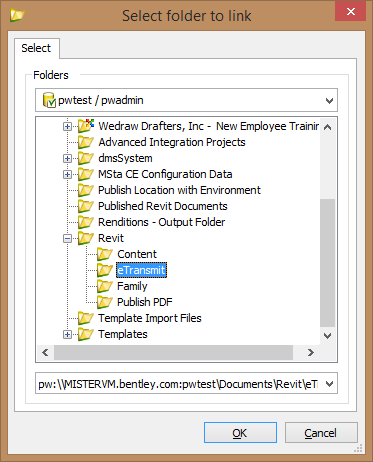
When you click the ProjectWise button, the Select folder to link dialog opens to the current datasource, which is the datasource that your project is stored in. If needed, you can select a folder from another datasource by selecting another datasource from the Folders list and logging in when prompted. Whichever datasource you use, you can either select an existing project or folder, or you can right-click in the dialog to create a new project or folder.
Selecting a destination folder sets the Name and Binding in the Create Folder dialog.
The Name field sets the display name for this location in the ProjectWise browser in Revit. The location name is the same as the folder name by default, which you can keep or change as needed.
The Binding field shows the path to the selected destination folder.
If using a ProjectWise folder, the Environment field shows the name of the environment assigned to the selected ProjectWise project or folder (if it has no environment, this field displays <none>).
Populate the folder with bound content is on by default. When on, a link to each document that currently exists in (or later gets added or published to) the destination folder will be added under this location in the project.
Create version if document exists is on by default. When on, and publishing tries to send a document to the destination folder and there is already a document having the same file name in that folder (from a previous publishing, for example), then a new version of the document will be created. If off, the existing document will be overwritten with the new document.
- Click OK.
The publish location is added to the project in the ProjectWise browser. You now can use it to publish your Revit project files. (see Publishing)
Add a Family Source Location
A family source location is a folder in the advanced integration project that is linked to some folder that contains the Revit family files (RFA) you want to use in your project. You can add as many family source locations to the project as you need. For example, if your Revit family files are currently stored in more than one location, you can add one family source location to your project for each physical folder that contains the family files you want to use.
- Open your project in the ProjectWise browser.
- On the
Documents tab, right-click the project and
select
Create Folder.
The Create Folder dialog opens.
- Set Role to Family Source Folder.
- Click the
ProjectWise or
Local button, then select the
ProjectWise or local folder that contains (or
will contain) your source family files and click
OK.
When you click the ProjectWise button, the Select folder to link dialog opens to the current datasource, which is the datasource that your project is stored in. If needed, you can select a folder from another datasource by selecting another datasource from the Folders list and logging in when prompted. Whichever datasource you use, you can either select an existing project or folder, or you can right-click in the dialog to create a new project or folder.
Selecting the family source folder sets the Name and Binding in the Create Folder dialog.
The Name field sets the display name for this location in the ProjectWise browser in Revit. The location name is the same as the folder name by default, which you can keep or change as needed.
The Binding field shows the path to the selected family source folder.
Populate the folder with bound content is on by default. When on, a link to each document that currently exists in the family source folder will be added under this location in the project.
- Click OK.


The family source location is added to the project in the ProjectWise browser. You can now load family files from this location into Revit. (see Loading Families)
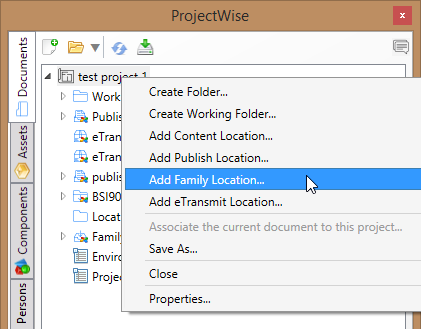
Add a Family Publish Location
A family publish location is a folder in the advanced integration project that is linked to some destination folder, used for making your Revit family files (RFA) available to others users. You can add as many family publish locations to the project as you need (for example, if you need to make family files available to users in multiple ProjectWise datasources). Once you create a family publish location and publish families to it, other users can create a family source location in their project that points to your family publish location, so that they can easily load and place your published families into their Revit models.
- Open your project in the ProjectWise browser.
- On the
Documents tab, right-click the project and
select
Create Folder.
The Create Folder dialog opens.
- Set Role to Family Publish Folder.
- Click the
ProjectWise or
Local button, then select the
ProjectWise or local folder that you will
publish family files to and click
OK.
When you click the ProjectWise button, the Select folder to link dialog opens to the current datasource, which is the datasource that your project is stored in. If needed, you can select a folder from another datasource by selecting another datasource from the Folders list and logging in when prompted. Whichever datasource you use, you can either select an existing project or folder, or you can right-click in the dialog to create a new project or folder.
Selecting the family publish folder sets the Name and Binding in the Create Folder dialog.
The Name field sets the display name for this location in the ProjectWise browser in Revit. The location name is the same as the folder name by default, which you can keep or change as needed.
The Binding field shows the path to the selected family publish folder.
If using a ProjectWise folder, the Environment field shows the name of the environment assigned to the selected ProjectWise project or folder (if it has no environment, this field displays <none>).
Populate the folder with bound content is on by default. When on, a link to each document that currently exists in (or later gets added or published to) the selected destination folder will be automatically added under this location in the project.
Create version if document exists is on by default. When on, and publishing tries to send a document to the destination folder and there is already a document having the same file name in that folder (from a previous publishing, for example), then a new version of the document will be created. If off, the existing document will be overwritten with the new document.
- Click OK.

The family publish location is added under the project in the ProjectWise browser.
Add an External Content Location
An external content location is a folder in the advanced integration project that is linked to some folder in ProjectWise that contains the documents you want to attach as links to the current Revit document.
You will create one external content location for each folder in ProjectWise that contains the documents you want to attach a link to.
- Open your project in the ProjectWise browser.
- On the
Documents tab, right-click the project and
select
Create Folder.
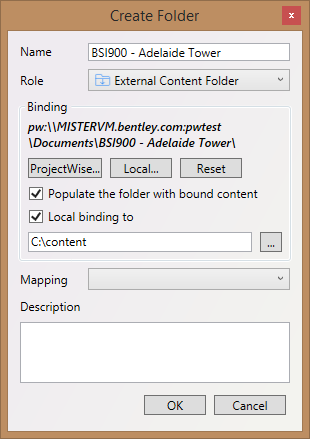
The Create Folder dialog opens.
- Set Role to External Content Folder.
- Click the
ProjectWise button, then select the
ProjectWise folder containing the documents you
want to attach a link to and click
OK.
Important: You must select the folder that contains the documents you want to attach a link to, and not some parent folder or project above it. If you select a parent folder, you will not be able to make links to documents in any of its subfolders.
When you click the ProjectWise button, the Select folder to link dialog opens to the current datasource, which is the datasource that your project is stored in. If needed, you can select a folder from another datasource by selecting another datasource from the Folders list and logging in when prompted. Whichever datasource you use, you can either select an existing project or folder, or you can right-click in the dialog to create a new project or folder.
Selecting a folder sets the Name and Binding in the Create Folder dialog.
The Name field sets the display name for this location in the ProjectWise browser in Revit. The location name is the same as the folder name by default, which you can keep or change as needed.
The Binding field shows the path to the selected folder.
Populate the folder with bound content is on by default. When on, a link to each document that currently exists in the selected folder will be added under this location in the project.
- Turn on Local binding to and click the Browse (...) button to select the local folder you want to link to the ProjectWise folder.
- Click OK.
The external content location is added to the project, and a copy of each document in the ProjectWise folder is added to the linked local folder. This enables Revit to use the local file when you go to attach a link to a document in the external content location.
You can now attach links to files in this location. (see Attaching Links)
Add an eTransmit Location
An eTransmit location is a folder in the advanced integration project that is linked to some destination folder where you can send Revit project files (RVT) in your project using the eTransmit command. The eTransmit location can be a folder in ProjectWise or a local folder. You can add as many eTransmit locations to your project as you need, in case you need to send your Revit files to more than one location.
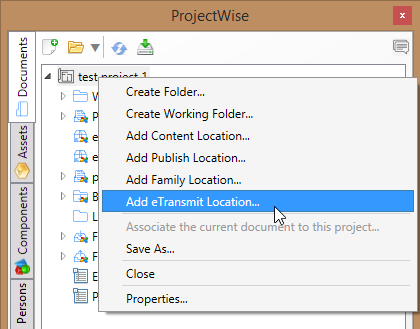
- Open your project in the ProjectWise browser.
- On the
Documents tab, right-click the project and
select
Create Folder.
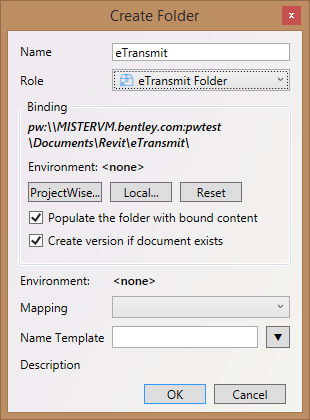
The Create Folder dialog opens.
- Set Role to eTransmit Folder.
- Click the
ProjectWise or
Local button, then select the
ProjectWise or local folder that will be the
destination folder for this eTransmit location and click
OK.
When you click the ProjectWise button, the Select folder to link dialog opens to the current datasource, which is the datasource that your project is stored in. If needed, you can select a folder from another datasource by selecting another datasource from the Folders list and logging in when prompted. Whichever datasource you use, you can either select an existing project or folder, or you can right-click in the dialog to create a new project or folder.
Selecting a destination folder sets the Name and Binding in the Create Folder dialog.
The Name field sets the display name for this location in the ProjectWise browser in Revit. The location name is the same as the folder name by default, which you can keep or change as needed.
The Binding field shows the path to the selected destination folder.
If using a ProjectWise folder, the Environment field shows the name of the environment assigned to the selected ProjectWise project or folder (if it has no environment, this field displays <none>).
Populate the folder with bound content is on by default. When on, a link to each document that currently exists in (or later gets sent to, using eTransmit) the destination folder will be automatically added under this location in the project.
Create version if document exists is on by default. When on, and eTransmit tries to send a document to the destination folder and there is already a document having the same file name in that folder (from a previous eTransmit action, for example), then a new version of the document will be created. If off, the existing document will be overwritten with the new document.
- Click OK.
The eTransmit location is added to the project in the ProjectWise browser. You can now use the eTransmit command on individual RVT files in your Work in progress folder, to send the RVT file to the eTransmit location. (see eTransmitting)
Add a Backup Location
A backup location is a folder in the advanced integration project that is linked to some destination folder, and is used to store backup copies of Revit project files (RVT) in the project. You can add as many backup locations to your project as you need, in case you need to back up your files to more than one location. Once a backup location exists in your project, you can use the eTransmit command in the ProjectWise browser to send RVT files to the destination folder specified in the backup location.
- Open your project in the ProjectWise browser.
- On the
Documents tab, right-click the project and
select
Create Folder.
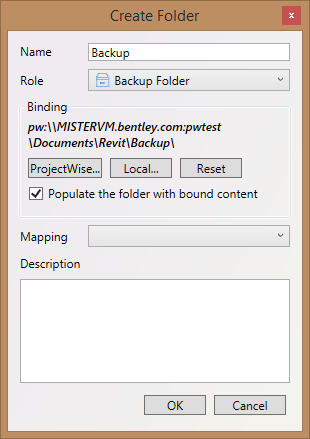
The Create Folder dialog opens.
- Set Role to Backup Folder.
- Click the
ProjectWise or
Local button, then select the
ProjectWise or local folder that will be the
backup location and click
OK.
When you click the ProjectWise button, the Select folder to link dialog opens to the current datasource, which is the datasource that your project is stored in. If needed, you can select a folder from another datasource by selecting another datasource from the Folders list and logging in when prompted. Whichever datasource you use, you can either select an existing project or folder, or you can right-click in the dialog to create a new project or folder.
Selecting a destination folder sets the Name and Binding in the Create Folder dialog.
The Name field sets the display name for this location in the ProjectWise browser in Revit. The location name is the same as the folder name by default, which you can keep or change as needed.
The Binding field shows the path to the selected destination folder.
Populate the folder with bound content is on by default. When on, a link to each document that currently exists in (or later gets sent to, using eTransmit) the destination folder will be automatically added under this location in the project.
- Click OK.
The backup location is added to the project in the ProjectWise browser. You can now use the eTransmit command on individual RVT files in your Work in progress folder, to send the RVT file to the backup location. (see eTransmitting)
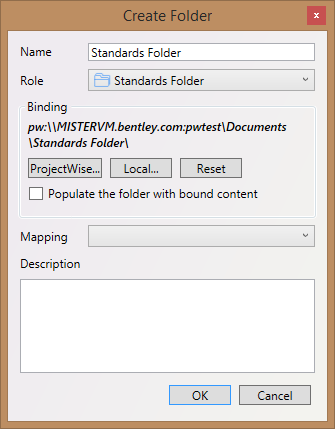
Add a Standards Location
A standards location is a folder in the advanced integration project that is linked to some ProjectWise project, and is used so that the custom project properties and/or CONNECTED project properties of the linked ProjectWise project can be used as source attributes in a project mapping (a ProjectWise-to-Revit attribute mapping definition).
- Open your project in the ProjectWise browser.
- On the
Documents tab, right-click the project and
select
Create Folder.
The Create Folder dialog opens.
- Enter a Name for the folder.
- Set Role to Standards Folder.
- Click the
ProjectWise button and select a
ProjectWise project.
(In this case, you must select a ProjectWise project rather than a ProjectWise folder.)
- Click OK.
You can now use this standards location in the creation of a project mapping. (see Configuring Attribute Mapping)
Add a Locations Set
A locations set is a folder in the advanced integration project that contains other locations. Create a locations set if you want to organize your locations within the project.
- Open your project in the ProjectWise browser.
- On the
Documents tab, right-click the project and
select
Create Folder.
The Create Folder dialog opens.
- Enter a Name for the folder.
- Set Role to Locations Set.
- Click OK.
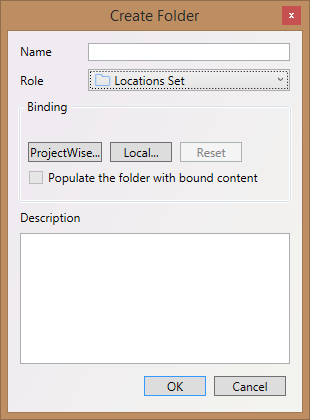
The locations set folder is added to the project. You cannot move existing locations into this folder, but you can add new locations to this folder by right-clicking the locations set folder and selecting Create Folder.
Synchronize a Location with its Linked Folder
As documents are added to or removed from the source or destination folder that is linked (bound) to a particular location, you can synchronize the location in the advanced integration project so that it displays the current list of documents in the linked folder.
- Open your project in the ProjectWise browser.
- On the Documents tab, right-click the location you want to update and select Synchronize content.
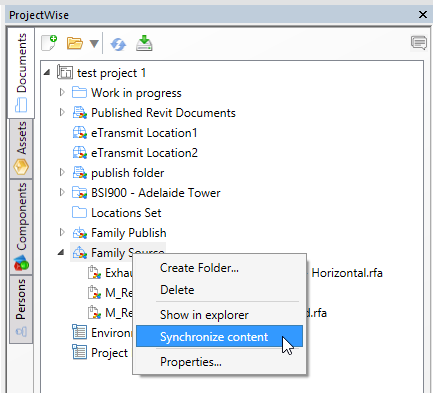
The location is updated with the current list of documents in the linked folder.
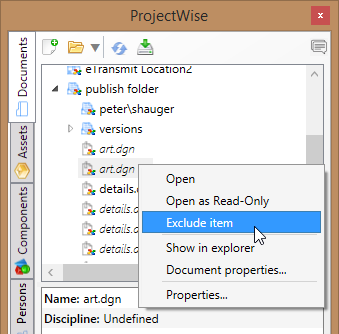
Exclude Items from a Location
You may want to remove some of the document links from a location in the project. For example, if your destination folder contains some documents that are unrelated to this project, you might want to remove the links to those documents, to make it easier to focus on the files relevant to this project.
Create Folder / Folder Properties Dialog
| Setting | Description |
|---|---|
| Name | Sets the display name for the location in the ProjectWise browser. By default, if you do not enter a name, the display name will be the same as the name of the selected source or destination folder. You can edit the name as needed. |
| Role | Sets what type of location this is. Once you set the role and begin using the location, there is typically no need to change the role. |
| Binding | Shows the path to the source or destination folder
that this particular location is linked to.
You can change the source or destination folder as needed. Click ProjectWise if you want to select a folder in ProjectWise. Click Local if you want to select a local folder. Click Reset to clear the selected folder. When selecting a ProjectWise folder, by default you are prompted to select a folder in the current datasource (the datasource that contains the advanced integration project you are working in). However, from the ProjectWise folder selection dialog you can log into and select folders from other datasources if needed. To log into another datasource, select another datasource from the Folders list and log in when prompted. If you have a ProjectWise project or folder selected, the Environment field displays the name of the environment assigned to the selected ProjectWise project or folder. If the ProjectWise project or folder has no environment, this field displays <none>. |
| Populate the folder with bound content | If this setting is on when the location is initially
created (the default), then for each document that currently exists in the
linked source or destination folder, a link to that document is automatically
added under this location in the project. If this setting is on and the
location is a destination location, then for each document that gets placed in
the destination as a result of a publish or eTransmit through this advanced
integration, then a link to that document is also automatically added under
this location in the project.
When this setting is off, then links to documents that are currently in (or later get placed in) the linked source or destination folder only appear under the location when you synchronize the location with its linked folder. |
| Create version if document exists | If on, and the process tries to place a document in the destination folder and there is already a document having the same file name in that folder (from a previous publishing, for example), then a new version of the document will be created. If off, the existing document will be overwritten with the new document. |
| Mapping | Used to assign an attribute mapping definition to
the folder / location.
If the folder is a publish location, family publish location, or eTransmit location, then this option is used to assign an environment mapping (a Revit-to-ProjectWise attribute mapping definition). If the folder is a working folder, then this option is used to assign a project mapping (a ProjectWise-to-Revit attribute mapping definition). |
| Name Template | Used to specify which Revit variables will be used to generate the document name, when a document gets created as a result of using this location. To select a variable from this list, you must have a Revit file open. |