Publishing
Using the various types of locations you have already added to the project, you can publish your Revit files to other formats, including PDF, DWG, i-model, and image. You can also publish schedules and quantities to a Microsoft Excel file.
Publish to PDF
You can publish views from Revit project or family files as PDFs. The resultant PDFs will be stored in the destination folder specified in the publish location, which can either be a ProjectWise folder or a local folder.
- Open your project in the ProjectWise browser.
- Make sure you have
already:
- installed a supported PDF printer (see Requirements)
- specified which installed and supported PDF printer you want to use as the default PDF printer for this project. (see Creating Revit Advanced Integration Projects)
- added at least one publish location to this project. (see Adding Locations to Projects)
- Open the Revit project or
family file you want to publish.
You can open the Revit file the way you normally would (for example, using ), or if you have added the Revit file to your project you can open it from the ProjectWise browser by right-clicking the Revit file in the Work in progress folder and selecting Open.
- In the ProjectWise browser, right-click the publish location you want to use for publishing PDFs and select Publish to PDF.
- In the Print dialog that opens, do the following:
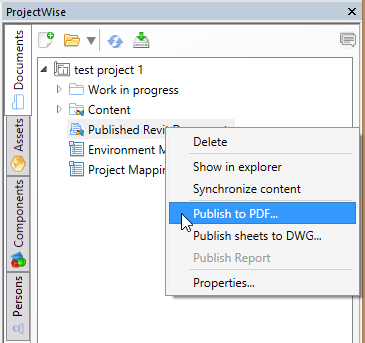
The PDFs are created and stored in the destination folder specified in the selected publish location.
If the location setting Populate the folder with bound content is on, then a link to each published document in the destination folder is automatically added under the location in the ProjectWise browser.
If the destination folder is a ProjectWise folder and the location setting Create version if document exists is on, then publishing creates a new version if a document with the same name exists in the destination folder. The active version of a document is shown as plain text. The non-active versions are shown in italic text.
Publish to DWG
You can publish views from Revit project files as DWG files. The resultant DWG files will be stored in the destination folder specified in the publish location, which can either be a ProjectWise folder or a local folder.
- Open your project in the ProjectWise browser.
- Make sure you have already added at least one publish location to this project. (see Adding Locations to Projects)
- Open the Revit project
file you want to publish.
You can open the Revit file the way you normally would (for example, using ), or if you have added the Revit file to your project you can open it from the ProjectWise browser by right-clicking the Revit file in the Work in progress folder and selecting Open.
- In the ProjectWise browser, right-click the publish location you want to use for publishing DWGs and select Publish sheets to DWG.
- In the Publish DWG Settings dialog that opens, do the following:
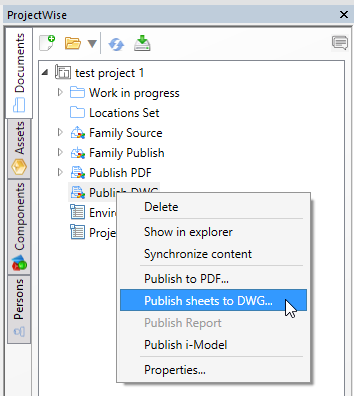
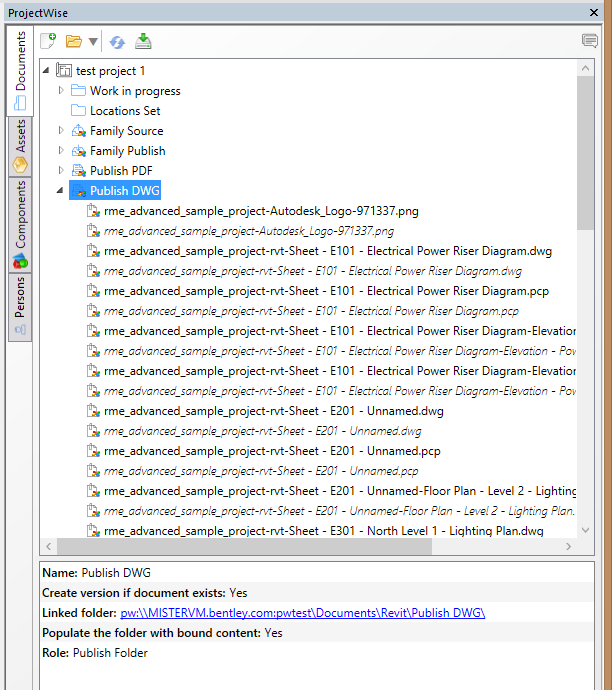
The DWGs are created and stored in the destination folder specified in the selected publish location.
If the location setting Populate the folder with bound content is on, then a link to each published document in the destination folder is automatically added under the location in the ProjectWise browser.
If the destination folder is a ProjectWise folder and the location setting Create version if document exists is on, then publishing creates a new version if a document with the same name exists in the destination folder. The active version of a document is shown as plain text. The non-active versions are shown in italic text.
Publish to i-model
You can publish Revit project and family files as i-models. The resultant i-models will be stored in the destination folder specified in the publish location, which can either be a ProjectWise folder or a local folder.
- Open your project in the ProjectWise browser.
- Make sure you have
already:
- installed i-model Plug-in for Revit (available from the Bentley Software Fulfillment Center)
- added at least one publish location to this project. (see Adding Locations to Projects)
- Open the Revit project or
family file you want to publish.
You can open the Revit file the way you normally would (for example, using ), or if you have added the Revit file to your project you can open it from the ProjectWise browser by right-clicking the Revit file in the Work in progress folder and selecting Open.
- In the
ProjectWise browser, right-click
the publish location you want to use for publishing i-models and select
Publish i-Model.
The publishing begins immediately. A Please wait window opens to show you the publishing progress and estimated time left.
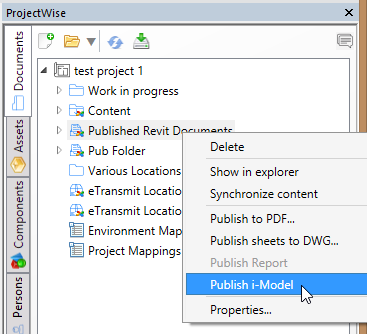

The i-model is created and stored in the destination folder specified in the selected publish location.
Publish to Image (JPG, BMP, PNG, TIF)
You can publish a Revit project file as an image. The resultant image file will be stored in the destination folder specified in the publish location, which can either be a ProjectWise folder or a local folder.
- Open your project in the ProjectWise browser.
- Make sure you have already added at least one publish location to this project. (see Adding Locations to Projects)
- Open the Revit project
file you want to publish.
You can open the Revit file the way you normally would (for example, using ), or if you have added the Revit file to your project you can open it from the ProjectWise browser by right-clicking the Revit file in the Work in progress folder and selecting Open.
- Open Revit's Render dialog ().
- Click the Render button, then click the Export button.
- In the Publish dialog that opens, do the following:
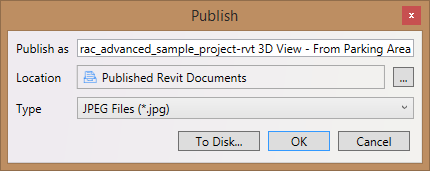
The image file is created and stored in the folder specified in the selected publish location.
If the location setting Populate the folder with bound content is on, then a link to each published document in the destination folder is automatically added under the location in the ProjectWise browser.
If the destination folder is a ProjectWise folder and the location setting Create version if document exists is on, then publishing creates a new version if a document with the same name exists in the destination folder. The active version of a document is shown as plain text. The non-active versions are shown in italic text.
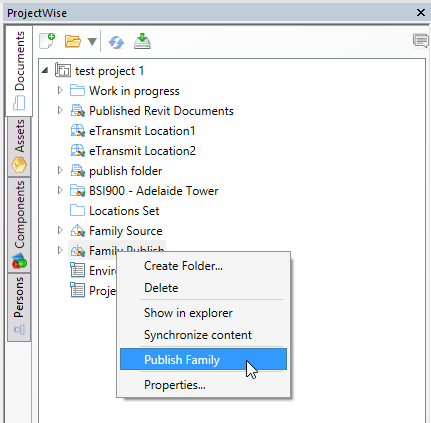
Publish Families
You can publish Revit family files to a family publish location so that they can be used by other users. The family publish location can either be a ProjectWise folder or a local folder. You can publish the open family file, or you can open a Revit model and publish some or all of the family files in it.
- Make sure you have already added at least one family publish location to this project. (see Adding Locations to Projects)
- Open a Revit family file,
or open a Revit model that contains one or more Revit families.
You can open the Revit file the way you normally would (for example, using ), or if you have added the Revit file to your project you can open it from the ProjectWise browser by right-clicking the Revit file in the Work in progress folder and selecting Open.
- Right-click the family publish location in the ProjectWise browser and select Publish Family.
- Do one of the following:
- If you have a Revit
family file open, the
Publish Family dialog opens,
prompting you to save a copy of the open family file to the destination folder
specified in the family publish location.
Click
Yes.
or
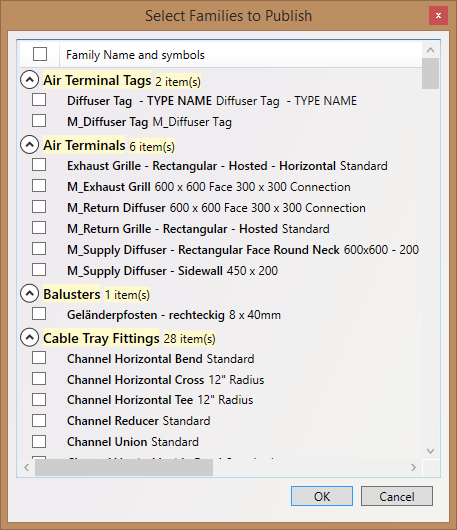
- If you have a Revit model open, the Select Families to Publish dialog opens. Select which families in the current model you want to publish and click OK.
- If you have a Revit
family file open, the
Publish Family dialog opens,
prompting you to save a copy of the open family file to the destination folder
specified in the family publish location.
Click
Yes.

The selected family or families are published to the destination folder specified in the selected family publish location.
If the location setting Populate the folder with bound content is on, then a link to each published document in the destination folder is automatically added under the location in the ProjectWise browser.
If the destination folder is a ProjectWise folder and the location setting Create version if document exists is on, then publishing creates a new version if a document with the same name exists in the destination folder. The active version of a document is shown as plain text. The non-active versions are shown in italic text.
Publish a Schedule or Quantity to XLSX
You can publish the schedule or quantity that is currently open in Revit to any publish location in your project. The schedule or quantity will be published as a Microsoft Excel file (XLSX).
- Open your project in the ProjectWise browser.
- Make sure you have already added at least one publish location to this project. (see Adding Locations to Projects)
- Open a Revit project file and generate the schedule as usual.
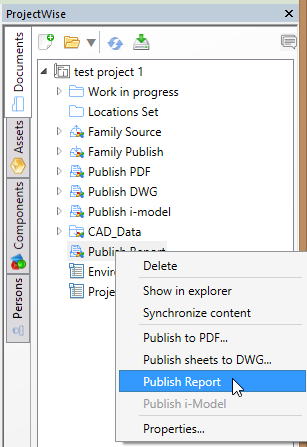
- In the ProjectWise browser, right-click the publish location you want to use for publishing schedules and select Publish Report.
The schedule is published as a Microsoft Excel file (XLSX) and stored in the destination folder specified in the publish location.