OpenBuildings™ Designer Help

Tapered Column

Used to place tapered column shapes. A tapered shape is one that is represented by one section size on one end and a different section size on the other end. A tapered shape transitions smoothly from one end to the other; there are no irregularities as such being a single section size for six feet, then tapering the last 24 feet to a smaller or larger section size at the end.
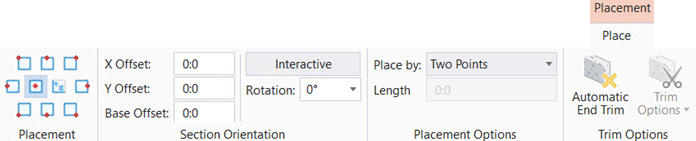
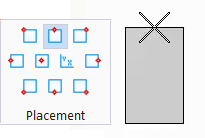
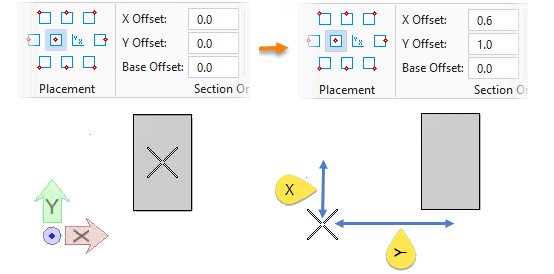
Note: Placement is completed using the controls found on the Placement ribbon tab and the Property Panel which is loaded with the active Building element catalog items and properties.
Accessed from:
Note:
  • Ribbon: Building Design > Structural > Structural Elements > Tapered Steel Column > Dropdown Menu Icon > Tapered Column

Placement tab

Note:
Note: The Placement tab opens on the ribbon when placing Building elements. The Placement tab contains settings specific to the Building element being placed that are used to define the position, orientation or dimensions of the Building element being placed. Also available on the Placement tab, are a collection of Building common tools selected specifically because of their relevance to the Building element being placed.
SettingDescription
Placement Defines the location of the baseline relative to the member section by selecting from the drop list items. The attachment point dynamically updates on the pointer as the Placement icons are selected.
Note: The Centroid placement point is enabled only if the section is fully symmetric or if the section properties include a valid centroid.
Offsets
  • X/Y Offsets- Moves the physical member's placement points in the X and Y axis directions relative to the section definition orientation. The attachment point dynamically updates on the pointer as the offset values are entered.

    X/Y Offsets: With no offsets, the cursor is on the Center, Center placement point (left). With offsets defined, the cursor is offset from the Center, Center placement point (right).

  • Base Offset- Enabled when a floor is selected in the Floor Manager as a reference plane. Sets the Z axis distance between the elevation of the active floor ACS plane and the elevation of the component being placed. The value defines offsetting structural members from the active floor, there by allowing to route at an appropriate elevation relative to the active floor. Base Offset can be a negative value.
Interactive When on (highlighted), an additional data point is required to place the member. The member appears to spin about the member line as the cursor moves around the screen. Rotation angle is calculated from the input point and the member is created with that angle. The contextual Placement tab settings is updated with the calculated angle and the Interactive option is disabled to place the next member with the same Rotation angle.
Rotation Entered directly or selected from a drop down list of common angles between minus 180° and plus 180°.
Note: The specific entries are defined in the Design File Settings Dialog's Locks settings category.
Place by Determines the method of placement.
  • Two points - Data points for the start and end are required. This option is automatically selected when placing linear members like beams and horizontal bracing.
  • Length at end 1 | 2 | midpoint - A single data point defines the location of the member, and the entered value determines the member length. The Length field is enabled below the Place by setting when any of the three Length at options are selected.
    Note: These options are automatically selected when placing columns.
  • Select path - Members are placed along existing path elements. Fence and selection set contents are supported with an additional prompt. The following elements are valid:
    • Lines
    • Line strings
    • Shapes
    • Arcs
    • Complex strings
    • Complex shapes
    • Curves – planar only
    • B spline curves – open, planar only
  • Grid- Places members along (Beams) or at intersections (Columns) of selected grid system grid lines.

    Selection options are:

    Action Description
    Click Selects individual grid line segments. Gridlines are treated as separate segments when they are intersected by other grid lines. A data point (to select) places the component immediately.
    Click + <Ctrl> Selects multiple grid line segments. The grid line segments can be disjoined or be adjacent to one another.
    Click + <Ctrl> + <Shift> Selects an entire grid line regardless of how many segments it is divided.
    Fence drag crossing (left to right) Selects all grid line segments that intersect the fence box (depicted with dashed lines).
    Fence drag inside (right to left) Selects all grid line segments wholly inside the fence box (depicted with solid lines).
    Fence drag + <Ctrl> Selects all grid line segments that intersect (fence drag left to right) or are wholly inside (fence drag right to left) the fence box plus any other selected segments.
    Fence drag + <Ctrl> + <Shift> Selects all grid lines (entire grid line) that intersect (fence drag left to right) or are wholly inside (fence drag right to left) the fence box plus any other selected segments.
Length Used to enter values for the various Place bymethods.
Automatic End Trim When on, enables automatic trimming as concrete/timber members are placed connected to other concrete/timber members. When off, the Trim Options are also disabled.
Trim to member connected by AccuSnap Fits the member around the selected connecting member
Trim to any interfering member Fits the member around all members in the vicinity of the member end.

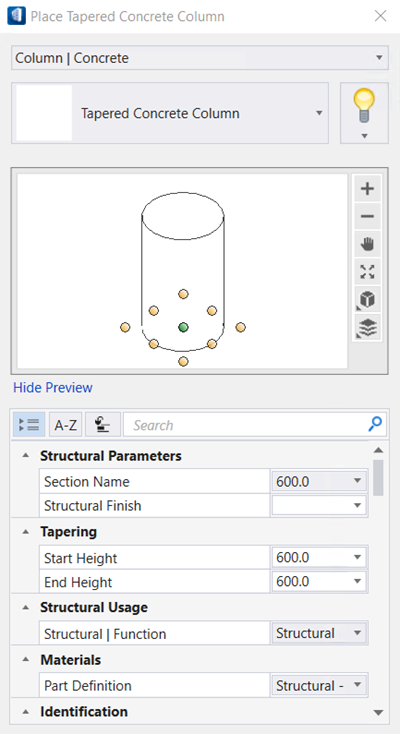
Tapered Concrete Column Properties

SettingDescription
Catalog Type Selector Used to select from Catalog Types. Selections made here updatesCatalog Item Selector combo box.
Catalog Item Selector Used to select from available Catalog Types.The Catalog Item Selector combo box contains several options and settings designed to make it easier to find the exact catalog item you need to place/change.

A generic example of Catalog Item selector options for searching, grouping and navigating

TheCatalog Itemlist also includes user defined assembles, and RFA catalog items, if any.
  • Search -Used to search for catalog items by name. Results are dynamically updated in the catalog items list. The searched text is also highlighted in the results.
  • Group By: -Used to list catalog items in groups based on values assigned to specific catalog item properties. Groups can be collapsed and expanded by clicking the down/up arrows on the group name headers. For instance, selecting Group By: > Typefor a wall catalog type creates groupings withSchematicPartitionWallComponent,etc headings. Catalog items which have Typedefined asSchematicPartitionWallComponentwill be listed under those headings. You can also select Group By: > Do Not Groupto create a flat list with no grouping.(Exemption Mechanical)
  • (Large Icons) -Displays a representative icon for each catalog item listing.
  • (List) -Displays catalog item listing without any icons.
  • (Large Icons) -Displays a representative icon for each catalog item listing.(Float) -When selected, the Catalog Item Selectorcombo box is detached from the placement/modify dialog, and becomes a separate dialog. You may prefer to have the floated dialog docked and always open over clicking the Catalog Item Selectorin the placement/modify dialog for each catalog item selection.
    Note: The main dialog remains open and refreshes the thumbnail and preview in responsive to the selected catalog item.
    Click the Dockicon to close the floated dialog.
  • Recently Used -Lists catalog items that were recently selected in a "Group".This is useful because when you need to repeatedly place or modify the same catalog items, you do not need to repeatedly browse or search the main catalog items list.
Note: When you make your catalog item selection, it becomes the active partthe Family/Part Toolbar.
Catalog Tools A split button located to the right of the Catalog Item Selectorcontains tools to assist with managing catalog data prior to placement of selected catalog items.
  • (Match Element Properties) -Sets the current active placement/modify dialog settings to match the parameters of an existing, selected catalog item instance in the model. This saves a good amount of time when placing catalog items that need to identically match those that already exist.
    Note: The existing catalog item instance must be of the same catalog type selected with theCatalog Item Selectorfor the parameters to be matched.
  • (Reset to Defaults) -Resets the selected catalog item property values to the default state as defined in the catalog library.
  • (Edit Catalog Item) -Used to edit selected catalog item. Opens the Catalog Editor, where you can create and edit new catalog types and catalog items. Catalog Editor can also be used to edit existing data and to view catalog item instance properties and values by definition.
  • (Catalog Item Manager) -Used to manage catalog items library into organizational dataset. Opens the Catalog Item Manager, where you can copy or move catalog items into the dataset, and promoting current items by moving then across workset levels.
  • (Save Catalog Item) -Updates the active catalog item in the DataGroup System catalog library with the values currently shown in the Propertieslist box permanently changing the defaults for the catalog item.
  • (Save Catalog Item As...) -Used to save a copy of selected catalog item as another catalog item (the default name adds the prefix"Copy of"<current catalog items name>).Opens the Save As dialog where the catalog item definitions can be named before saving them to the DataGroup System.
Note: The Save Catalog Item and Save Catalog Item As... tools perform administrative tasks on DataGroup System catalogs. Administrators and users may want to hide the tool icons to avoid incidental or unwanted changes to their firm's dataset by setting the user configuration variables. BB_CATALOGITEM_ADMIN_IN_PLACEMDSandBB_CATALOGITEM_SAVEAS_IN_PLACEMDS to "0", respectively.
Preview Displays the selected catalog item in the preview window. This displays changes and the preview updates as various options are chosen. The preview also changes dynamically with some of the prominent settings on the Placement tab, e.g Height ,Rotation angle, etc. A right-click in the Preview opens a SHOW/HIDE Viewing Tools options menu:
  • Zoom In -Zooms in about center of preview.
  • Zoom Out -Zooms out about center of preview.
  • Pan -Moves the preview following the pointer. Click again to stop panning.
  • Fit -Fits the object to the extents of the preview.
  • Rotation -Sets the orientation of the selected item in the preview to one of the standard orientation options:
    • Isometric
    • Right Isometric
    • Top
    • Bottom
    • Left
    • Right
    • Front
    • Rear
  • Display Mode -Sets the display of the selected item in the preview to one of the standard display modes.
    • Solid
    • Wire Frame
    • Visible Edge
    • Filled Visible Edge
    For Placeworkflow, the Hide/Show Preview controls displaying preview of the element currently selected for placement.
Properties list - toolbar Used to manage catalog item properties during placement or modification. Catalog item properties define the catalog item instance in the model, and are accountable in the DataGroup System data management tools. You can place a catalog item with its default property values or you can change property values as needed, place an instance in the model , and optionally save the changes to the catalog.

The Properties combo box contains tools for sorting and searching the properties list:

  • (Categorize) - When on, catalog item properties are grouped in categories based on the catalog type definitions. When off, the properties are listed alphabetically without grouping.
  • (Alphabetical) - When on, catalog item properties are listed alphabetically without grouping. When off, the properties are listed in categories.
  • (Description) - Toggles a description field at the bottom of the placement dialog listing information about the highlighted catalog item property. The information listed includes the property definition display name, internal name, and type definition.
  • Search - Used to search for catalog item properties by name. Results are dynamically updated in the properties list.
Structural Parameters
  • Section Name -Sets the section shape for the structural element. A selection made here overrides the Structural section defined for the selected Structural component type. You can select from a list of Recent section shapes or Parametric Shapes .Also you can select from the loaded catalog Library or Parametric. You can also browse and load more shape category types with the available Shape Catalog
    • Search - Used to search loaded shapes by name.
    • Shapes List Box - Displays loaded shape classes and shapes by type. The list can be collapsed/expanded by clicking on the triangle buttons or by pressing the Collapse All, Expand Types, Expand Selected Shape Class toolbox options below.
    • Shape Catalog - Opens the Shape Catalog where you can browse and load more shape category types.
    Note: If you are using Legacy Mode structural tools, section definitions can be selected using the legacy section picker.
  • Structural Finish - Sets the finish to be applied to the structural member.
Tapering
  • Start Height - Lists the start height of the tapered concrete column.
  • End Height - Lists the end height of the tapered concrete column.
Structural Usage
  • Structural Function - Lists the structural function like structural , non-structural and undefined.
Materials
  • Part Definition - Lists the default family/part definition assigned to the structural member being placed.
    Structural linear members are Building forms. All forms are associated with a part definition. Similar parts are grouped together into a family. The referenced datasets delivered with OpenBuildings Designer use material as the family (steel) and member function (beam) as the part. Part definitions include default symbology values for displaying the form in the drawing output, and information for quantifying the form in a schedule, etc. Parts defined as Structural parts also include section orientation, end treatment and extended Structural data. Associated analytical members are handled in the same way. The active family and part information is displayed in the Family/Part Toolbar. If the active part (and/or family) is changed during placement, the Property Panel dialog is updated.

    The Part Definition property is a link to the Family/Parts system. Placement tools use the Part Definition value to access the part information and to set the default values for section orientation, end treatments, extended data, and associated analytical members. Selecting another catalog item updates the entire Property Panel dialog including DataGroup properties and part related properties. Similarly as the Part Definition property value is always synchronized with the active part definition, changing the value also updates the Family/Part Toolbar. That is, that whenever and however part names change, all the part-related values get updated.

    The handling of the relationship between DataGroup catalogs and Family/Part systems also enables catalog types for Structural linear members to include the ObjectMaterial catalog schema. This schema contains the Section Name property. Placement tools retrieve the default section data value from the Section Name property. The Section Name property value in the Properties list is synchronized with the Placement contextual ribbon tab's (End 1) section name. Changing the value in either tab updates the data on the other.

Identification Lists identification properties for the active catalog item type.
Fire Resistance Lists fire rating properties based on agency fire safety tests and classifications.
Thermal Transmittance Lists the thermal properties to apply to the active catalog item.
Construction Phase Lists design and construction phase properties for walls such as New Construction, Future Construction, and Items to be Moved.
IFC Override Lists IFC properties not automatically mapped to DataGroup System properties that can be manipulated for export.
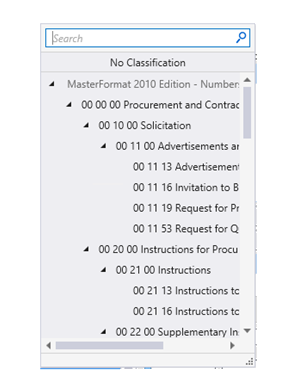
Classification Building Classification Systems are supported by the DataGroup System. MasterFormat, OmniClass, and UniFormat property values can be associated with any Building element. Click the Value cell to open the Classification System selection combo box. The combo box is populated with selected classification system property values. It can be resized by clicking on the combo box's bottom right corner. Search for properties by name. Search results are displayed in the classifications hierarchy. Double click a property to select it. This action also closes the selection menu. The selected property displays in the selected classification system property value (on the Properties list).
LEED Parameters Lists several common Leadership in Energy and Environmental Design properties used to identify compliance of the active catalog item.
Structural Data
  • Mark - Sets the identification mark for the structural member. Members are typically marked with a prefix. For instance:
    • B-1 for Beams
    • C-1 for Columns
    • P-1 for Purlins, etc.
    You can edit the field to set a relevant Mark , if it differs from your standards.
  • Type - Sets the type of structural member. Types are typically the identification of the member category. For instance:
    • Beam for Beams
    • Column for Columns
    • Purlin for Purlins
    • Handrail for Handrails, etc.
    You can edit the field to set the relevant Type .
  • Material - Sets the type of material for the structural member. For instance:
    • Steel
    • Timber
    • Concrete, etc.
    You can edit the field to set the relevant Material .
  • Grade - Sets the grade for the structural member. Grade indicates material specifications standard, and is added as an attribute to the member.
    • A36, A50 for Steel
    • 4000psi, 5000psi for Concrete, etc.
    You can edit the field to set the correct gradation.
  • Status - Sets the status for the structural member. For isnatnce:
    • New
    • Old
    You can edit the Status from New to Old when over the time the member gets older.
  • Class - Sets the class for the structural Member. Class indicates the member order, usually stated as the following:
    • Primary
    • Secondary
    • Framing, etc.
    You can classify the member to suit as appropriate.
  • User1 .. User 4 - Sets the user defined variables 1 through 4 for the structural member. You can set and alter the name of the variables to be unique to manipulate parts externally in 3rd party applications.
  • End1 / End2 Detail - Sets the end 1 and end 2 detail for the structural member. For instance: Type I / Type II.
Note: Information in the Value column rows can be completed by selecting the applicable cell to activate an editor field, an option menu, or a pop up dialog. This data is written to the element properties. Properties displayed with grey text are read only. Some of these are set in the placement tool's Placement tab, and can be modified there. The dividing bar between the Property , and Value columns can be moved to change the width of either area, or resize the dialog. A vertical and horizontal scroll bars are available to scroll and adjust Properties panel viewing and the display of data.
Key-in: STFPLACE FORM TAPERED [ [ Catalog_Type ] ] [ [ Catalog_Item ] ]

Use the Catalog_Type and Catalog_Item arguments to key-in the desired catalog item saved in the active DataGroup System catalog to pre-populate the tool settings. For instance STFPLACE FORM TAPERED "Steel Beam" Beams where "Steel Beam" is the catalog type and Beams is the catalog item.

Note: Catalog_TypeCatalog_Item and arguments are case sensitive. Be sure to key them in exactly as they appear in the catalog.
Note: When keying in catalog items, the Catalog_Type and Catalog_Item arguments can not contain spaces because within the key-in, the space character is reserved to separate the key-in arguments. If the Catalog_Type or Catalog_Item names contain spaces in their names, they must be entered in quotes. If there are no spaces in their names, there is no need for the quotes. This is different when keying in the catalog items only. Here the Catalog_Item argument can contain spaces.
Note: Tip: When keying in catalog items, you must use the catalog type definition Type Name for the Catalog_Type argument instead of the Display Name which can not be processed by the key-in. Type Name can be displayed in the Catalog Editor by selecting the Show Catalog Types filter control or Properties from the catalog item right click menu (opens the Catalog Type Definition dialog where catalog types are created and managed).