| Catalog Types directory
|
Displays the directory of catalog types, items, and
instances. Navigation to (and selection of) reports is accomplished in this
directory box. Reports for selected directories display in the adjacent list
box.
When filter is applied, the label of the root
folder in the directory reads
"Catalog Types
(Filtered)", and the directory list sorts catalog
items of only disciplines checked in the filter.
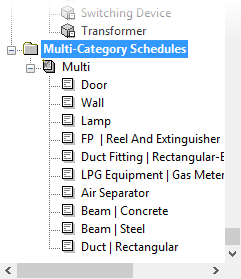
Note: The directory
tree lists all single-category schedules under
Catalog Types. Schedules created using
multiple categories and catalog types from multiple disciplines are grouped
under
Multi-Category Schedules.
|
| Directory tree Show menu
|
While no filter is applied, the
Show menu lists:
-
Show All – Displays all of the catalog
items delivered in the dataset. All available catalog types are listed.
-
Show Used – Displays only those catalog
types represented by existing catalog item instances in the active DGN model
and references.
- Show
Used (Active) – Displays only the catalog instances contained in
the active file. Omits all referenced catalog instances.
-
Show Only Selection Set – Displays only
those catalog types represented by catalog instances that are actively selected
in the model.
|
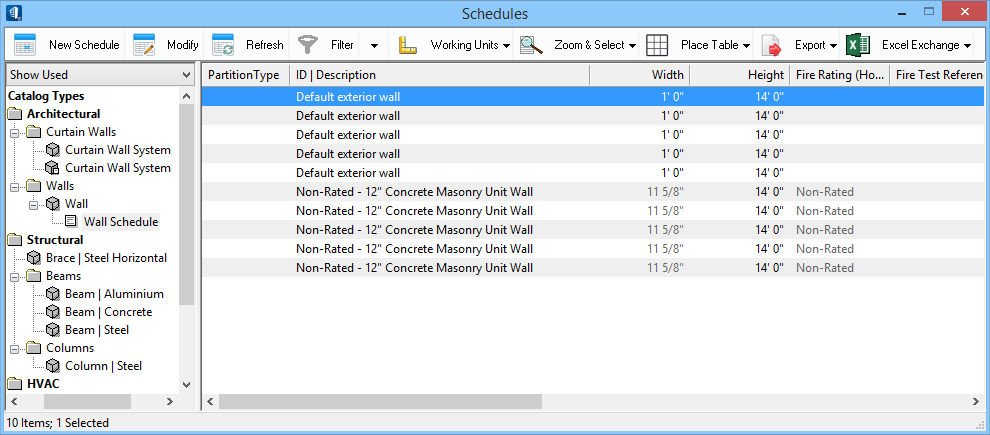
| Schedules list box
|
Catalog types, items and instances (available for
reports and schedules) are displayed here. Report and schedule information is
organized and presented in a series of columns that can be selectively closed
and opened to customize report layouts. Selected catalog types, items, and
instances highlight in the model when selected in the list box. Information in
column rows can be modified by selecting the applicable cell to activate an
editor field or option menu.
Column headings change as different catalog types,
items and instances are selected in the adjacent directory. When the active
directory selection changes, the list box menu bar columns change also. The
list box column configuration and layout also changes when saved report layouts
are opened.
When a catalog item is selected in the directory,
properties for the catalog item appear in the list box menu bar and property
values display in the table.
The property values in the list can be edited by double
clicking on the cell. For searchable properties, e.g. classifications, parts,
IFC class etc., the property picker opens allowing you to resize, search in it,
and apply a desired value.
Note: Application
defined Catalog item properties are generally required by the Building
disciplines and tend to be discipline specific. User defined Catalog item
properties are generally required by individual users and firms for individual
projects.
|
 New Schedule New Schedule
|
Opens the
Schedule Properties
dialog
where you can select catalog item categories and
corresponding properties to include in your schedules. Filters and sorting
panels help add properties through search and sort criteria to manipulate
report entities and column orders in the report layout. Formatting options
allow you assign customized formats and justifications to the selected
properties in the report. Excel export options allow you to set report file
template information, and to select a report layout template file to which the
data is exported.
|
 Modify Modify
|
Enabled when an existing schedule is selected in the
Catalog Type directory. Opens the Schedule Properties dialog, where schedule
name and schedule options are modified.
|
 Refresh Refresh
|
Refreshes and updates the Schedules directory to
reflect changes made to the selected directory item.
|
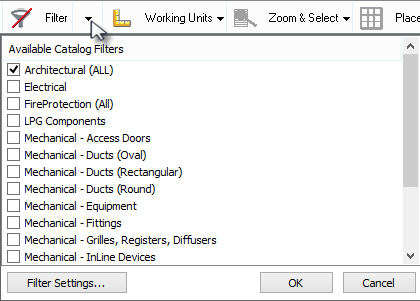
 Filter Filter
|
When one or more filters are applied in the Catalog
Filter, the
Filter menu option is enabled (crossed).
When no filter is applied, the icon toggles to
 . Filters add a "(filtered)" suffix
in Catalog Types folder label in the directory. Clicking . Filters add a "(filtered)" suffix
in Catalog Types folder label in the directory. Clicking
 opens
the Catalog Filters list dialog attached to the toolbar: opens
the Catalog Filters list dialog attached to the toolbar:
- Available
Catalog Filters – Displays all available filters. The checked ones
are the selected catalog filters.
- Filter
Settings – Opens the
Modify Catalog
Filters
where the filters are managed with selections of
required catalog types.
- OK – Applies
and saves altered filters.
- Cancel –
Dismisses the filter list.
|
 Working Units Working Units
|
These settings format the data for export to Excel.
-
Text – The default setting. Data values
are exported as text, which cannot be used in formulas or calculations in
Excel.
In this mode, units of linear measurement are
determined by
design file working units. Here the
MU:SU needs to be changed to a
numerical representation for standard linear unit values. Schedules column
headings, and all column rows, reflect the applied unit of measurement. Units
of measurement are represented in parenthesis,
"(m)". These change when different
Sub Unit options are set.
Units of
Area measurement are determined by
Architectural preferences for spaces.
- Numeric:
Master Units – Displays the dimensions is master units, for example
the length in meters (m).
- Numeric:
Sub Units – Displays the dimensions is sub units, for example the
length in millimeters (mm).
Numeric data
values are exported in numeric format, which can be used in formulas and
calculations in Excel which is also required for data summations in Excel. No
delimiters or labels are included.
Note: The exception to this is that the
Units of Area measurement are
determined by
design file working units settings on the
Advanced Unit Settings
Dialog
(the
Edit button opens the Advanced Unit
Settings dialog).
|
 Zoom & Select Zoom & Select
|
Enabled when a report item is selected from the
Schedules list box. Contains options to use report data to zoom to or create
selections of the reported on catalog item instances.
- Zoom
& Select – Selects the catalog item instance and fits it into
the active view.
- Create
Selection Set – Creates a selection set of selected report items.
- Copy to
Clipboard – Places a catalog item instance of the selected report
item.
|
 Place Table Place Table
|
Enabled when an existing schedule is selected in the
Catalog Type directory. Places schedule
tables using standard
Tables
functionality.
- From
Schedule – Places a Table element populated with your schedule
data.
- From
Excel – Places a Table element populated with schedule data that
has been exported from Schedules to Excel.
Note: Both
From Schedule and
From Excel options open the Place Table
dialog. The dialog opened from here differs from the standard
Place Table dialog in that it does not include the dialog
toolbar.
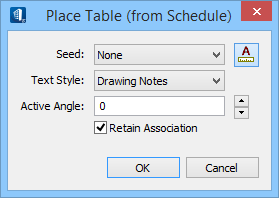
The Place
Table dialog opened by selecting
From Schedule.
- Refresh
from Source – Refreshes schedule data in existing Tables with the
most recent changes in the schedules.
Note: Use
the
Refresh Tables
 tool, as an alternate,
when Schedules dialog is closed.
- From
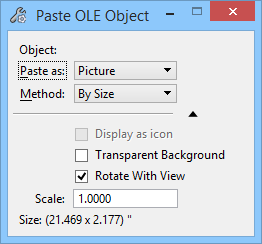
Excel (OLE) – Places a raster image of the data report/schedule.
Selecting
From Excel (OLE) opens the Paste OLE
Object dialog which allows for setting paste method, size and scale for the
schedule image. The Paste OLE Object dialog opened from here differs from the
standard
Paste OLE Object dialog in that the
Paste as options
Embedded and
Link are disabled.
|
 Export Export
|
Exports all data for the selected catalog item to
Excel file format. A worksheet is assigned to store each Catalog Type data.
Contains the following
"export to" options:
- Excel
– Exports data to Microsoft Excel format (*.xls).
Note: An Excel
template file is provided with the application.
-
Text – Exports data to a text file
(*.txt).
-
CSV – Exports data to a comma separated
values file (*.CSV).
-
XML – Exports data to an extensible
markup language file (*.xml).
-
Export All Instances... as XML | to
Excel - Exports all catalog item instance data contained in the DGN
file, and generates a report in an XML/Excel format.
|
 Excel Exchange Excel Exchange
|
Provides options for
Bidirectional Editing of catalog instance
data in Excel.
- Edit in
Excel – Opens schedule data in Excel format
(*.xls) for the purpose of editing it in Excel. Changes
are then applied to the schedule data when update from Excel.
- Update
from Excel – Imports stored schedule data from edited Excel files.
When the schedule is reimported, changes are read and applied to your schedule.
Changes are summarized in an import information dialog which also provides
access to an import log.
Note: Importing
and manipulating externally generated schedules is possible with this option.
Note: Excel
Exchange also works on elements in a reference.
|
| Catalog Types directory right-click options
|
An options menu opens upon
right-click
on any item in the directory.
Contained in the menu, are the following options:
-
Refresh – Updates the Schedules dialog
to reflect any changes made to the selected directory item in the active DGN
model.
-
New (For Catalog type) – Opens the
Schedule Properties
dialog
dialog where datagroup schedule names, directory
locations, and catalog type information is available.
-
Save – Saves the report layout (all displayed list box menu bar
columns) for the selected directory item; opens the Save Schedule Layout dialog
where report layout names and destination directory file locations are
established for report layouts.
-
Save As – Saves the current report
layout (all displayed list box menu bar columns) under another name for the
selected directory item; opens the Save Schedule As dialog where report layout
names and destination directory file locations are established for report
layouts.
-
Delete – Deletes the report layout and
returns the list box to the default configuration, for the selected directory
item.
-
Rename – The selected directory report
name is highlighted in an editor field where it can be renamed.
-
Schedule Properties (For Schedule) –
Opens the
Schedule Properties
dialog
dialog where schedule names, directory locations, and
catalog type information is available.
|
| Schedules list box columns right-click options
|
An options menu opens upon
right-click
on any item in the valid Schedules list box columns.
Contained in the menu, are the following options:
Note: For a selected
Schedule, options are available to instantly remove columns, align and format
list box data..
- Remove –
Instantly removes the selected column.
- Remove
All – While the
Instance Name column is retained, all
other columns are removed from the Schedules list box.
- Add
All – Adds all columns to the Schedules list box.
- AutoSum – When
AutoSum is active for a column, the Greek character for summation appears as
prefix to the name in the column heading. For example,
 . AutoSum's
output appears in the Excel spreadsheet; a summation does not appear in the
Schedules list box. . AutoSum's
output appears in the Excel spreadsheet; a summation does not appear in the
Schedules list box.
- Rename –
Renames the right-clicked on column.
-
Size Column to Fit – Sizes the
right-clicked on column, so all data in the column displays in the list box.
-
Size All Columns to Fit
– Sizes all columns so that all data in every
column displays in the list box.
-
Align – Controls the text justification
to
Left,
Centered, or
Right.
-
Format – Overrides the capitalization
Upper Case,
Lower Case,
First Capital,
Title, or
Default.
-
Schedule Properties – Opens the
Schedule Properties
dialog
dialog where schedule names, directory locations, and
catalog type information is available.
For a selected
Catalog Type, the column sizing options
are available.
-
Size Column to Fit – Sizes the column,
upon which the right-click was issued, so that all data in the column displays
in the list box.
-
Size All Columns to Fit
– Sizes all columns so that all data in every
column displays in the list box.
|
| Schedules list box right-click options
|
An options menu opens upon
right-click on any item in the schedules
list box.
Contained in the menu, are the following options:
- Modify
Properties – Opens the instance's
Modify Properties
dialog where data for the selected instance can be edited and modified. Changes
made to the properties of the elements using the
In-Line editing instantly applied in the current schedule
and the geometry of the active model reflects the effect.
-
Edit Values – Enabled in property
columns where the values (bold fields) can be
In-Line edited in editor field by overwriting or selecting
a pull-down option. This is applicable to all elements when multiple rows are
selected. The amended values are shown in green.
- Zoom – Zooms
into the selected item(s) in the active view window, in the model.
-
Create Selection Set – Creates a
selection set of all items selected in the Schedules list box (right panel).
Manipulation and modification operations can be performed on the selection set.
-
Select All – Selects all items in the
list box.
- Select
None – Deselects all items in the list box.
- Invert
Selection – Inverts the selection of items in the list box. This
action specifically deselects all items currently selected and continues by
selecting all items previously not selected.
-
Copy to Clipboard – Copies all selected
data to the clipboard.
|
| Status Bar
|
Displays the status of current items being loaded,
selected.
|