Creating Documents and Folders
You can create new documents in ProjectWise by adding documents and folders to ProjectWise Drive.
Automatic document creation
(requires ProjectWise Drive v2022.1.x or later)
When the Create Document Wizard is not used and auto check out is enabled for a folder, a document will be automatically created (automatically uploaded to ProjectWise) when you add a file to that folder in ProjectWise Drive.
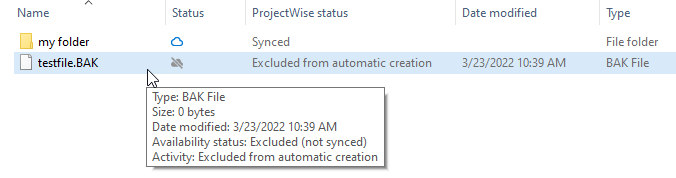
File types which are not typically stored in ProjectWise (for example, temp files, BAK files, EXE and DLL files) will not be automatically uploaded to ProjectWise, but you can still manually upload them if needed. File types that are excluded from automatic document creation will have a different icon when they are added to ProjectWise Drive. Contact Bentley if there is a particular file type that is currently being excluded, that you want to be included for automatic document creation.
Whether or not the Create Document Wizard is used is first set at the organization level (by the administrator in Enterprise Administration), and can then be overridden as needed at the work area connection level, or at the individual folder level, through folder settings.
Manually adding a document to ProjectWise
(assumes that auto check out is disabled for the folder, or you are using a version of ProjectWise Drive earlier than v2022.1.x)
- Add a document to a folder
in
ProjectWise Drive like you normally would
in File Explorer (for example, copy and paste or drag and drop).
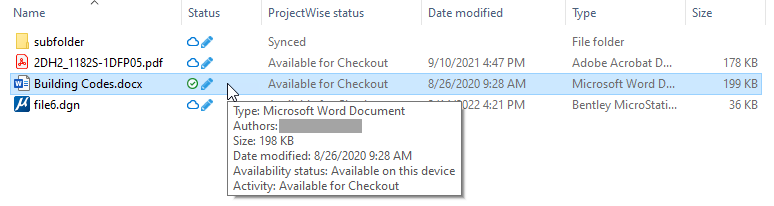
The Status column will show a star/asterisk icon, and the ProjectWise status column will say Non-managed.
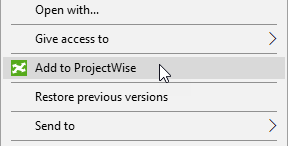
- When you are ready to add the document to ProjectWise, right-click the document and select Add to ProjectWise.
- Use the Create Document Wizard if it opens, to fill out document properties before uploading. If the Create Document Wizard is not used, then the document is uploaded as soon as you select Add to ProjectWise.
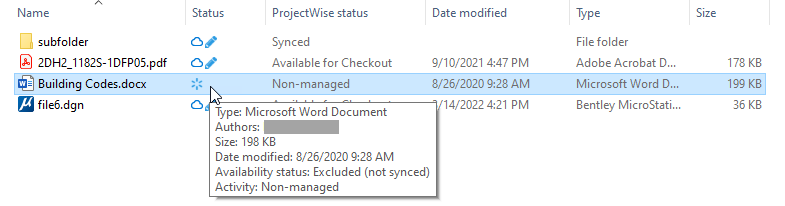
Once the document is added to
ProjectWise, the star/asterisk icon
 in the
Status column changes to a circle with a check
mark
in the
Status column changes to a circle with a check
mark
 (to show that the document has
been added to
ProjectWise and that a local copy still exists on
this computer), and a pencil icon is added to the Status column (to show that
the document is checked in and can now be checked out by anyone who has
permission to check out this document). The
ProjectWise status column now says
Available for Checkout.
(to show that the document has
been added to
ProjectWise and that a local copy still exists on
this computer), and a pencil icon is added to the Status column (to show that
the document is checked in and can now be checked out by anyone who has
permission to check out this document). The
ProjectWise status column now says
Available for Checkout.
Using the Create Document Wizard
Whether or not the Create Document Wizard is used when creating documents is determined by the folder settings of the folder you are adding documents to.
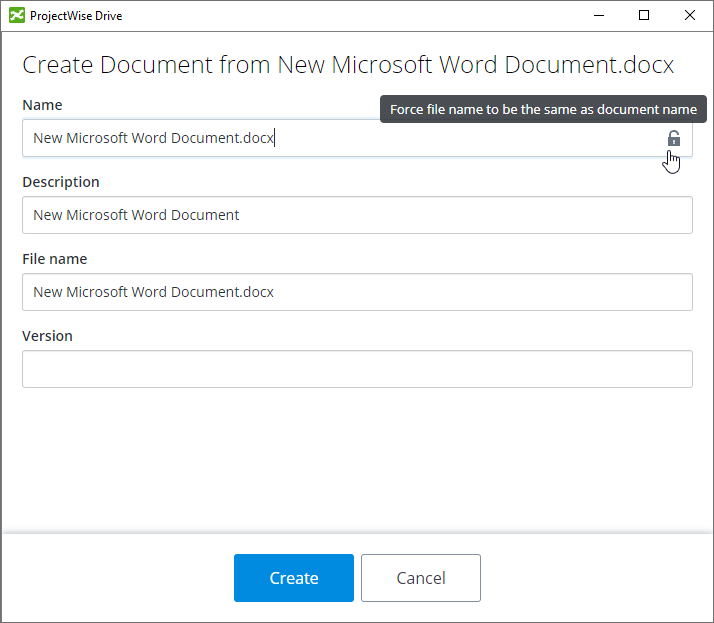
The Create Document Wizard, when the folder has no environment, lets you fill out general document properties including document name, file name, description and version. You can also click the lock icon in the (Document) Name field if you want to force the document name and file name to be the same.
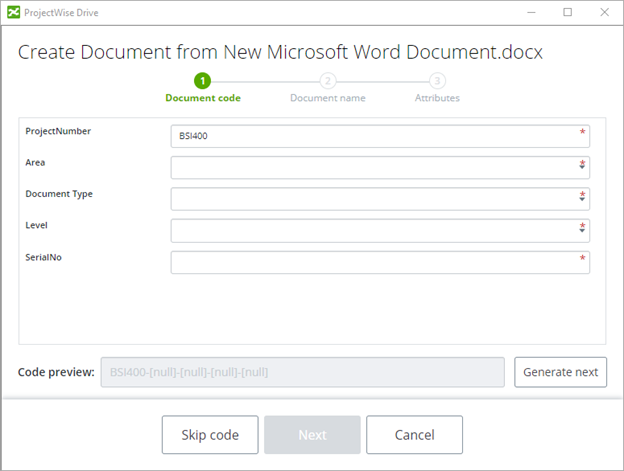
The Create Document Wizard, when there is an environment, lets you fill out document code (if the environment has document code defined) and environment attributes, in addition to the general document properties.
Adding multiple documents at the same time
You can also add multiple documents to ProjectWise at the same time. When using the Create Document Wizard, you can fill out the values as needed one document at a time, or at any point you can turn on Apply to remaining documents to have the values you have entered for the current document applied to the rest of the documents (so that you do not have to re-enter them).