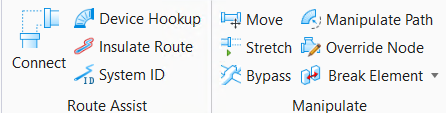
Connect Ducts/Pipes
 Used to quickly join
common duct or pipe intersections; Turns, tees and cross intersections.
Depending on the circumstances, individual fittings or a combination of
fittings are inserted using Mechanical discipline's auto fitting placement functionality.
Used to quickly join
common duct or pipe intersections; Turns, tees and cross intersections.
Depending on the circumstances, individual fittings or a combination of
fittings are inserted using Mechanical discipline's auto fitting placement functionality.
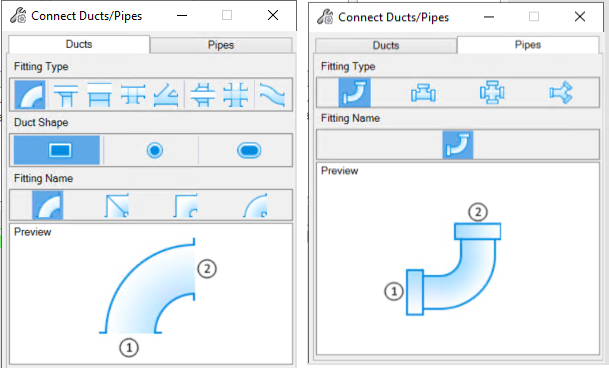
Improved capabilities:-
Integrated and simplified the existing functions of connect Ducts/Pipes and HAVC(Plumbing) Autofitting Preferences to improve the work efficiency of users.
You don't need to Select the fittings you want to use and set its parameters in Autofitting Preference. You can select most used fittings in connect Ducts/Pipes tool itself.


Confirmation of the Shape of Duct
1] Rectangular-Shape Fitting
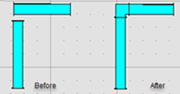
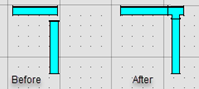
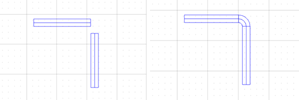
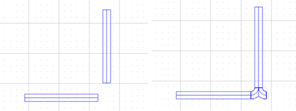
- Join with Elbow- The tool applies to rectangular shape ducts and also accepts ducts of different sizes. After accepting the selection of the main duct, followed by each branch, the ducts are then joined once you accept the selections. The properties of selected elbow applies to the fitting.
- 2 Point to Place: Duct Fitting|Rectangular-Elbow|Mitered -In Rectangular-Elbow|Mitered 2 points are to be placed inorder to connect the ducts.
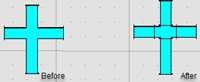
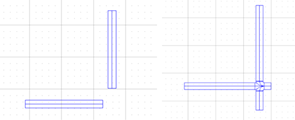
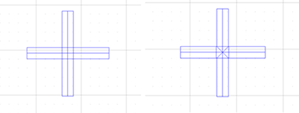
- Join with Cross -The tool applies to rectangular shape ducts and also accepts ducts of different sizes. After accepting the selection of the main duct, followed by connection 2 opposite to it and branches at each side, the ducts are then joined once you accept the selections.
- 2 Point to Place: Duct Fitting|Rectangular-Square Throat Cross -In Rectangular-Square Throat Cross 2 points are to be placed inorder to connect the ducts.
- 4 Point to Place: Duct Fitting|Radius Throat Square Heel Cross -In Radius Throat Square Heel Cross 4 points are to be placed inorder to connect the ducts.

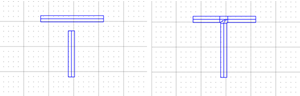
- Join with Tee - The tool applies to rectangular shape ducts and also accepts ducts of different sizes. After accepting the selection of the main duct, followed by each branch, the ducts are then joined once you accept the selections. The properties of selected tee applies to the fitting.
- 2 Point to Place: Duct Fitting| Square Throat Tee -In Square Throat Tee 2 points are to be placed inorder to connect the ducts.
2] Round-Shape Fitting
- Join with Tee- The tool applies to round shape ducts and also accepts ducts of different sizes. After accepting the selection of the main duct, followed by each branch, the ducts are then joined once you accept the selections. The properties of selected tee applies to the fitting.
- 3 Point to Place: Duct Fitting|Round Tee|Round Tee -In Round Tee 3 points are to be placed inorder to connect the ducts.
- Join with Wye- The tool applies to round shape ducts and also accepts ducts of different sizes. After accepting the selection of the main duct, followed by each branch, the ducts are then joined once you accept the selections. The properties of selected wye applies to the fitting.
- 3 Point to PlaceDuct Fitting|Drop Cheek Wye -In Drop Cheek Wye 3 points are to be placed inorder to connect the ducts.
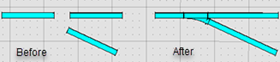
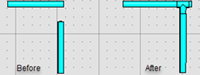
- Join with Elbow- The tool applies to pipes and also accepts pipes of different sizes. After accepting the selection of the main pipe, followed by each branch, the pipes are then joined once you accept the selections. The properties of selected elbow applies to the fitting.
- Pipe Fitting|Elbow|Default Elbow -In Elbow Pipe Fitting the first pipe is selected followed by the second pipe inorder to connect the pipes.
- Join with Tee- The tool applies to pipes and also accepts pipes of different sizes. After accepting the selection of the main pipe, followed by each branch, the pipes are then joined once you accept the selections. The properties of selected tee applies to the fitting.
- Pipe Fitting|Twin Elbow|Twin Elbow -In Twin Elbow Pipe Fitting the first pipe is selected followed by the second pipe inorder to connect the pipes.
- Join with Cross- The tool applies to pipes and also accepts pipes of different sizes. After accepting the selection of the main pipe, followed by each branch, the pipes are then joined once you accept the selections. The properties of selected cross applies to the fitting.
- Pipe Fitting|SanitaryCross|SanitaryCross -In Sanitary Cross Pipe Fitting the first pipe is selected followed by the second pipe inorder to connect the pipes.
- Join with Wye- The tool applies to pipes and also accepts pipes of different sizes. After accepting the selection of the main pipe, followed by each branch, the pipes are then joined once you accept the selections. The properties of selected wye applies to the fitting.
- Pipe Fitting|H-BranchWye|H-BranchWye -In H-Branch Wye Pipe Fitting the first pipe is selected followed by the second pipe inorder to connect the pipes.

Join with Tee- The tool applies to
pipes and also accepts pipes of different sizes. After accepting the selection
of the main pipe, followed by each branch, the pipes are then joined once you
accept the selections. The properties of selected tee applies to the fitting.
Join with Cross- The tool applies
to pipes and also accepts pipes of different sizes. After accepting the
selection of the main pipe, followed by each branch, the pipes are then joined
once you accept the selections. The properties of selected cross applies to the
fitting.
Key-in: