Creating Revit Advanced Integration Projects
All the work you do in Revit advanced integration takes place within the Revit advanced integration project, which you create, configure, and use from the ProjectWise browser inside Revit.
The Revit advanced integration project is stored as a document (with the file extension, .PwdiProj) in ProjectWise.
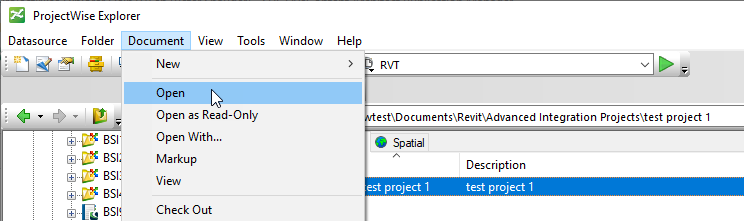
The .PwdiProj document is associated to the ProjectWise application, 'ProjectWise Revit Advanced Integration'. You can apply access control settings to the .PwdiProj document in ProjectWise Explorer as you normally would, in order to make it available or unavailable to other ProjectWise users who are also using Revit advanced integration. Right-clicking the .PwdiProj document in ProjectWise Explorer and selecting Open will launch Revit and open the project in the ProjectWise browser.
The first project you create will be an empty project, to which you will add:
- documents - links to the Revit project and family documents you are working on, whether local or in ProjectWise
- locations - links to source and destination folders for your Revit content, whether local or in a ProjectWise datasource or in ProjectWise Share
- environment mappings - Revit-to-ProjectWise attribute mappings, where selected Revit document properties are mapped to ProjectWise environment attributes.
- project mappings - ProjectWise-to-Revit attribute mappings, where selected ProjectWise work area properties and/or ProjectWise project properties are mapped to Revit document properties.
Create a New Project
- In Revit, open the ProjectWise browser ().
- Click the
Create Project icon
 .
.
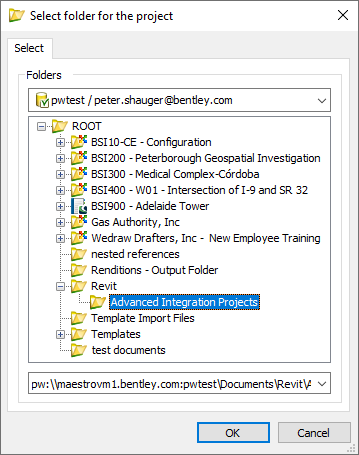
- In the dialog that opens,
select a folder or work area in your
ProjectWise datasource and click
OK.
You can also right-click in this dialog and create folders as needed.
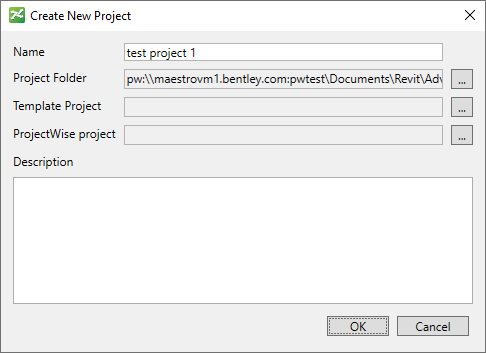
The Create New Project dialog opens.
- Enter a
Name and optional
Description for the project.
- The Name field defaults to the name of the folder or work area you selected to store the project in, and you can edit the name of the project here if needed.
- The Project Folder field displays the full datasource path of the folder or work area you selected to store the project in.
You typically do not need to change the project folder at this point, but you can change it from this dialog if needed (for example, if you accidentally selected the wrong location).
- Click OK.

The new project is loaded in the ProjectWise browser. You can now begin configuring the project, including adding Revit documents to the Work in progress location, and adding locations to the project.

Open an Existing Project
You can open an existing project using a few different methods.
To open a project from the ProjectWise browser in Revit:
- In the
ProjectWise browser, click the
Open Project icon
 .
.
- In the dialog that opens, select the folder or work area in your ProjectWise datasource that contains the project and click OK.
To open a recent project from the ProjectWise browser in Revit:
- In the ProjectWise browser, click the Open Recent Project icon (next to the Open Project icon) and select one of the recently opened projects from the list.

To open a project from ProjectWise Explorer:
Create a Project from a Template
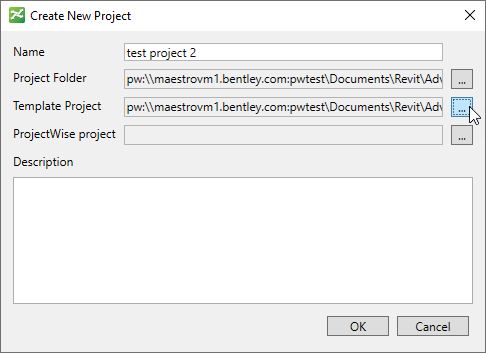
You can also use existing projects as templates to create new projects. For example, create an empty project, and then define your locations and mapping configurations in that project. Once configured, you can use that project as a template when creating new projects. This way you can quickly create new projects with the locations and mapping configurations already defined.
The steps for creating a project from a template are the same as creating a new project, except that in the Create New Project dialog you will also click the Browse (...) button next to the Template Project field to select which existing .PwdiProj project document you want to use as the basis for this new project.
Associate a Project to a ProjectWise Project
You can associate your advanced integration project to a ProjectWise project, either during project creation, or after the project is created.
This association is required when you need to do the following from Revit:
- publish to the ProjectWise Share portal of a ProjectWise project
- add issues to your punch list in the ProjectWise Issue Resolution Service portal of a ProjectWise project
To associate a project to a ProjectWise project during project creation, click the Browse button (...) next to the ProjectWise Project field in the Create New Project dialog, and then select a ProjectWise project in the Select Project dialog and click Associate.

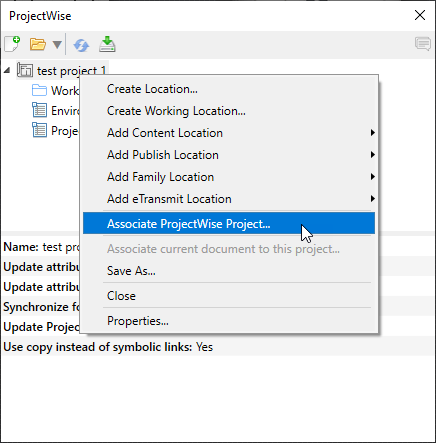
To associate after the project is created, or to change the association, right-click the project and select Associate ProjectWise Project, and then select a ProjectWise project in the Select Project dialog and click Associate.
Once the association is made, you can:
- begin adding issues to your punch list in the ProjectWise Issue Resolution Service portal of the associated ProjectWise project (see Integration with ProjectWise Issue Resolution Service)
- add locations to this project that are linked to a folder in the ProjectWise Share portal of the associated ProjectWise project (see Adding Locations to Projects)
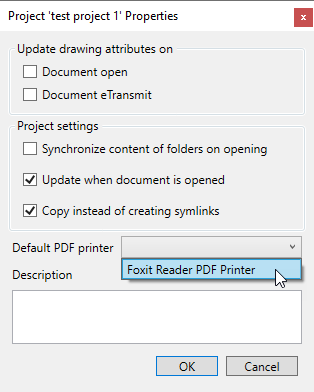
Setting the Default PDF Printer
In order to use the Publish to PDF command, you must first install a supported PDF printer, and then set that as the default PDF printer in the properties of the Revit advanced integration project.
The following PDF printers are supported:
- Adobe PDF printer (versions 10, 11, DC)
- Bluebeam PDF (Bluebeam Revu 2017 or 2018.3, Standard Edition)
- PDF-XChange printer (version 6.0 or 7.0)
- novaPDF (version 8 or 9)
- Foxit Reader (version 9.x)
To set or change the default printer:
Project Commands
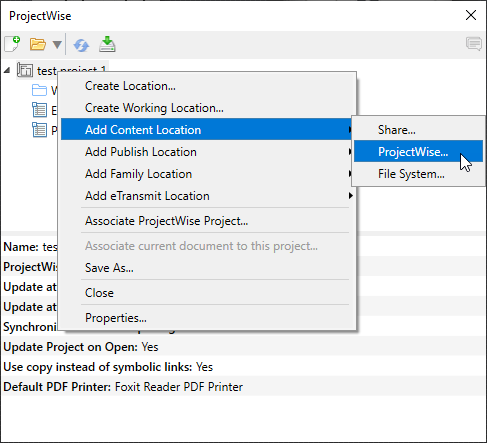
When you have a project open in the ProjectWise browser, you can right-click the project to open the menu of project commands.
| Setting | Description |
|---|---|
| Create Location | Used to create any of the possible location types. You will specify the location type and other settings when the Create Location dialog opens. |
| Create Working Location | Creates another Work in progress location, which is a location in the project where you keep track of the Revit documents in this project. You can group your Revit documents into multiple working locations within the project as needed. |
| Add Content Location | Used to create an external content location, which is a link to some folder (on the file system, in a ProjectWise datasource, or in ProjectWise Share) that contains the documents you want to attach as links to the current Revit document. You will create one external content location for each folder that contains the documents you want to attach a link to. |
| Add Publish Location | Used to create a publication location, which is a link to some destination folder (on the file system, in a ProjectWise datasource, or in ProjectWise Share), for the purpose of publishing Revit project files (RVT) in the project. |
| Add Family Location | Used to create either a family source location or a family publish location. A family source location is a link to some folder (on the file system, in a ProjectWise datasource, or in ProjectWise Share) that contains the Revit family files (RFA) you want to use in your project. A family publish location is link to some destination folder (on the file system, in a ProjectWise datasource, or in ProjectWise Share) that you want to send your Revit family files to, to make them available to other users. The destination folder of your family publish location might be used as the source folder of another user's family source location. |
| Add eTransmit Location | Used to create an eTransmit location, which is a link to some destination folder (on the file system, in a ProjectWise datasource, or in ProjectWise Share), for the purpose of sending Revit project files (RVT) using eTransmit. |
| Associate ProjectWise Project | Used to associate this advanced integration project to a ProjectWise project, or to change the association if needed. |
| Associate the current document to this project | This command is enabled when you have a Revit project file (RVT) open in Revit. Associating an RVT file to the project makes it so that the opening the RVT file will also open its associated project in the ProjectWise browser. |
| Save As | Lets you save the open project under a new name or to a different folder in ProjectWise. |
| Close | Closes and checks in the open project. |
Project Properties and Settings
The settings of the project that is open in the ProjectWise browser can be seen in the lower panel of the browser.
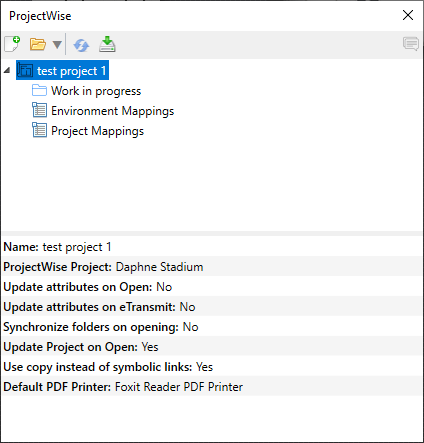
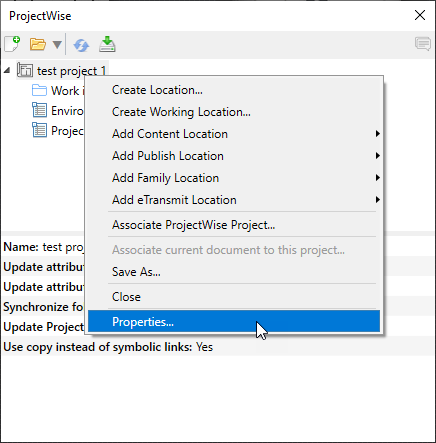
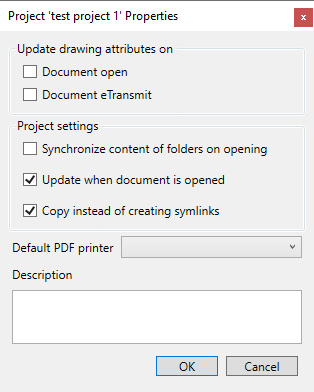
To change project settings, right-click the project in the ProjectWise browser and select Properties.
| Setting | Description |
|---|---|
| Update drawing attributes on - Document open | When this setting is on and you have a
project mapping assigned to a work in
progress folder, opening a Revit document (stored in ProjectWise) from that
work in progress folder causes the mapped Revit document properties
(destination attributes) within that document to be populated with the values
from the corresponding custom work area attributes and/or ProjectWise project
properties (source attributes).
See Create a Project Mapping and Assign It to the 'Work in progress' Folder |
| Update drawing attributes on - Document eTransmit | When this setting is on and you have a
project mapping assigned to a work in
progress folder, eTransmitting or detaching from central a Revit document
(stored in ProjectWise) from that work in progress folder causes the mapped
Revit document properties (destination attributes) within that document to be
populated with the values from the corresponding custom work area attributes
and/or ProjectWise project properties (source attributes).
See Create a Project Mapping and Assign It to the 'Work in progress' Folder |
| Project settings - Synchronize content of folders on opening | If on, each location is automatically synchronized with its linked folder when the project opens, so that each location automatically displays the current list of documents in its linked folder when the project opens. |
| Project settings - Update when document is opened | If on, the open project is updated with the latest information when the associated document is opened. |
| Project settings - Copy instead of creating symlinks | It is recommended that you disable this setting, which allows to use the references without copying to mapped location but with using symbolic link creation. You will need special permissions to create the symbolic links to make this functionality work, so it is recommended that you do not use this setting in your usual workflows. |
| Default PDF printer | Used to set the PDF printer that this project will use when you use the Publish to PDF command (see Publish to PDF). |
| Description | The description of the advanced integration project. |