Integration with ProjectWise Issue Resolution Service
The ProjectWise Issue Resolution Service portal is a service available in each ProjectWise project that lets you create and manage punch list items and other issues for your project.
Revit advanced integration provides integration with the ProjectWise Issue Resolution Service portal, so that you can add issues to your punch list and other issues lists directly from Revit. You can also view issues added by other users, regardless of where they were added from. Currently, users can add issues from Revit integration (Issues pane), Bentley Navigator (desktop or mobile app), MicroStation, ProjectWise Explorer ( tab), or a by going directly to the ProjectWise Issue Resolution Service of your ProjectWise project in the CONNECT Center (web browser).
Before You Can Create or View Issues in the Issue Pane
Issues are added from Revit using the Issues pane.
In order to be able to open the Issues pane, you must first do the following:
- Create a new or open an existing Revit advanced integration project. (see Create a New Project or Open an Existing Project)
- Associate your Revit advanced integration project with a ProjectWise project. (see Associate a Project to a ProjectWise Project)
- Open the Revit document you want to create issues against and add it to the Work in progress location of the advanced integration project.
You can now open the Issues pane so that you can create or view issues from Revit.
Creating an Issue
- Open your advanced integration project.
- From the Work in progress location, open the Revit document you want to create issues against.
- Click the
Issues button ().
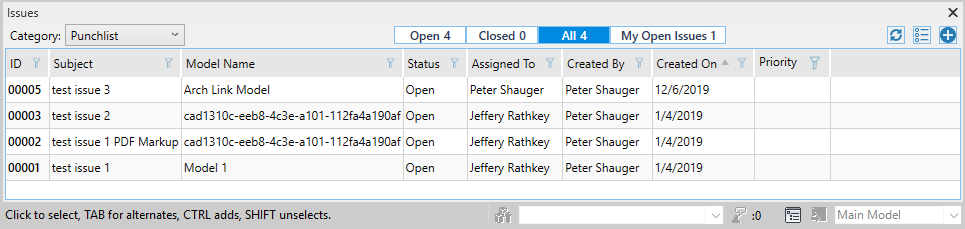
Below the open Revit document, the Issues pane opens. This is where you create new issues, and can also see existing issues that have already been added to this ProjectWise project. Use the Category menu to select which category of issues you want to display in the list. You can further filter the list to show all issues in that category, all open issues in that category, all closed issues in that category, or all of your open issues in that category.
- (Optional) Select an object in the Revit document that you want to link to this issue.
- Click the
Create a new issue icon (
 ) in the upper right corner of the
Issues pane.
) in the upper right corner of the
Issues pane.
The Select a form definition to use dialog opens. The list of form definitions available in the dialog comes from the list of form definitions that are available in the ProjectWise project that is associated to this Revit advanced integration project.
- Select a form definition
in order to determine which category this issue will belong to and click
OK.
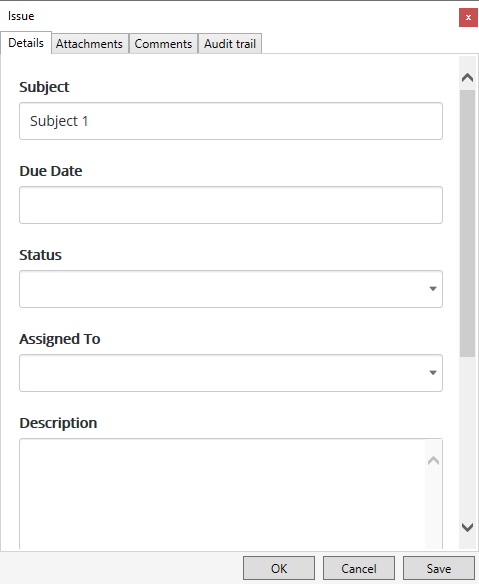
The Issue dialog opens.
- On the
Details tab, do the following:
- In the
Subject field, enter a name for the issue.
If you selected an object to link to this issue, the name of the object is automatically entered by default in the Subject field.
- Set a Due Date that the issue should be closed by.
- Set the Status of the issue.
- Select whom this issue
should be
Assigned To.
You can assign the issue to anyone who is a member of the ProjectWise project that is associated to this Revit advanced integration project.
- Click Save.
- In the
Subject field, enter a name for the issue.
- On the
Attachments tab, do the following:
- If you want to mark up
the open Revit document, click
Capture the screen. A copy of the open
Revit document is saved as an image and opens in the Edit Markup dialog.
or
If you want to mark up some image you have already saved locally, click Attach image from file system (
 ). The selected image opens in the
Edit Markup dialog.
). The selected image opens in the
Edit Markup dialog.
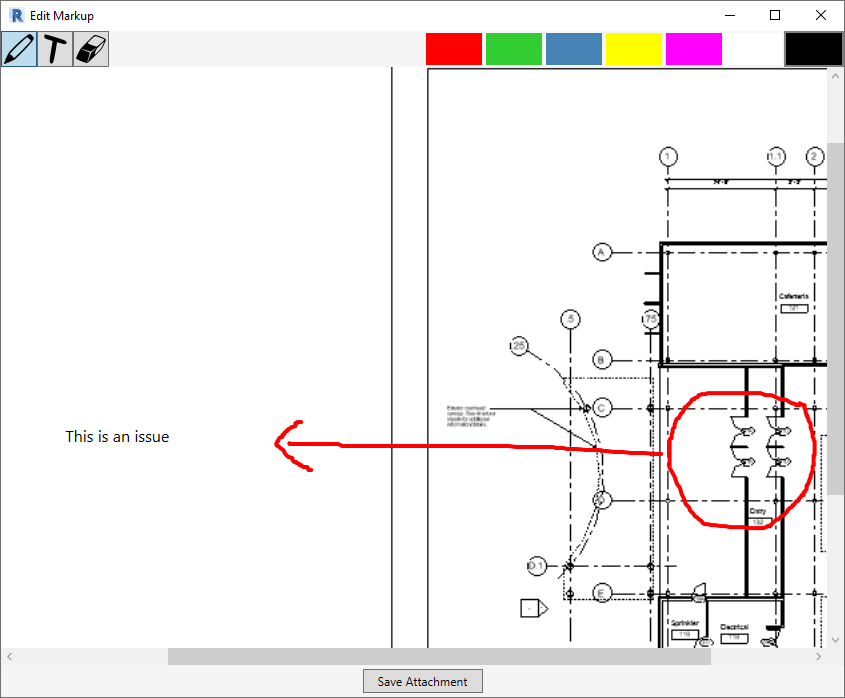
- In the Edit Markup
dialog, mark up the image as needed with the tools provided and click
Save Attachment when finished.
Use the pencil icon to markup the image. Use the T icon to add text to the image. Click one of the colors on the color bar to set the color of the markup or text (clicking a different color does not change the color of markup or text already added). Use the eraser icon to erase any markup or text.
The marked up attachment is added to the Attachments tab. You can repeat the steps above to add as many attachments with markup to the issue as you need.
- If you want to mark up
the open Revit document, click
Capture the screen. A copy of the open
Revit document is saved as an image and opens in the Edit Markup dialog.
- On the
Comments tab, do the following:
You can repeat the steps above to add as many comments to the issue as you need.
- Click
OK when finished configuring the issue.
The issue is added to the Issues panel.
You can reopen any issue to change its subject, status, due date, assignee, add more comments, add more attachments with markup, or view the audit trail history of this issue.
You can open the Revit document associated to an issue by double-clicking the issue in the Issues pane.


Right-click Options for Issues in the Issues Pane
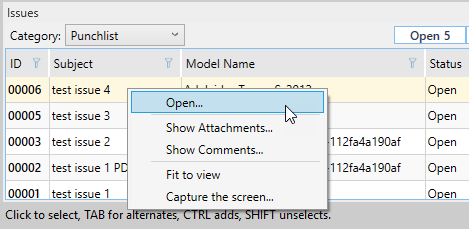
- Open - Opens the issue in the Issue dialog to the last open tab.
- Show Attachments - Opens the issue in the Issue dialog to the Attachments tab.
- Show Comments - Opens the issue in the Issue dialog to the Comments tab.
- Fit to view - Zooms in on the object that is linked to this issue (if the issue is linked to an object).
- Capture the screen - Opens the issue in the Issue dialog to the Attachments tab, and also saves a copy of the open Revit document as an image and opens it in the Edit Markup dialog so that it can be marked up and added as another attachment to the issue.