Transmittal Attributes and Settings
The tab is where you manage attributes and settings for all transmittals in this project.
Transmittal Settings
| Setting | Description |
|---|---|
| Enhance response visibility for external organizations | Lets you control whether or not one external organization can see
the responses of the other external organizations, when a transmittal has been
sent to multiple external organizations. This setting is off by default.
When this setting is off and a transmittal is sent to multiple external organizations, only the transmittal author/issuer can see the responses from the external organizations. When this setting is on and a transmittal is sent to multiple external organizations, then each external organization who receives the submittal can now also see the responses from the other external organizations. |
View the Current Transmittal Attribute List
The transmittal attribute list determines which document attribute information can be included in a transmittal.
-
Click the
Settings icon
 to open the
Settings page.
to open the
Settings page.
- Click the Package types tab and look at the Transmittal tab.
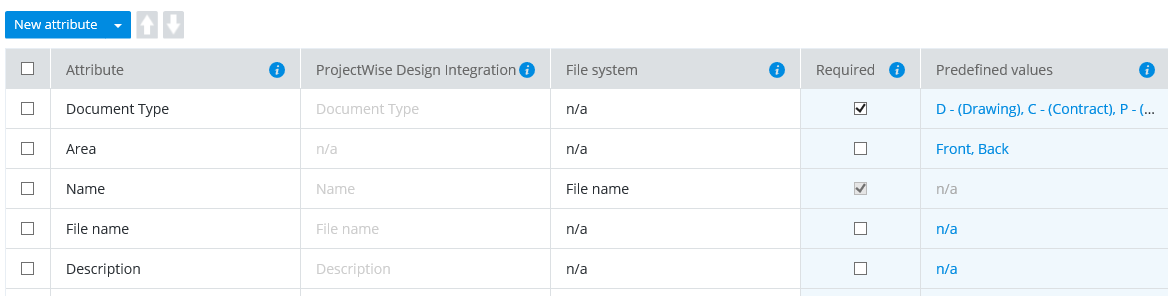
The attributes listed in the Attribute column determine the name and order of the attribute columns you see on the Documents tab when you create a new transmittal. You cannot change the attribute columns of an existing transmittal (the columns are fixed as soon as you create the transmittal), but you can make changes to the attribute list here (add, remove, rename, reorder) and the changes will be seen on the Documents tab in the next new transmittal created from this project.
In a new project, the default transmittal attributes are:

Attribute Mapping
On the Transmittal attributes tab:
- The Attribute column contains the complete list of attributes, and is where you configure the display name and order of the attribute columns.
- The ProjectWise Design Integration column contains the corresponding ProjectWise attributes for each attribute in the Attribute column. If there is no corresponding ProjectWise attribute, "n/a" (not applicable) displays. If this project is not associated to a work area in ProjectWise, the entire column will show "n/a".
- The File system column contains the corresponding file system attributes for each attribute in the Attribute column. If there is no corresponding file system attribute, "n/a" (not applicable) displays. With the default attributes, the only corresponding attribute is the File name attribute.
When a corresponding ProjectWise attribute exists, it means the attribute will be automatically populated with the correct value from ProjectWise when you add a ProjectWise document to the transmittal.
When a corresponding file system attribute exists, it means the attribute will be automatically populated with the correct value from the file system when you add a file from the file system to the transmittal.
Adding ProjectWise Attributes to the Transmittal Attribute List
When this ProjectWise project is associated with a work area in a ProjectWise datasource, you can add ProjectWise attributes to the transmittal attribute list.
The adding of ProjectWise attributes to the transmittal attribute list is done from the ProjectWise Explorer client where the ProjectWise Deliverables Management connector for ProjectWise Explorer is installed.
The ProjectWise document attributes that are included in the transmittal attribute list is determined by the ProjectWise global view that is assigned in the Deliverables Management settings of the associated work area.
The Deliverables Management settings of each associated work area has a default view called Default transmittal documents view which contains the following columns:
You will notice that these attributes are the same as the default attributes in the transmittal attribute list in the portal settings. If you keep this default view selected, synchronization will add these attributes to the ProjectWise Design Integration column and then map them to the attributes in the Attribute column in transmittal attribute list. If you assign a global view that has some new attributes and some of the same attributes as the default attributes, then synchronization will add any new attributes and the matching attributes will remain. If you assign a global view that has a completely different set of attributes, then synchronization will remove the default attributes and add all of the new attributes from the newly assigned global view.
To configure the transmittal attribute list by assigning a different ProjectWise global view:
- Open
ProjectWise Explorer and create a global view
that contains the attributes you want to include in your transmittals.
You must be an administrator of the work area in order to create a global view.
- Right-click the Deliverables Management node in your associated work area and select Settings.
- In Deliverables Management Settings dialog, select the Document's attributes tab.
- From the
Selected view list, select the new global view
and click
Apply.
The settings are synchronized with the portal, and the ProjectWise attributes from the assigned global view are added to the transmittal attributes list in the portal.
Adding, Renaming, Removing, or Reordering Attributes
-
Click the
Settings icon
to open the
Settings page.
- Click the Package types tab.
- On the
Transmittal attributes tab, do one of the
following:
To change the display name for an attribute (which changes the name of the corresponding attribute column in future transmittals):
- In the Attribute column, click in one of the attribute fields, change the name as needed, and press <Enter>.
To change the order of the attributes (which changes the order of the corresponding attribute columns in future transmittals):
- Click the check box next to the attribute you want to move, then click the Up or Down arrow to move the attribute up or down in the list.
To remove an attribute from the list (which means the corresponding attribute column will not appear in future transmittals):
- Click the check box next to the attribute you want to remove, then click the menu next to the New attribute button and select Delete.
To add a new file system attribute to the list (which will appear as an attribute column in future transmittals):
- Click
New attribute.
A row is added for the new attribute.
- In the
Attribute column, click in the attribute
field, enter a name for the attribute, and press <Enter>.
You can name the attribute whatever you want, but the name is usually going to be the same as or similar to the file system attribute you select in the next step.
- In the File system column, click Select attribute and select which file attribute you want to use for this transmittal document attribute.

Required Attributes
The Required column in the transmittal attribute list shows which document attributes will be required (must have a value) and which document attributes will be optional (can have a value or can be left blank) in transmittals issued from this project.
When an attribute is marked as required, it means that a transmittal cannot be issued until every document in the transmittal has a value entered for that particular attribute. A required attribute will have an asterisk next to the attribute in the transmittal, indicating that it is a required field.
You only need to turn on the Required check box in the portal settings for any portal-only attribute that you want to mark as required.
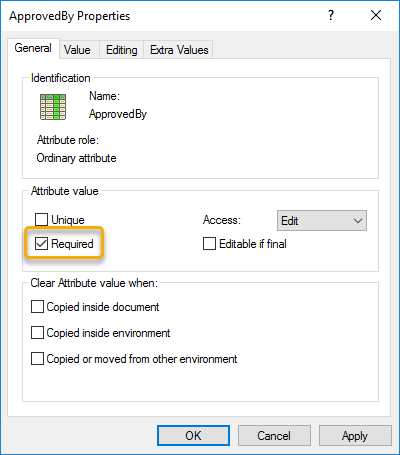
ProjectWise environment attributes that are marked as required in ProjectWise will automatically be marked as required in the transmittal attribute list. If there is a ProjectWise environment attribute that is not marked as required but you would like it to be required, you need to open the properties of the attribute in ProjectWise Administrator () and turn on the Required setting there.
Predefined Attribute Values
The Predefined values column in the transmittal attribute list shows which document attributes have a list of predefined values that the user can select from when setting attribute values for documents in a transmittal draft. The values in this column are comma separated.
For any ProjectWise environment attribute in the transmittal attribute list whose values have already been defined in ProjectWise Administrator and are configured to be selected from a list, the Predefined values column will expose those list values. If you cannot see all of the values for a particular attribute, you can click the value link to see the full list of values for that attribute. Predefined values for ProjectWise environment attributes can only be changed from ProjectWise Administrator.
For certain portal-only attributes, you can use the Predefined values column to define a list of possible values for that attribute. A portal-only attribute is one that is created in the portal settings. In order to be able to add a list of values to a portal-only attribute, the File system column must be set to n/a. (A portal-only attribute will always have the ProjectWise Design Integration column set to n/a.)
To add a list of values for a portal-only attribute, first click the value link (which is n/a initially) in the Predefined values column of your attribute. In the Edit predefined values dialog, add the values you want, arrange them in the order you want them to be presented to users, and then click Save. You can modify this list later by clicking the value link again in the Predefined values column.

Configuring the Attributes in the ZIP Upload Template
When you use the portal to add local files to a transmittal, you must manually enter document attribute values for each file you add (if attribute values are required).
If you add files individually, then you must manually enter attribute values in the transmittal after the file is added.
If you have a significant number of files to add, you can place those files in a ZIP file and upload the ZIP file to the transmittal instead. When you upload files through a ZIP file, you have the option of downloading and configuring a Microsoft Excel spreadsheet that contains the name of each file you are uploading, as well as attribute values for each file. Although you are still manually entering the information, this way makes the process go quicker. The spreadsheet you download will contain the current transmittal attribute list. When you finish entering attribute information, add the spreadsheet to your ZIP file and upload the ZIP file to the transmittal in the portal.

Configuring the Attribute Columns in the Distribution Matrix
The document distribution matrix (Settings > Distribution matrix) is used to create various distribution rules that can be applied to transmittals.
One use of these distribution rules, related to attributes, is that you can create rules that only allow a transmittal to be issued if the documents in it have the correct attribute values. For example, every document in a transmittal with this rule applied must have the State attribute set to Approved, otherwise the transmittal cannot be issued.
When you download and open the document distribution matrix template to configure it, an Attributes section is provided with an attribute column for each attribute in the transmittal attribute list. To configure a distribution rule that requires all documents in a transmittal to have specific attribute values, go to the attribute column for the rule you are configuring and enter the specific attribute value(s) you want documents to have (whenever that rule is applied). If you leave an attribute column blank for a particular rule, then the rule will not require documents in a transmittal to have a value for that attribute.
