To Create a Transmittal (ProjectWise Explorer)
-
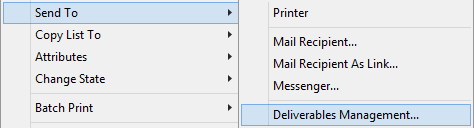
Select the type of transmittal draft you want to create:
In most cases, the Transmittal Draft dialog opens next for you to configure the transmittal.
If you are creating a transmittal by selecting ProjectWise documents, and the documents you have selected are not in a work area where ProjectWise Deliverables Management is enabled, then before the Transmittal Draft dialog opens, you are prompted to first select a work area in which ProjectWise Deliverables Management is enabled to store the transmittal.
Tip: As you are preparing the transmittal, click Save draft at any time to save a draft of this transmittal. Once saved, you can close the draft and open it later for further editing. -
On the
General tab, do the following:
- Subject - Enter a title that describes the transmittal.
- (Optional)
Confidential data included - Turn this
option on if you want to ensure that only the recipients of this transmittal
(and also additional reviewers and delegate responders) will be able to open
it.
Other team members will still see a record of it (name and ID) in their list of incoming submittals, but they will not be able to open it. The administrator and the transmittal author and issuer will always have access to it.
-
Purpose - Select a purpose from the
list.
Purposes are defined by the administrator in the ProjectWise Deliverables Management portal.
- (Optional)
Distribution rules - If distribution
rules are configured for this project, select a distribution rule from the
list.
When distribution rules are configured for the project, selecting a purpose filters the Distribution rules list to display only the distribution rules that are related to the selected purpose.
The selected distribution rule automatically adds pre-selected recipients with fixed acknowledge and response settings, sets the maximum response date and time for those recipients, and sets the required document attributes.
If the selected distribution rule also specifies any pre-selected additional reviewers for a given recipient, the additional reviewers do not appear on the Recipients tab. Instead, a note is added in the Details column on the Audit Trail tab, listing which additional reviewers were selected to send responses to which original recipient.
Distribution rules exist in the project when the administrator configures the document distribution matrix in the ProjectWise Deliverables Management portal. If there is no document distribution matrix, then there will be no distribution rules to choose from in this list.
- (Optional)
Comments - Write a brief note to the
recipients of the transmittal.
- (Optional)
Cover letter - Either leave the default
cover template selected, or select a different one from the list.
Cover letters are uploaded to the project and managed by the administrator in the ProjectWise Deliverables Management portal.
-
Classification
- Select a classification from the list to assign to the transmittal.
Classification labels are used to categorize transmittals, submittals, RFI's, and general correspondences into the parts of the project they relate to.
They can also be used in conjunction with storage settings to control where in the work area the related incoming documents are imported into. (See Defining Storage Locations for Imported Content .)
Classification labels are completely customizable in each project and are defined by the administrator in the portal settings. The administrator can also decide whether to make assigning a classification required or optional. If the Classification list is not present at all, it means the administrator has not defined any classification labels for this project.
-
Use the
Recipients tab to select which internal and
external project participants you want to send this transmittal to.
See To Add Recipients to a Transmittal Draft (ProjectWise Explorer) .
-
Use the
Documents tab to add
ProjectWise documents to this transmittal.
See To Add ProjectWise Documents to a Transmittal Draft (ProjectWise Explorer) .
-
Use the
Scheduling tab to set various dates for the
transmittal, including the dates by which the transmittal must be issued,
acknowledged, and fully responded.
See To Set Due Dates and Reminders for the Transmittal (ProjectWise Explorer) .
-
Depending on how complete
the transmittal is, click one of the following:
- Save draft - if you want to save your changes so far but leave the draft open for further editing
- Close - if you want to close the draft after saving it (you can open it for editing later)
- Send for review & issue - if you want to send the transmittal to another internal participant before issuing it
- Issue - when you are ready to send the transmittal to the recipient(s)