| Transaction
|
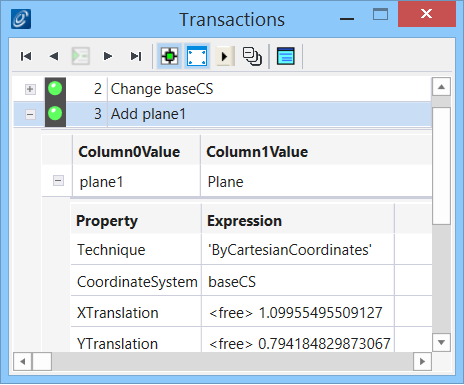
A transaction step appears in the Transaction
dialog as follows.
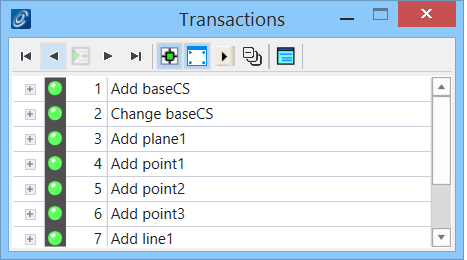
The Transaction dialog shows an overview of the existing
transaction steps.
When expanded, the expression statements recorded under each
transaction step are seen.
|
| Transaction controls
|
The
icon color of transaction step indicates its status:
 — Transaction
being played, will be visible in both geometry and graph views. — Transaction
being played, will be visible in both geometry and graph views.
 — Transaction
being unplayed, will vanish from both geometry and graph views. — Transaction
being unplayed, will vanish from both geometry and graph views.
 — Transaction
being suppressed, will vanish from view and the transaction step turns grey. — Transaction
being suppressed, will vanish from view and the transaction step turns grey.
At the bottom of the Transaction dialog are the controls for
moving backward and forward through the transaction steps.

Controls from left to right:
- Unplay all
transactions — Allows you to undo all steps in the sequence of stored
transactions.
- Unplay the previous
transaction — Allows you to undo the previous step in the sequence of stored
transactions.
- Record recent model
changes as a new transaction — Creates a new transaction step containing all of
the changes and new nodes since the last transaction step, named according to
the actions taken since the last transaction step. Clicking the text allows you
edit the name of the transaction step with any description that helps to
identify the specific step when revisiting the file. This allows you to
structure and name the sequences of steps used to create a particular model.
- Play the next
transaction — Allows you to execute the next step in the sequence of stored
transactions.
- Play all remaining
transactions — Allows you to execute the remaining steps in the sequence of
stored transactions.
- Auto record a new
transaction whenever the model changes — Allows recording of changes made in
the model as a new transaction step added in the list.
- Re-fit all views
whenever transactions are played — Re-frames the Graph window and View window
every time a transaction step is played.
- Select all played
transactions — Highlights all transactions in the list played in recent
session.
- Collapse all —
Collapse all transaction steps including expanded expression statements within
each to a top level transactions
- Edit this entire
transaction list — Opens a Script Editor window that allows you to edit all
transactions in the directory.
Transaction steps can also be played or unplayed by clicking
on their icon.
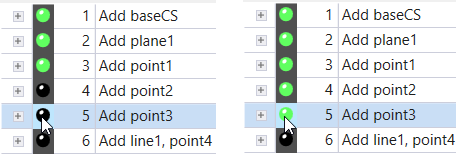

Play
transaction / Unplay Transaction
Note that irrespective of the current position of
the cursor in transaction steps list, the
Unplay the previous transaction control
unplay the last green icon step in the list. Unplaying a transaction step
having one or more transaction steps below it in
play
state, will unplay them all
.
Transactions with
Include File clause will have additional controls appear,
when played.
They are:
 — steps into
nested transaction file, by opening the included file in the transaction player
and allows you to edit the transaction steps of the external file. — steps into
nested transaction file, by opening the included file in the transaction player
and allows you to edit the transaction steps of the external file.
 — unplays all
the transactions followed by returning to the outer-level host transaction. — unplays all
the transactions followed by returning to the outer-level host transaction.
 — plays all
transactions in the included file and then returns to the outer-level host
transaction. — plays all
transactions in the included file and then returns to the outer-level host
transaction.
|
| Right-click a transaction
|
Right-clicking a transaction opens the following
choices:
Note: You can most
of the below options on multiple consecutive steps by selecting them while
pressing the <Ctrl> or <Shift> key.
- Edit
Transaction(s) — Opens a Script Editor window that allows you to
edit a transaction.
-
Consolidate Transactions — Combines continuous
transactions.

Consolidate multiple
(consecutive) transactions
- Rebuild
Transaction(s) - Replaces the selected transaction(s) with an
alternative transaction(s) that achieve the same result.
Note: The new
transaction(s) may add or change multiple nodes if those nodes are of the same
type. This operation cannot be undone.
- Split
Transaction(s) - Replaces the selected transaction(s) with an
alternative transaction(s) that achieve the same result.
Note: The new
transaction(s) add or change only one node unless there is a recursive
relationship. This operation cannot be undone.
-
Suppress Transaction(s)
— Suppresses one or more transactions without deleting
the transaction step. The transaction icon turns grey and corresponding nodes
disappear from view if were in play state.
-
Unsuppress Transaction(s) — Unsuppresses previously suppressed
transactions. The unsuppressed transactions reappear in unplay state.
-
Insert Include–File Transaction — Opens
a Script Editor window that allows you to edit the transaction with the title
"New Include-File Transaction" being inserted
before the current transaction.
- Insert
Model-Change Transaction — A transaction with the title
"New Model-Change Transaction" is inserted
before the selected transaction in the list. The existing transactions state
change to unplayed.
-
Insert Script Transaction — Opens Script
Editor begun the script with the title
"New Script Transaction" being inserted before
the current transaction
-
Delete Transaction(s) — Deletes the
selected transaction.
-
Cut Transaction(s)— Cuts the selected
transaction. The transaction can be pasted to another location in the
transactions window.
-
Copy Transaction(s) — Copies the
selected transaction. The transaction can be pasted to another location in the
transactions window.
-
Paste Transaction(s) — Pastes the
transaction from the clipboard that was recently copied or cut.
- Insert – pastes it before the
transaction currently highlighted.
- Replace – replaces the currently
highlighted transaction.
|
| Right-click a statement
|
Expanding a step lists the statements.
Right-clicking a node statement opens the following choices:
|
 (
(