Using the Style Editor
Using the Style Editor in Forms Designer, you can change
the style of controls in a form. To open the Style Editor, select a control on
the canvass. From the Control panel on the right, select the Style tab and
select the Style Editor
 icon from the right side of the
Control Style field. The Style Editor dialog box opens where you can select a
style from the dropdown at the top to edit the style, or add a new style by
selecting
Create New Style. When you have finished editing
the style, select
Apply.
icon from the right side of the
Control Style field. The Style Editor dialog box opens where you can select a
style from the dropdown at the top to edit the style, or add a new style by
selecting
Create New Style. When you have finished editing
the style, select
Apply.
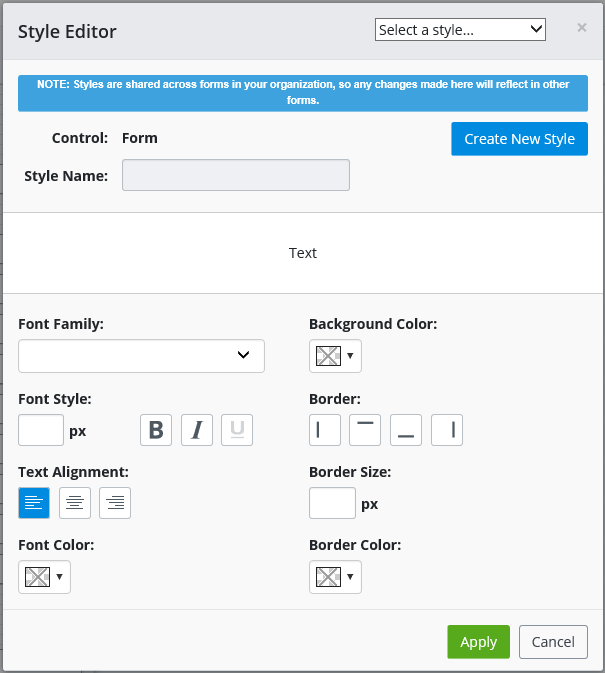
Style Name
In the Style Name field, enter the name of the style or edit the existing style name. Style names cannot contain spaces.
Preview
Below the Style Name field, all the changes that you make to the style are displayed with a sample text.
Font
Next, under Font Style, enter the size of the font in pixels.
Select the Bold, Italic, or Underlined buttons if you want the font to display with these styles.
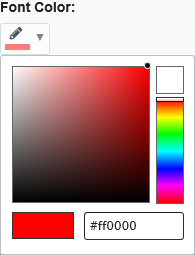
Font Color
You can set the color of the font from the Font Color picker. Here you can select a color from the color spectrum, or enter a hex code for a specific color. Once you have entered the hex code, click or tap inside the hex code field to select that color. You can also clear the color selection by selecting the white box at the top right of the color picker.
Border
Four buttons display under the Border section. You can select one or several of these buttons to display a border above, below, or to the right or left of the text. To display a border all around the text, select all four buttons.
Next, under Border Size, enter the size of the Border in pixels.
From the Border Color picker, you can set the color of the border.