Creating an Excel Template
The export and import tools use an Excel spreadsheet to store the attributes of documents during the export/import process. You can create this template manually, or you can use the Create Excel Template wizard to simplify this task.
In the first step of the wizard, you enter or select the name of the template you wish to create and define the environment and interface you wish to include in the template.
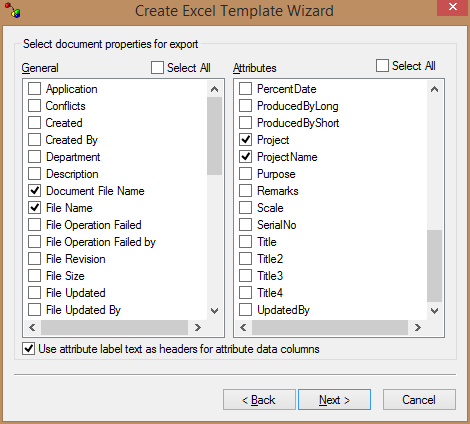
In the second step, you select general document properties and custom environment attributes you want to include in the template.
When you export a document from ProjectWise, you can define the value of certain attributes. This value is then applied to that attribute in all the documents exported. You can use this functionality to record information relating to the exportation, such as to whom you exported the document, who carried out the export, the purpose of the export, and so on. This information is stored in the copy of the document in the ProjectWise datasource and can be examined by viewing the document's properties.
When the document is re-imported into the datasource, these values are cleared. You should reserve specific attributes to store these values, because any value contained in them is overwritten during the export process and is not restored when the document is re-imported.
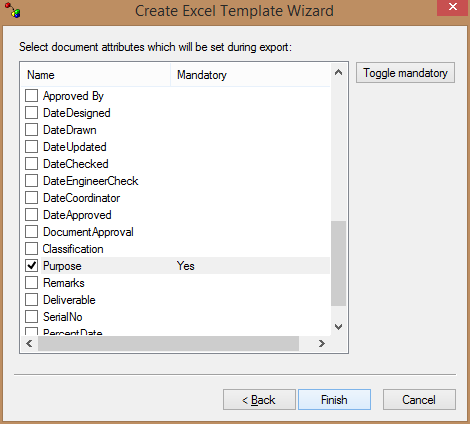
In the last step, you define which attributes contained in the environment are to be set in this way during the export process. If you make the attributes mandatory, they display automatically when you export documents and you must define their values. If you do not make attributes mandatory, you can add them during the export process and then define their values.
To Create an Excel Template
-
Open the Create Excel Template Wizard.
- In
ProjectWise Explorer, select
.
or
- From the desktop - Windows
8 or later / Windows Server 2012 or later:
Go to the Start page and type Create Excel Template, or go to and click Create Excel Template.
- From the desktop - Windows
7 / Windows Server 2008:
Select .
When prompted, log in to the datasource you want. See Logging In.
- In
ProjectWise Explorer, select
.
-
On the first page of the wizard, do the following:
- In the Excel template file name field, enter the path to and name of the Excel template file you want to create, or click Browse to select an existing file to overwrite.
- From the ProjectWise environment for export list, select an environment.
- From the Interface for field names or field labels list, select an interface.
-
Click
Next.
- On the Select document properties for export page, do the following:
-
On the
Select document attributes which will be set during
export page, do the following:
-
In the list, select the attributes you want to set during
export.
You can define the value of the attributes selected for all documents when you export them.
-
To make data entry in an attribute required, select the
attribute in the list and click
Toggle mandatory.
Required attributes display automatically in the Export to Excel wizard, and you define their values by modifying them. If they are not required, you can still define their values in the wizard by adding them and setting their values.
- Click Finish.
-
In the list, select the attributes you want to set during
export.