Importing Documents
The ProjectWise Export/Import tool lets you import documents from an Excel spreadsheet containing their details. This is usually the spreadsheet created by the Export Wizard when you exported documents from a ProjectWise datasource. However, you can use this tool to import documents obtained from other sources, such as document management systems, or simply as a means of importing documents and defining their attributes during the import process.
New documents are created if their entry in the spreadsheet contains no value in the Folder Id and Document Id columns. If these columns contain values, the documents can be simply imported into the relevant folder, overwriting the existing documents in that folder, or creating a new version of the documents. If the documents do not exist in the datasource, an error is generated.
You can use this feature to import documents and the values contained in the attributes defined in the spreadsheet. The columns in the spreadsheet must have names identical to the attribute names from either the ProjectWise standard attributes, or the attributes contained in the environment you select for new documents in the Import Wizard. The spreadsheet must contain certain standard columns, Folder ID, Folder Name, Document Id and Name. The easiest way to create a spreadsheet, which you can use to import documents and their attributes, is to create a template for the destination datasource, selecting the attributes you require. This template contains the required attributes, even if you do not select them. You can then enter the information about the documents you wish to import, either manually or by importing them from another datasource.
It is possible to use the import tool to copy documents between different environments in a ProjectWise datasource. The attributes copied between environments must be the same data types and either have identical column names, or the names must be changed from the name in the exported environment to the name in the imported environment.
The import command opens the Import Wizard. This guides you through the process of importing the documents.
If you simply wish to import documents, which were previously exported from the same datasource, you can ignore many of the steps in the wizard that relate purely to the creation of new documents. In the first step of the wizard, you select spreadsheet containing the names and attributes of the documents you wish to import. There are a number of options you can select in this step.
- Use status and message columns - If you set the Use status and message columns, status information, import errors and messages are stored in the Excel spreadsheet. The spreadsheet must contain _STATUS_and_MESSAGE_ columns, otherwise an error is generated.
- Only undo export - If you set the Only undo export check box, no documents import and no attributes update occurs. The Exported status of the documents contained in the spreadsheet changes to checked in and no other changes are made to the datasource. The wizard skips the remaining steps and goes straight to the last step. Setting this check box activates the two other options.
- Delete files - If you set the Delete files check box, the documents contained in the spreadsheet are deleted. They must be located in the folder to which you exported them when you created the spreadsheet.
- Delete Excel documents - If you set the Delete Excel document check box, the spreadsheet is deleted after the status of each document is changed. If you set the Only undo export check box the remaining steps of the wizard are skipped and you go straight to the last step.
In the second step of the wizard, you set the options for any new documents which are created. The settings you choose here only effect new documents, so if you are only importing existing documents, you can accept the default values and move to the next step. The options are:
- Select environment for import - The environment you select here is applied to all new folders created by the import process. This environment should normally be the same as the one used to create the template, except where you wish to transfer documents between environments.
- Select GUI definitions for import - The interface you select here is applied to all documents imported into the folders created in the previous section.
In the third step of the wizard, you select a number of options effecting the way documents import. These options are:
- Select root folder for incoming documents - The folder you select here contains all the new documents and all folders created in the import process. The environment defined for this existing folder should be the same as the one you select above, if you want all the document attributes to be imported successfully.
- Create subfolders - If you set this check box and a new document contains a value in the Folder Name column of the spreadsheet, a new sub-folder creates in the folder selected for new documents. The document then imports into this folder. If it is clear, the document imports into the folder selected for new documents and no subfolder creates. This setting works in conjunction with the Create new documents check box. New documents only import if this check box is set. If it is clear and Create subfolders is set, new subfolders create for any new documents, but the new documents are not created.
- Always locate documents by name (ignore ID columns) - If you set this check box and the name of the document in the spreadsheet differs from the name of the document with the same ID in ProjectWise, Export-Import ignores the Document and Folder ID's and treats it as a new document in the folder specified in the spreadsheet. The full path to this folder must be specified.
- Create new documents - If you set this check box, any documents in the spreadsheet that have null values in their Folder ID and Document ID columns are created when you run the import command. If it is clear, the import process skips any new documents.
- Create new versions for existing documents - If you set this check box, a new version of each existing document is created when you run the import command. If it is clear, the imported document overwrites the existing document.
- Update files - If you set this check box, documents update when you run the import command.
- Update attribute data - If you set this check box, attributes update when you run the import command.
- Update code fields - If this check box is set, code fields update with the value in the matching fields contained in the spreadsheet.
- Document workflow state - Use this pick list to select the action to be performed on imported documents that are in a workflow. You can select from Do not change, Set to next, or Set to previous.
In the last step, you start the import process. The wizard displays the progress of the importation and finally displays a log of the events which occurred.
To Import Documents Using the Import from Excel Wizard
-
Open the Import from Excel Wizard.
- In
ProjectWise Explorer, select
.
or
- From the desktop - Windows
8 or later / Windows Server 2012 or later:
Go to the Start page and type Import from Excel Wizard, or go to and click Import from Excel Wizard.
- From the desktop - Windows
7 / Windows Server 2008:
Select .
When prompted, log in to the datasource you want. See Logging In.
- In
ProjectWise Explorer, select
.
-
On the first page of the wizard, do the following:
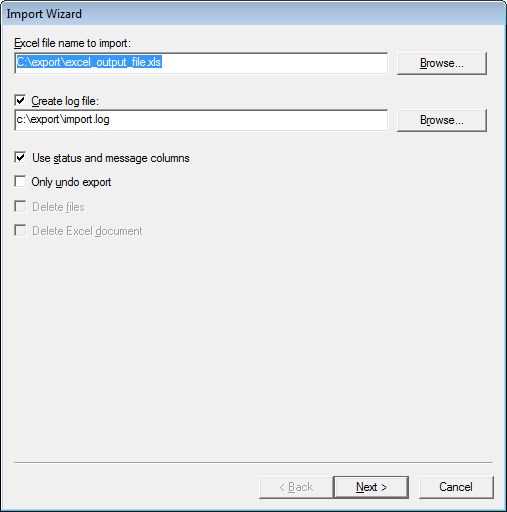
- In the Excel file name to import field, enter the path to and name of an existing Excel export file, or click Browse to select the file.
- (Optional) Turn on Create log file, and in the field below, enter the path to and name of the log file you want to create, or click Browse to select an existing log file to overwrite.
- (Optional) If you want to log status information, import errors and messages in the Excel spreadsheet, turn on Use status and message columns. The spreadsheet must contain STATUS and MESSAGE columns to store this information.
- (Optional) If you want to undo the "Exported" status of the exported documents, turn on Only undo export. This enables the Delete files and Delete Excel documents check boxes. Turn these options on if you want to deletes the exported files and Excel spreadsheet respectively.
-
Click
Next.
If Only undo export is on, then the Import Wizard skips the remaining pages and goes straight to Import page. Skip to step 5.
If Only undo export is off, the Select Environment page opens. Continue with the next step.
-
On the
Select Environment page, do the following:
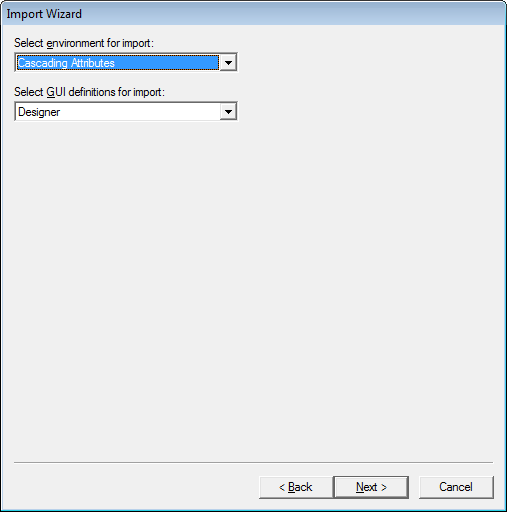
- From the Select environment for import list, select an environment to apply to new documents. (Documents which already exist in the datasource, which you are importing after previously exporting them, retain their existing environment.)
- From the Select GUI definitions for import list, select an interface to use for new documents. (Documents which already exist in the datasource, which you are importing after previously exporting them, retain their existing interface.)
-
Click
Next.
-
On the
Import Options page, do the following:
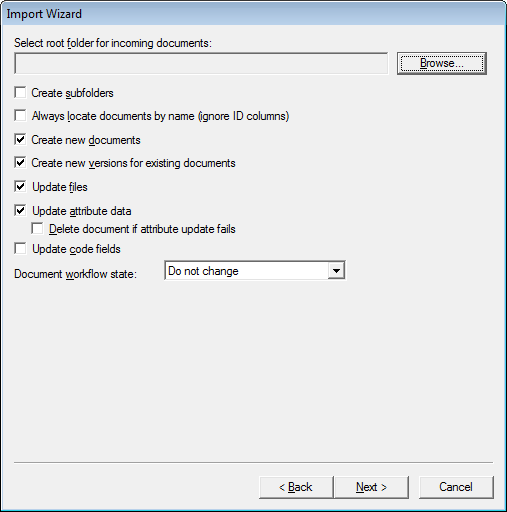
- Click the Browse button to the right of the Select folder for new documents field. When the Select Folder dialog opens, select a folder or work area and click OK. (Documents which already exist in the datasource, which you are importing after previously exporting them, import to their original folders.)
- (Optional) To create subfolders for new documents, turn on Create subfolders. If on, and a name exists in the Folder Name column of the spreadsheet of a new document, a subfolder of this name is created in the folder selected for new documents. If Create subfolders is off, new documents will be placed at the root of the folder selected for new documents.
- (Optional) To locate documents by name, turn on Always locate documents by name (ignore ID columns). This means the Import tool will assume that the document ID is not specified and will match documents by their names.
- (Optional) To create new documents for documents that were added to the Excel spreadsheet, which were not previously exported, turn on Create new documents.
- (Optional) To create new versions of the existing documents, turn on Create new versions for existing documents.
- (Optional) To update files of the existing documents, turn on Update files.
- (Optional) To update attribute data of the existing documents, turn on Update attribute data.
- (Optional) To update code fields, turn on Update code field. Code fields may consist of a number of attributes in the document’s environment joined according to rules defined in the environment. If any of these attributes have been changed since you exported the document, turning on this option forces an update of the code field.
- To set whether or not to change the workflow state of existing documents, select the appropriate option from the Document workflow state list (Do not change, Set to next, or Set to previous).
-
Click
Next.
The Status page opens, displaying Ready.
-
Click
Import.
The progress of the import process displays in the Status page. On completion the status changes to Done.
- Click Close.