Changing Program Associations
Default program associations for the datasource are set by your administrator, in ProjectWise Administrator. You can see what these default associations are, and change your personal program associations if necessary, using the Program Associations dialog (Tools > Associations > Programs).
For each application, you can set the same program to be used for opening, viewing, marking up, or printing, or you can set a different one for each operation. Any additional command line arguments that the program normally opens with can also be specified. When specifying command line arguments you have the option of using system (ProjectWise) or Windows environment variables.
To change an application's program associations, or to see any modifications you have made to program associations, you need to set the association view to User associations. User associations are unique for each ProjectWise user, so any changes you make to an application's settings only affect the user you are currently logged in as. This way your program associations will be the same no matter which computer you log in to ProjectWise from.
When the association view is set to Global associations in the Program Associations dialog, the Applications list displays the association settings defined by your administrator in ProjectWise Administrator. When the association view is set to All associations, the Applications list displays both User and Global associations. That is, it shows the User association if one is defined, otherwise it shows the Global association. You cannot modify any settings when the dialog is set to Global associations or All associations.
To Change the Program Used to Open, View, Mark Up, or Print Documents Associated to a Particular Application
- Open the Program Associations dialog ().
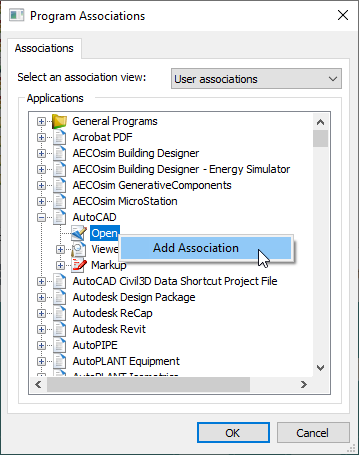
- Set the Association view to User associations.
- In the Applications list, expand an application so that the options Open, Viewer, and Markup display.
- Right-click the action to
which you want to associate a program. For
Open, select
Add Association. For
Viewer or
Markup, select
Browse Path.
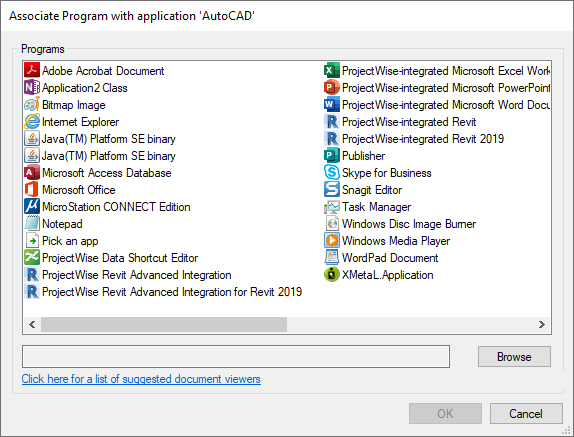
A dialog opens, displaying a list of programs currently installed and registered on your computer. When a program is selected, the field at the bottom of the dialog displays the program's registry class name, rather than an absolute path to the respective executable file. This way, in the event you need to work in ProjectWise on another computer, and assuming that computer has the same program(s) installed, your user associations will automatically work.
- Select a program from the
list of available programs and click
OK.
If the program you want is not listed, click Browse. In the dialog that opens, navigate to and select the program's executable (.exe) file, then click OK. The selected executable's program name is added to the list of available programs. Select that program from the list and click OK.
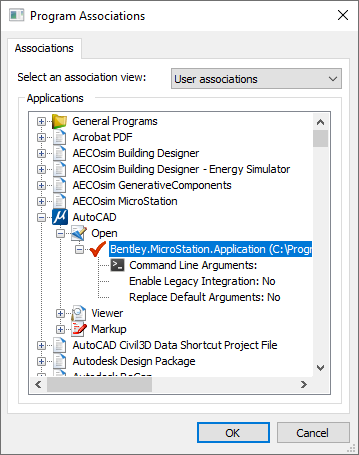
The program is added under the selected action in the Program Associations dialog. If you selected a program from the list of registered programs, the program displays with its registry class name first, and the path to the program's executable file (on that computer) to the right in parentheses. If you selected a program based on the location of an executable file, the path to and including the executable file displays.
- (Optional) If you want to add more programs to the action, right-click the action again and select Add Association.
- (Optional) If you have multiple programs associated to an action and you want to change the default program for that action, right-click the program you want to be the default and select Set As Default, or just double-click the program.
- Click OK to save changes and close the Program Associations dialog.
To Add a Command Line Argument to a Program
- Open the Program Associations dialog ().
- Set the Association view to User associations.
- In the Applications list, expand an application.
- Expand the action (Open, Viewer, or Markup) containing the program you want to configure.
- If the action does not yet have a program associated to it, do so now, then continue with the next step.
- Expand the program so that the options Command Line Arguments and Replace Default Arguments display.
- Double-click
Command Line Arguments, or right-click
Command Line Arguments and select
Modify Command Line Arguments.
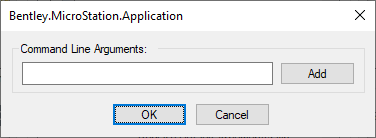
The Command Line Arguments dialog opens for you to specify arguments that will be used to start the program.
- In the Command Line Arguments field, type the necessary arguments for your application. For example, to set up the Oracle database configuration, add -wdoracle. Not all programs require command line arguments. You can find these arguments by right-clicking the application's shortcut icon on your desktop and selecting Properties. In the Shortcut tab's Target field, copy the entire text string (starting with -w), including any quotation marks. You can then paste this text string in the Command Line Arguments field.
- Click OK to close the Command Line Arguments dialog.
- Click OK to save changes and close the Program Associations dialog.