Exporting Documents
You export documents using the Export to Excel wizard.
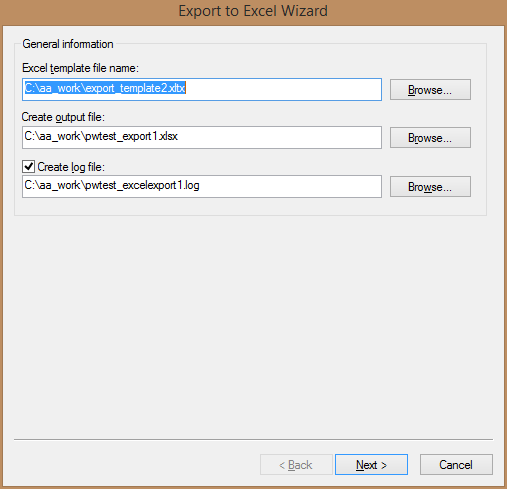
In the first step of the wizard, you select the template file you wish to use, enter, or select, the export spreadsheet, and enter, or select the log file, if you wish to keep a log of the export process.
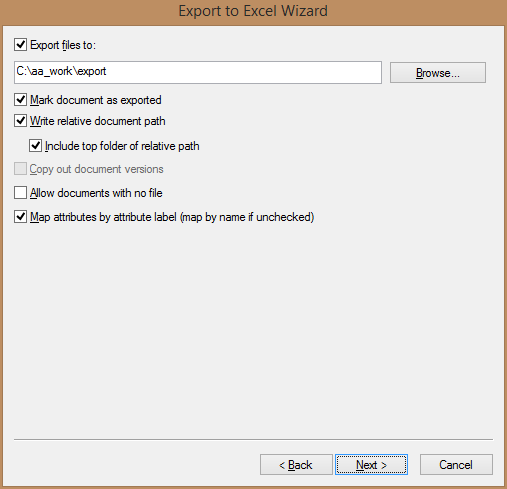
In the second step, you define whether the documents should be marked as exported. Exported documents are similar to checked out documents, they can be viewed but cannot be modified. You also select a location where the exported drawings are copied. This can be either the default location or a selected location. The exported documents retain their folder structure when they are copied to this location. The export tool creates new folders with the name of the documents' parent folders in this location and copies the documents into these folders. You can also define whether the top folder of the document path is also created and whether the paths contained in the DGN file headers are changed to the export locations. If you are only copying documents out you can set whether all versions of the document are copied to the export location or only the selected version.
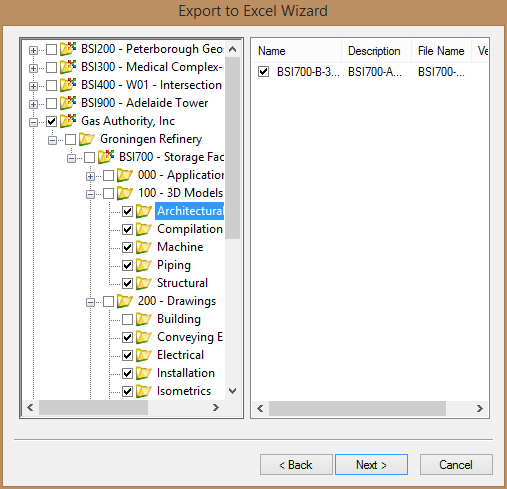
In the third step, you select the documents you wish to export. You can select either a folder, which marks all the documents in the folder for export, or individual documents. If you select a folder or a document that does not belong to the environment defined in the export template, you will receive a warning and be asked if you wish to proceed. If you do proceed, only those columns containing attributes that are common to both environments will contain values. All other attributes will contain null values.
In the fourth step, you select which attributes you wish to set when the documents are exported and enter a value for this attribute. This value is then applied to this attribute in the copy of the document held on the server, for all documents that are exported. You can only choose attributes that you selected for this purpose when you created the template. If you later re-import these documents, or free them, the attribute is cleared. You can use this feature to record information about the exported document. If you do not select any attribute for this purpose when you created the template, the wizard skips this step.
In the last step, you start the export process. The wizard displays the progress of the exportation and finally displays a log of the events which occurred.
To Export Documents Using the Export to Excel Wizard
-
Open the Export to Excel Wizard.
- In
ProjectWise Explorer, select
.
or
- From the desktop - Windows
8 or later / Windows Server 2012 or later:
Go to the Start page and type Export to Excel Wizard, or go to and click Export to Excel Wizard.
- From the desktop - Windows
7 / Windows Server 2008:
Select .
When prompted, log in to the datasource you want. See Logging In.
- In
ProjectWise Explorer, select
.
-
On the
General information page, do the following:
- In the Excel template file name field, enter the path to and name of an existing Excel template file, or click Browse to select the file.
- In the Create output file field, enter the path to and name of the Excel workbook file (XLS or XLSX) you want to create, or click Browse to select an existing workbook file to overwrite.
- (Optional) Turn on Create log file, and in the field below, enter the path to and name of the log file you want to create, or click Browse to select an existing log file to overwrite.
-
Click
Next.
-
On the
Export options page, do the following:
- If you want to export documents, turn on Export files to and click Browse to select the local folder (outside of ProjectWise) that you want to export the documents to. When Export files to is off, an Excel file (containing information about the selected documents) will still be created, but no documents will be exported.
- Turn on Mark document as exported if you want the selected documents to be exported, resulting in a managed copy of each exported document. When Mark document as exported is off, the selected documents will be copied out, resulting in an unmanaged copy. Exported documents can be modified and later re-imported. Copied out documents cannot be later re-imported. This option is disabled if Export files to is off.
- Write relative document path - Turn this option on if you want to the document paths in the DGN file headers to be changed from the ProjectWise paths where the files are exported.
- Include top folder of relative path - Turn this option on if you want to include the top folder of the path.
- Copy out document versions - If Mark document as exported is off, you can turn this option on to copy out all versions that exist for a selected document. If off, only the active version of a document will be copied out. This option is disabled if Mark document as exported is on, because only the active version of a document can be marked as exported.
- Allow documents with no file - Turn this option on if you want to allow placeholder documents to be exported.
-
Map attributes by attribute label (map by name if
unchecked)
-
Click
Next.
-
On the
Select documents page, do the following:
- In the Folders list, select the folders or work areas whose documents you want to enable for export. Documents at the root of the selected folder or work area are automatically selected for export in the Documents list. Subfolders are not automatically selected, and must be manually selected if you want to export documents in those folders.
- In the Documents list, turn on or off individual documents at the root of the selected the folder or work area as needed.
-
Click
Next.
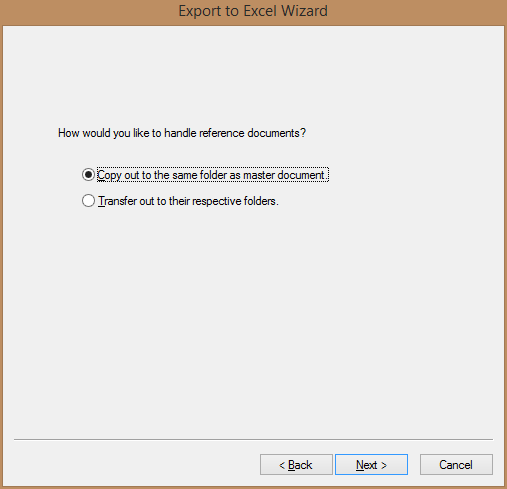
If one or more of the documents selected on the previous page is a master document, the next page that opens asks you where you want to download the master document's references.
-
On the
Reference documents page, do one of the
following:
If you want all of the master document's references to be downloaded to the same folder as the master document, select Copy out to the same folder as master document and click Next.
or
If you want the master document's references to be downloaded to relative local folders, select Transfer out to their respective folder and click Next.
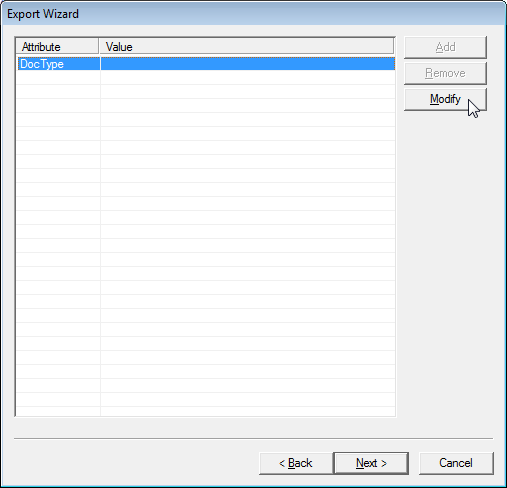
Next, the Set Attributes page opens, where you can define values for the mandatory attributes which are automatically listed, and you can also add other attributes and define values for them as needed. The selected attributes will get updated in the exported documents inside ProjectWise and the Excel file will contain the original attribute values.
-
On the
Set Attributes page, do the following:
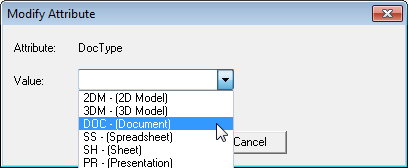
- Select one of the mandatory attributes (one that was already listed when the page opened) and click Modify. In the Modify Attribute dialog, enter or select a value to set for the attribute and click OK.
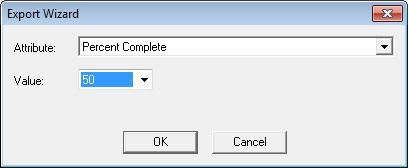
- If there are other attributes that are set in the export template which are not mandatory, click Add. In the Add Attribute dialog, select an attribute, select a value for the attribute, and click OK.
- (Optional) If you want to remove any attributes (mandatory or non-mandatory) from the list, select the attribute and click Remove.
-
Click
Next.
The final page opens, with a Status of Ready (to export).
-
Click
Export.
The wizard shows the progress of the export. When export is complete, the Status changes to Done.
-
Click
Close.