Working with Cell Libraries Stored in ProjectWise
When you have a document open in integrated MicroStation, you can attach a cell library that is stored in ProjectWise, or you can create a new cell library and store it in ProjectWise.
When you attach a cell library that is stored in ProjectWise, you have the option to check out the cell library (so it can be edited) or attach it as read-only. When you create a new cell library in ProjectWise, that cell library document is automatically checked out and attached to the open document.
To Create and Attach Cell Library Stored in ProjectWise, Using the Integrated Create Cell Library Dialog
-
Select Element > Cells.
MicroStation’s Cell Library dialog opens.
- In the dialog, select File > New.
-
If the Select a Wizard dialog opens, select No Wizard and click OK.
ProjectWise's Create Cell Library dialog opens.

-
To change the project or folder in which the new cell library document will be stored, click Select in the Folder section.
By default the cell library document will be stored in the same project or folder as the open document.
-
Do one of the following:
Turn on the check box next to the Name field if you want the file name to match the document name.
or
Turn off the check box next to the Name field if you want to edit the file name independently of the document name.
-
Enter information in the Name, Description and File Name fields as needed.
A description for the document is optional, but the document must have a name and a file name, and both the (document) name and file name must be unique in the folder or project in which you select to save the document. The cell library file name will be automatically assigned the .CEL extension.
-
Assign a ProjectWise application and department to this document from the respective Application and Department lists. You can set both to <none> if necessary.
The cell library document is automatically associated to the ProjectWise application, ‘MicroStation’.
-
Click Save.
The cell library is created, checked out, and added to the Cell Library dialog.
To Create and Attach Cell Library Stored in ProjectWise, Using the Advanced Document Creation Wizard
-
Select Element > Cells.
MicroStation’s Cell Library dialog opens.
- In the dialog, select File > New.
- If the Select a Wizard dialog opens, select Advanced Wizard and click OK.
- When the Advanced Document Creation Wizard opens, click Next.
-
When the Select Target Folder page opens, select the project or folder to store the cell library document in and click Next.
By default the cell library document will be stored in the same project or folder as the open document.
-
When the Document Properties page opens, enter a name, description, file name, version, and application for the cell library document as needed and click Next.
A description for the document is optional, but the document must have a name and a file name, and both the (document) name and file name must be unique in the folder or project in which you select to save the cell library document. Turn on the check box next to the Name field if you want the file name to match the document name, otherwise turn it off if you want to edit the file name independently of the document name. The cell library file name is automatically assigned the .CEL extension, and is associated to the ProjectWise application, ‘MicroStation’.
- When the Create a Document page opens, click Next.
-
When the final page of the wizard opens, click Finish.
The cell library is created, checked out, and added to the Cell Library dialog.
To Attach an Existing Cell Library Stored in ProjectWise
-
Select Element > Cells.
MicroStation’s Cell Library dialog opens.
-
In the dialog, select File > Attach File.
ProjectWise's Attach Cell Library dialog opens.
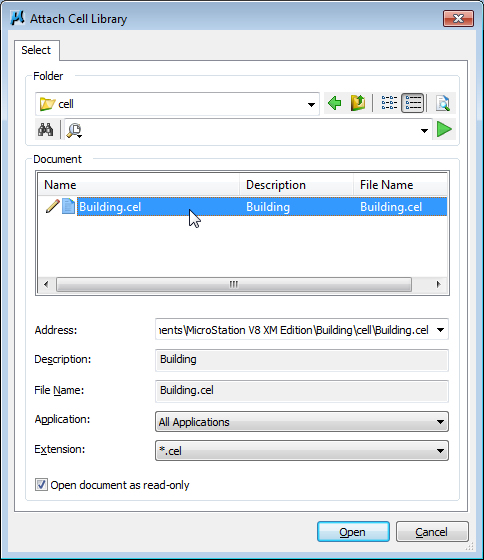
- Navigate to and select the cell library document.
-
Do one of the following:
If you do not plan on editing the cell library, leave on the setting, Open document as read-only.
or
If you need to edit the cell library, turn off the setting, Open document as read-only. This checks out the cell library document.
-
Click Open.
The cell library is added to the Cell Library dialog.