Attaching Documents Stored in ProjectWise
You can attach ProjectWise documents to the document open in integrated MicroStation.
You can use:
- the References dialog — to attach DGNs, DWGs, ESRI shapefiles (SHP), and other file types stored in ProjectWise (all file types on the Files of Type list are supported)
- the Raster Manager dialog — to attach raster image documents stored in ProjectWise
- the Point Clouds dialog — to attach point cloud (POD) files stored in ProjectWise
When you attach ProjectWise documents in MicroStation, checking in your changes to the master document automatically creates or updates the logical set in ProjectWise. (A logical set is the ProjectWise-maintained relationship of a master document and its attachments.) Specifically, ProjectWise stores the updated reference information in the ProjectWise database, eliminating the need to use the MicroStation configuration variable MS_RFDIR.
To Attach DGNs, DWGs, or Other File Types to the Open Document
-
Select File > References.
MicroStation's References dialog opens.
-
In the dialog, select Tools > Attach.
ProjectWise's Attach Reference dialog opens.
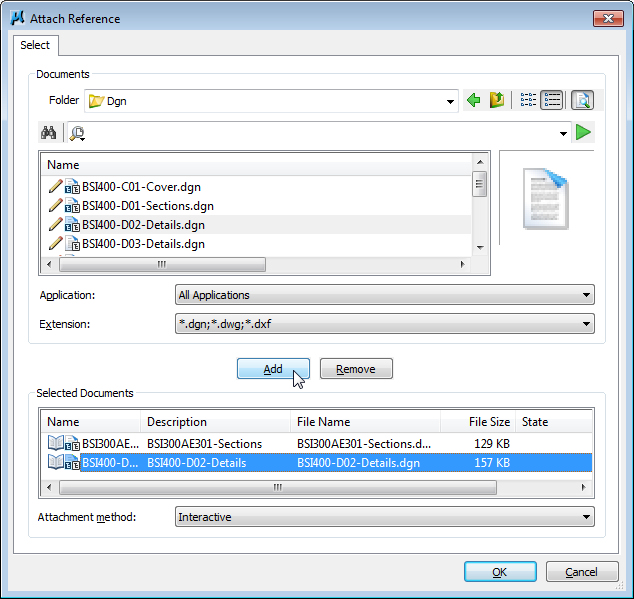
- From the Folder list, select the project or folder containing the document(s) you want to attach.
-
Do one of the following:
In the Document list, select the document(s) to attach and click OK.
or
Select the document(s) to attach and click Add. The documents are added to the Selected Documents list. Repeat steps 3 and 4 as needed to add documents from other folders. When finished adding documents, click OK.
MicroStation's Reference Attachment Settings dialog opens, displaying the full file name and working directory path to the document you are about to attach.
-
Make adjustments as needed to the default attachment settings and click OK. If you are attaching more than one document, the Reference Attachment Settings dialog opens once for each document being attached.
The selected document(s) display in MicroStation's References dialog.
-
When finished attaching references, close the References dialog.
The logical set will be created/updated in ProjectWise when you check in the master document.
To Attach a Raster Image to the Open Document
-
Select File > Raster Manager.
MicroStation's Raster Manager dialog opens.
-
In the dialog, select File > Attach.
ProjectWise's Attach Raster Reference File dialog opens.
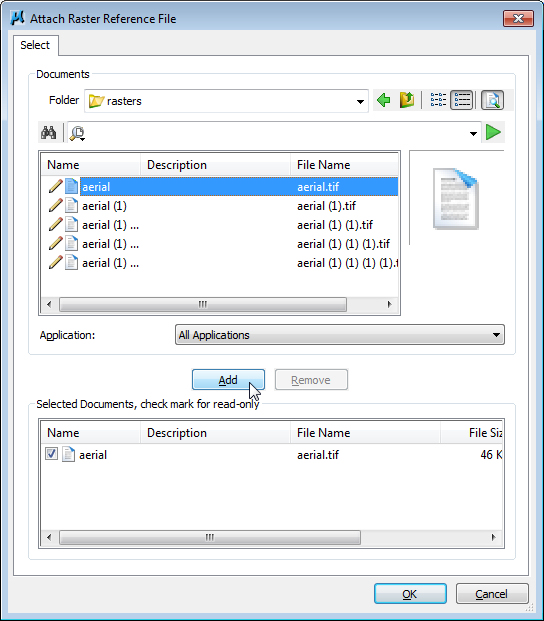
- From the Folder list, select the project or folder containing the document(s) you want to attach.
-
Do one of the following:
In the Document list, select the document(s) to attach and click OK.
or
Select the document(s) to attach and click Add. The documents are added to the Selected Documents list. Repeat steps 3 and 4 as needed to add documents from other folders. By default the documents added to the Selected Documents list are set to be attached as read-only. If you want any of them to be checked out when they are attached, turn off the check box next to them in the list. When finished adding documents, click OK.
MicroStation's Raster Attachment Settings dialog opens, displaying the full file name and working directory path to the document(s) you are about to attach.
-
Make adjustments as needed to the default attachment settings and click OK.
The selected document(s) display in the Raster Manager dialog.
-
When finished attaching references, close the Raster Manager dialog.
The logical set will be created/updated in ProjectWise when you check in the master document.
To Attach a Point Cloud File to the Open Document
-
Select File > Point Clouds.
MicroStation's Point Clouds dialog opens.
-
In the dialog, select File > Attach.
ProjectWise's Attach Point Cloud Reference File dialog opens.
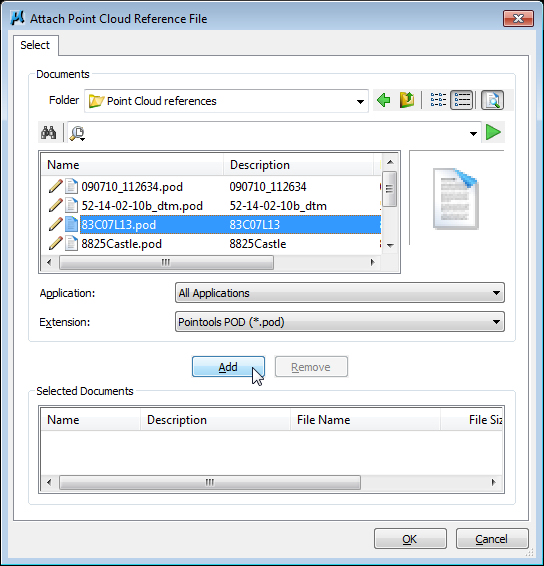
- From the Folder list, select the project or folder containing the document(s) you want to attach.
-
Do one of the following:
In the Document list, select the document(s) to attach and click OK.
or
Select the document(s) to attach. Click Add. Repeat steps 3 and 4 as needed to add documents from other folders. When finished adding documents, click OK.
The documents are copied out and attached.
-
When finished attaching references, close the Point Clouds dialog.
The logical set will be created/updated in ProjectWise when you check in the master document.
To Convert a File to a Point Cloud File and Attach It to the Open Document
-
Select File > Point Clouds.
MicroStation's Point Clouds dialog opens.
-
In the dialog, select File > Attach.
ProjectWise's Attach Point Cloud Reference File dialog opens.
- From the Folder list, select the project or folder containing the document(s) you want to attach.
- Change the Extension filter from Pointools POD (*.pod) to some other file type.
-
Do one of the following:
In the Document list, select the document(s) to attach and click OK.
or
Select the document(s) to attach. Click Add. Repeat steps 3 and 4 as needed to add documents from other folders. When finished adding documents, click OK.
A Convert dialog opens, which lets you set conversion options for the file(s) about to be converted.
- Make the necessary settings changes and click OK.
-
At this point, one of the following dialogs opens to save the newly converted point cloud file to ProjectWise.
Specify new pod file dialog
Fill out the necessary fields in the dialog and click Save to save the newly converted point cloud file to ProjectWise.
Advanced Document Creation Wizard
Click through the wizard and fill out the fields on each page to save the newly converted point cloud file to ProjectWise.
Select a Wizard dialog
Select No Wizard or Advanced Wizard and click OK. No Wizard opens the Specify new pod file dialog, and Advanced Wizard opens the Advanced Document Creation Wizard.
The converted documents are saved to ProjectWise, copied out, and attached to the open document.
-
When finished attaching references, close the Point Clouds dialog.
The logical set will be created/updated in ProjectWise when you check in the master document.
To Verify That the Logical Set Was Created
- Close and check in the open document and return to ProjectWise Explorer.
-
Find the folder containing the master document you just checked in.
The master document now shows the white logical set icon in the lower right corner of the document icon.
-
Select the master document and select .
The set contents window opens, listing the master document and all the documents referenced into it.