Creating a New Work Area Property
You can create new work area properties either during or after creation of the work area type. Once a work area property exists in the datasource, it can be added to any work area type in the datasource.
-
Start by doing one of the following:
Follow steps 1 to 4 of the procedure, To Create a Work Area Type.
or
Right-click an existing work area type and select Add Properties.
-
Then when you get to the Add Property dialog, click
New.
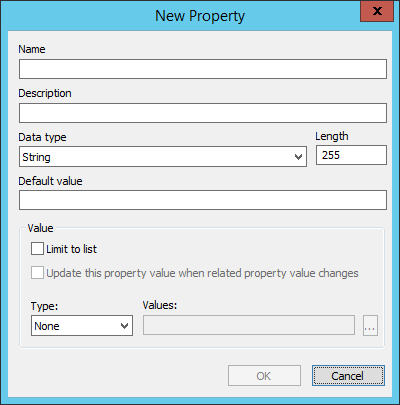
The New Property dialog opens. At a minimum you must enter a name for the property and specify the property's data type. All the other fields are optional.
- Name and Description — Enter a name and optionally a description for the property.
- Data type - The data type can be Long Integer, Double, String, or Date. Depending on the data type you set for a property, your users will only be able to enter up to a certain number of characters for their property value. Long Integer, Double and Date have fixed maximum character lengths (you cannot edit them) of 4, 8, and 25, respectively. String has a default maximum character length of 255, but you can edit this number as necessary. When String is the selected data type, the Length field appears on the dialog.
- (Optional) Default value - In the Default value field you can enter the value you want to display by default for this property. Users can change the default value for this property in their respective work area in ProjectWise Explorer. When you select Date as the Data type, the default value is set to today's date. When you select any of the other data types, the default value is blank.
- (Optional)
Value - If you want users to be able to
select from a list of values for this property, in the
Value section set
Type to either
Pick List or
Select. If you set Type to Pick List, click
the
Format button
(...) to select an existing pick list or
create a new pick list. If you set Type to Select, click the
Format button
(...) to create a SQL SELECT statement that
populates the list of available values for the property using existing
information from the database. When Type is set to Pick List or Select and
Limit to list is off, users will be able to
select a value from the list or enter their own. If
Limit to list is on, users will only be able
to select values from a list. If you do not want to use any lists, set Type to
None.
Tip: For information about creating both types of value lists, see Creating and Assigning Value Lists.
-
When finished, click
OK.
The new property is added to the Add Property dialog.