To Create a Pick List and Assign It to a Property
-
In either the New Property dialog or the Properties dialog for an
existing property, in the
Value section, set
Type to
Pick List and click the
Format button
(...).
The Select Pick List dialog opens. The list displays the existing pick lists available in the datasource, across all work area types. By default, the list is filtered to display only the pick lists for the data type currently set in the original dialog.
-
Click
New.
-
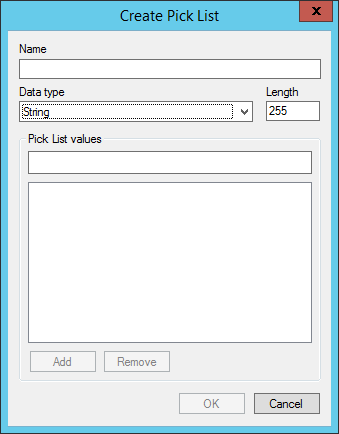
In the
Create Pick List dialog, do the following:
- Name - Enter a name for the pick list.
-
Data type - Specify the pick list's
data type.
(For more information about data types, see Creating a New Work Area Property.)
- Pick List Values - Enter a value in the field and click Add. Repeat this step to add more entries to the pick list.
-
Click
OK.
The pick list is saved and added to the Select Pick List dialog.
-
Select the new pick list in the Select Pick List dialog and click
OK.
The pick list is added to the Pick List field in the original dialog.