ProStructures Help

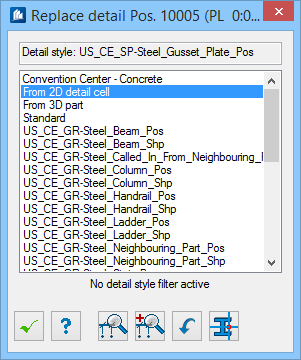
Replace Detail name dialog

Used to allow new detailing of detail Cells directly in the workshop drawing by simple selection. This permits you for example to assign a better detail style to some “unfavorable” details still during insertion.

Accessed from:
  • Dialog: Detail Center > Parts (tab) > Parts view: > Right-click > Replace 2D detail Cell
SettingDescription
display field Displays the currently selected detail style used for replacing.
list The available detail styles for new detailing.

When you have activated the option ‘List of detail styles dependent on Part’ in the global pre-settings of the DetailCenter, only the styles are displayed here which have been classified for the corresponding type.

Edit Detail Style Opens the Detail Style dialog, which is used to edit a detail style. If you select another style in the Detail Style drop-down list, the display in the detail style dialog will be updated as well.
Note: Please note however, that this function actually changes the detail style of the model. If it is still required, you first have to make a copy and use this copy to replace the detail Cell.
Edit new copy of Detail Style Creates a copy of selected detail style, followed by opens the Detail Style dialog, used to define a detail style.
Update Replaces selected detail cell. Processes the currently selected detail style; then it is replaced in the drawing. The detail Cell is replaced with the modifications
Select Selects a new detail Cell for replacing.
OK Closes the dialog and save your changes.
Help Opens online help.

Replace a Detail Cell

To replace a detail Cell you have to open the corresponding 2D-workshop drawing (with the inserted detail Cells) as well as the original 3D-model drawing.

Now select Parts view: > Right-click > Replace 2D detail Cell menu. Then pick any element of the detail Cell you want to replace and the dialog opens.

Now you can modify the current detail style or select another style from the list. Afterwards, you click the (Update) button, and the detail Cell will be automatically replaced.

Further detail Cells to be replaced can be selected directly from the dialog. Since the last selected Cell remains connected, you can assign another style to it if the result didn’t meet your requirements.

Note: When modifying detail style parameters please don’t forget that you change the detail style from the model. Replacing takes place as follows: The selected Cell is detailed anew (this is why the model drawing has to be opened) and then it replaces the former Cell in the drawing.
Note: If you assign a new style as well, this modification will be transferred into the model and the component part will be permanently linked again with the desired style. Therefore, don’t forget to save the model drawing afterwards.