DetailCenter Overview
In general, the DetailCenter is divided into three main work levels. Usually, your building part or component will pass through all three levels until it is visible on the workshop plan in the form of a detail. However, your work in the different levels is limited to only a few mouse clicks, if all the basic settings of detailing are adapted to your requirements.
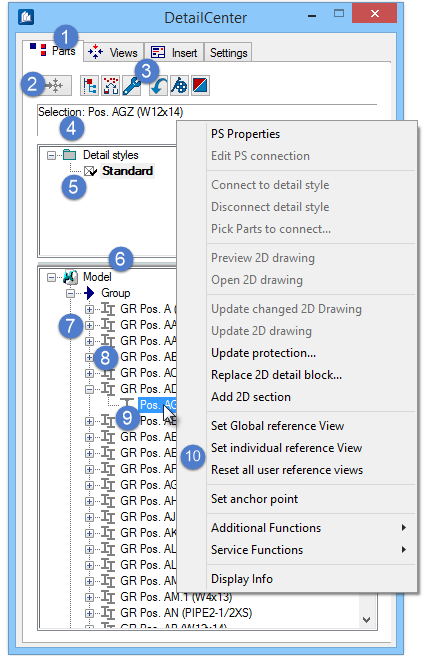
- Working Levels
- Action button
- Tool buttons
- Selection info
- List of Detail Styles
- Splitter bar for resizing
- List of Model Parts
- top level entry
- sub level entry
- Context menu
In general, the DetailCenter is divided into three main work levels. Usually, your building part or component will pass through all three levels until it is visible on the workshop plan in the form of a detail. However, your work in the different levels is limited to only a few mouse clicks, if all the basic settings of detailing are adapted to your requirements.
Level 1: Component Overview (Prepare)
Here you will obtain an overview of the parts of the model and their functional associations and relationships. You can view construction groups, single parts or whole areas of the model – all clearly structured in tree format. This is the place where you can manage and change detail styles and link your components with these styles as well as manage the modification mechanism. In addition, DetailCenter Express! Is started here.
Level 2: Display Views Overview (Detailing)
The second work level offers you an overview of the component or model views created by the program. You can add or remove views, display a preview and fine-tune the detail style.
In this overview you decide what exactly is to be processed as a detail block and start the actual detailing process.
Level 3: Detail Block Overview (Import)
The third and last level features the detailed parts, which are located on your hard drive in the form of detail blocks. You receive an overview of the detail blocks of the current model (or other models) and decide which parts to import or integrate into which drawing.
Placing the parts on a drawing sheet finishes the workshop plan, unless you would like to carry out a few adjustments manually. You can create automatic multiple sheets according to your own rules by means of DetailCenter Composer! which can be started here.
Construction Parts List
Each of the three levels offers access to a window with the settings for the display of construction parts lists using the function button bar.
Here you can specify which components are displayed in which logical sorting in the tree structure of the display. You can set any filter you like and store these settings in their own templates for each work level separately. In addition, a standard display is available for each level, which allows reasonable working already from the beginning.
Work Tools
Each of the three levels offers access to a window with work tools using the function button bar. These tools are assigned to the corresponding area. In order to keep the display area of the construction parts lists as large as possible, many of the infrequently used functions and settings have been delegated to these subordinate dialogs.
Information Window
In addition, the context menu offers access to another dockable information window. All three-work levels are subordinate to this information window, which shows the current status of the selected entry. Depending on the list, this window displays the name and type of the part, data of detailing, insertion location, current status, and much more.
Context Menu
A supplement to every level is a level-specific context menu accessible through the right mouse button, which lists only those functions that are significant to the respective list. You will probably use the context menus quite often because they represent the fastest way to access a command.
Templates
As you already know from the other ProStructures functions, the basic settings of the DetailCenter can be saved as template for each level. The settings of work tools and of construction parts list are stored.
These templates (as reference) may again be stored in a parent template together with the global settings for the DetailCenter. This allows individual configuration of the complete DetailCenter. Later, you only have to load the suitable configuration for the current working process.
Favourites
After defining some of the templates as favourites for the complete DetailCenter, this allows fast selection from the favorite list. This is the most comfortable way if you have to change the setting frequently during one session.
Detail Styles
The detail styles are the cornerstone of the entire detailing process. They describe how a part is to look as a workshop detail or how the model is to appear as an overview. The content of the styles is described in detail in the chapter 'Detailing Styles'. The management and modification of a style is described in detail in the 'Component Overview' section.
A component without detail style cannot be processed and is ignored by the program when it comes to detailing!
Preview
The detailing of a selected part can be previewed from within the views overview or directly from within the model. This will create a small drawing displaying the exact result of the detail style settings applied to this part. The small drawing shows how the part will be detailed. This window and its drawing can be zoomed or queried for information because it is an independent drawing.
Since you can now open this part's detail style, you can track the effects of different style settings in "real time". We call this fine-tuning of the detail style. If you open the preview for another part, you do not have to close this window first. The content is updated automatically. After viewing the detail, the window must be closed manually.
While the preview is open, most of the functions of the DetailCenter are inaccessible.To close DetailCenter dialog(s), use the key in: