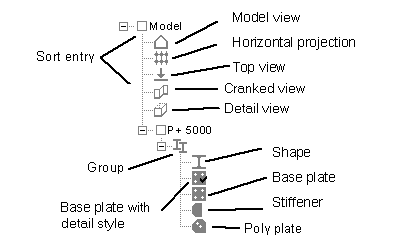
Information About the Component Parts
The meaning of the different entries can be easily differentiated by means of the symbols, because single parts, sheet metal plates, groups, views, etc. have their own typical symbol.
In addition to this, you can open a dockable information window via the entry Display Information in the pull-down menu. This window informs you in detail about all properties of the part selected at that moment.
This call can be found in the other work levels too. The content of this window is always automatically adapted to your current selection.
Multiple Selection and Drag&Drop
Use the <Shift> or <Ctrl> keys to select multiple entries. This is a Windows-specific function, which will not be explained here.
Many operations can also be carried out using drag&drop. For example, by dragging a component list entry on a detail style, you can link the two.
Selection of ProSteel Properties
Via the DetailCenter, the properties of component parts can be directly modified in the model. Select the entry PS Properties in the context menu after having selected the desired list entries. For more detailed information about parts properties, please refer to the corresponding chapters of this manual.
In principle, selection is as if you select the part(s) in the model and then load the properties. In combination with the sorting possibilities of the component parts list, however, it is possible here to modify e.g. only the material of head plates. If you are working with a big model, using the traditional way would be much more complicated.
Don’t forget to update the DetailCenter after a modification was made because the program doesn’t carry out an automatic update deliberately.
Reference to the Model (Search)
The component parts list has a direct reference to the model drawing in both directions, which allows an easy and fast orientation.
On one hand, the components of the entries selected in the list can be displayed in the model. This allows you to see directly which parts belong to a group, to a view, etc. To do this, select the option Display Parts Selection in the Model in the work tools. Now, select an entry in the component parts list and the assigned parts are colorfully checked in the model. Choose the entry 'Model’ to remove the marking.
On the other hand, a part selected in the model can be checked in the component parts list (and selected). To do this, pick the part in the model and select the menu point Search/Selection Single Part via the context menu of the right mouse button. Now, the list scrolls to the position with the assigned entry, the entry is checked and selected. The parent entries such as group list nodes etc. are "opened.
Sorting
Sorting of the component parts list always depends on the work tools settings. The numerical sorting of position within the sorting according to groups, part types, etc. is always carried out in three steps:
At first, sorting is effected according to the main position number. This number again is sorted according to an existing position index. If additional prefixes are available, theses are sorted in the last step. Position numbers, which only consist of letters, are displayed at the beginning in an alphabetical order. If the filter 'Display Each Part only 1x’ is checked, only those positions are assumed to be identical which only differ in their part prefix unless the button 'Don’t Use Position Number Prefix' has been activated.