Reporting Volumes - Dimensions

Reporting Volumes may also be added by using the Place Reporting Volume tool in the Plant toolbox.

After selecting this tool icon you can select either a CAD polygon or a 3D element to seed the dialog's location and dimension values. This includes other PlantWise elements, a Routing Volume, structure floor, or a pipeway/structure column, for example.
Reporting Volumes can be assigned a category. The categories are defined in the Reporting-Categories.lisp data table for the project. Please refer to the MTO-By-Volume-AndCategory report in the Demo-Projects folder for an example of how to report on the category. This report is also in the ...\projects\dpar_master\reports folder of the PlantWise installation.

Both options open the Reporting Volume Selection dialog.

Reporting Volumes are fenced reports that are restricted to the top and bottom elevations of the volume. The CAD Overlap fence mode is used to gather the elements to be reported. As such, if reports are to be generated on floors of a structure and the volumes touch at the top of one volume and bottom of the other volume, the elements that touch the overlapping edge will be included in both volume reports.
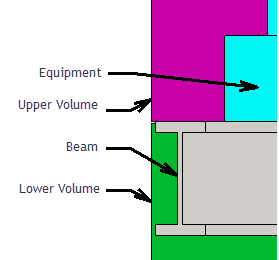
In the example the upper volume is highlighted. Note the very small gap between the top of the lower volume and the bottom of the upper volume. If the Reporting Volumes touched at the bottom of the upper volume, the equipment instance would be included in the report for both volumes.