To Create a 3 Axis Sketch Grid
Create a simple 3 axis grid system with Sketch Grids.
You are in the Sketch Grids mode, and will use tools from the Add/Modify Grid Lines toolbar to draw your grid lines.
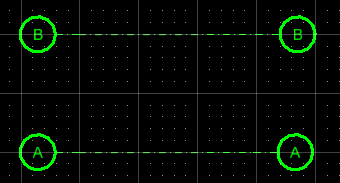
- From the Add/Modify Grid Lines toolbar, select Axis 1 from the Axis Groups drop menu.
-
Keep
A as the label for your grid line.
Axis 1's labeling scheme defaults to A as the starting value.
-
Keep the
Both Labels labeling option.
This draws labels on both ends of the grid line.
-
Select
 (Place
Line tool) and enter 2 data points to define the start and end
points. Draw the line in the X axis using AccuDraw for precision and the view
grid to act as a reference.
(Place
Line tool) and enter 2 data points to define the start and end
points. Draw the line in the X axis using AccuDraw for precision and the view
grid to act as a reference.
- After the second data point, do not reset (right mouse click). This keeps the Place Line tool active.
During placement the grid line is dynamically displayed with the labels attached at each end.
-
Repeat and draw a second grid line above the first one.
The second grid line uses the same Add/Modify Grid Lines toolbar settings as the first except the Label field is automatically incremented to B. After grid line B is placed, the Place Line tool is still active. The Label value is now C in anticipation of the next grid line on axis 1.
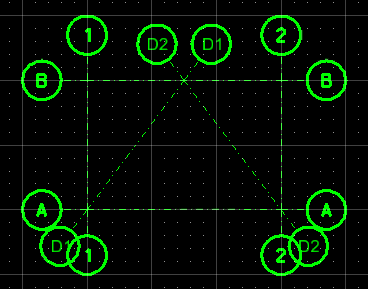
- Select Axis 2 from the Axis Groups drop menu.
-
Keep
1 as the label for your grid line.
Axis 2's labeling scheme defaults to 1 as the starting value.
- The Place Line tool is still active. Enter data points to draw 2 grid lines in the Y axis. Snap to the axis 1 grid line endpoints.
-
Select
Axis 3 from the
Axis Groups drop menu.
Selecting Axis 3 clears the Label field.
- Enter D1 as the new starting label for the third axis.
- The Place Line tool is still active. Enter data points to draw 2 diagonal grid lines. Snap to the axis 1 and 2 grid line keypoints.
-
Select the
 (Finish tool) to save the grid
system.
(Finish tool) to save the grid
system.
The temporary Sketch Grid model and the Add/Modify Grid Lines toolbar close and you are returned to the Grid Systems dialog.