To Place a Curtain Wall
-
Select the
 Curtain Wall tool.
The
Place Curtain Wall
properties panel and the contextual Placement ribbon tab
appear with default settings.
Curtain Wall tool.
The
Place Curtain Wall
properties panel and the contextual Placement ribbon tab
appear with default settings.
- Set the Place By option and the justification and offsets for the curtain wall in the Placement options of the Placement ribbon tab. Similarly, set the types for curtain wall, frame, and panel and associated properties in the Properties panel.
- Define the data points; first and end points for a Line type, center or edge for Arc types, or select existing element for from Element/Shape place by type. Continue to place additional curtain walls, as series of windows or Reset to stop.
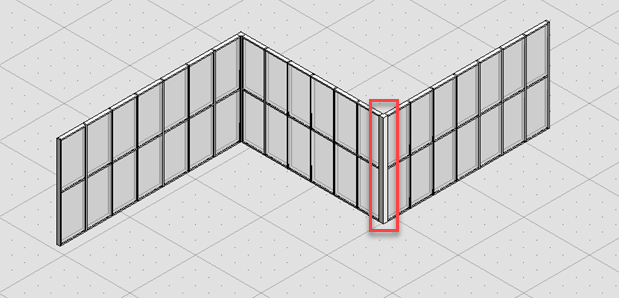
Multi-Segment curtain walls
When placing curtain wall more than one segment can be placed by giving start point and continuing data points to place next segments. Each segment will have same height and mullion spacing. A parametric corner mullion is added at each corner. To do this, follow the steps below:
- Select the Curtain Wall tool
- Set the Place By option to Line or From Element
- Define the data points; first and end points for a Line type, draw as many segments as you want Or select existing multi-segment line element and give datapoint.
- Reset to stop.
Multi-segment curtain wall get placed and a parametric corner mullion is added at each corner.
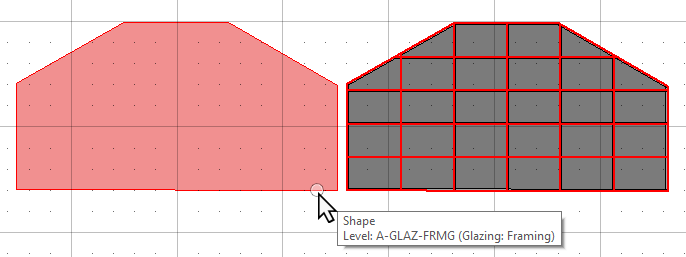
The curtain wall tool allow you to define a non-rectangular curtain wall by drawings its outline of a planar shape in elevation view and add operable panels, such as doors and louvers, to your curtain wall. Meaning, you can place a curtain wall other than default rectangular shapes. To do this, follow the steps below:
- Draw a desired shape using the Place Shape tool in your drawing that needs to be filled as a curtain wall.
- Set the Place By option to From Shape.
- In response to identify element, select the shape in the view.
- Accept the data point.
The curtain wall overlays to the selected shape.
The shape outline remains if you had deselect Delete Path option.