Crosshatch Area
 Used to crosshatch an area. Elements used to define the area to be crosshatched can be in the active model, or in references. Where associative patterning is used, any modification to elements defining the crosshatched area results in an equivalent update to the crosshatching.
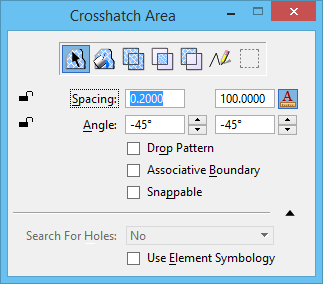
The tool settings and procedures are the same as those for the Hatch Area tool, except that there are additional fields to specify the Spacing and Angle of the crosshatch lines, in addition to those for the hatch lines. Icons in the tool settings let you select the method for defining the area to be crosshatched.
| Setting | Description | ||||||||||||
|---|---|---|---|---|---|---|---|---|---|---|---|---|---|
| Element icon | The interior of a shape, ellipse, or closed B-spline curve; or between components of a multi-line. | ||||||||||||
| Flood icon | The (minimum) area enclosed by a set of elements (something like the flood fill tool common in painting programs). With method set to Flood, a Show Extended Information icon appears in the lower right corner of the tool settings window. Clicking this icon expands the tool settings to display further controls. | ||||||||||||
| Union icon |
Edges bound the union of two or more closed, planar elements.
Where more than two elements are involved, use <Ctrl+data point> to select the extra elements. |
||||||||||||
| Intersection icon |
Edges bound the intersection of two or more closed, planar
elements.
Where more than two elements are involved, use <Ctrl+data point> to select the extra elements. |
||||||||||||
| Difference icon |
Edges bound the difference of two or more closed, planar
elements.
Where more than two elements are involved, use <Ctrl+data point> to select the extra elements. |
||||||||||||
| Points icon | An area defined by a series of data points, each of which defines a vertex. | ||||||||||||
| Fence icon | The area inside the fence. | ||||||||||||
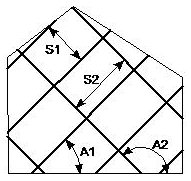
| Spacing | Sets the interval between the rows and the columns of the cross-hatching. | ||||||||||||
| Annotation Scale Lock icon |
Sets the Annotation Scale
Lock. When this lock is on, the annotation scale is applied to the crosshatch. By default, the annotation scale is taken from the model's Annotation Scale setting. You can change it only in the model's properties in the Properties dialog. The exception is when the model's Propagate Annotation Scale property is off. In that case, the annotation scale can be controlled independently for each element via its properties. |
||||||||||||
| Angle | The angle at which instances of the crosshatch are placed. By default, the angle is relative to the view being used. Where AccuDraw is active, however, the angle is relative to the AccuDraw drawing plane. | ||||||||||||
| Drop Pattern | If on, crosshatching is not associated with the crosshatched geometry. Static pattern class elements are created and put into a graphic group. If you modify the crosshatched element, the crosshatching does not change. The default is off. | ||||||||||||
| Associative Boundary | (Available only when Drop
Pattern is off) If on, creates an independent "Associative Region" element that is associated to the crosshatched element. Depending on
the status of the Drop Pattern and Associative Boundary setting, you get
following outputs:
|
||||||||||||
| Snappable | If on, crosshatched cells can be snapped to. If off, crosshatched cells do not interfere with snapping to other elements. | ||||||||||||
| Ignore Interior Shapes icon | (Flood icon selected only) If selected, interior shapes are ignored when the region boundary is calculated. | ||||||||||||
| Locate Interior Shapes icon | (Flood icon selected only) If on, all closed elements (regardless of their Area attributes) inside the selected area are avoided when the area is crosshatched. | ||||||||||||
| Identify Alternating Interior Shapes icon | (Flood icon selected only) If selected, alternating areas are crosshatched where shapes are nested inside one another. | ||||||||||||
| Locate Interior Text icon | (Flood icon selected only) If on, any text or dimension text inside or overlapping the selected area is avoided when the area is crosshatched. | ||||||||||||
| Dynamic Area Locate icon | (Flood icon selected only) If on, the area to be crosshatched displays dynamically as you move the screen pointer over the shapes. | ||||||||||||
| Maximum Gap | (Flood icon selected only) The maximum distance, in working units, between the endpoints of enclosing elements. | ||||||||||||
| Text Margin | (Flood icon selected only) Sets the size of the margin between hatching lines and existing text elements in the area to crosshatch. | ||||||||||||
| Search For Holes | When creating a non-associative pattern, you can ignore hole elements or search for hole elements on the same level as the element to crosshatch, or on all levels displayed in the view. | ||||||||||||
| Use Element Symbology | If on, crosshatching is created using the active color, line weight, and line style of the element being patterned. | ||||||||||||
| Fill Type | (Points method only) Sets the active fill type for the closed shape defined by the points — None (no fill), Opaque (filled with the active color), or Outlined. | ||||||||||||
| Fill Color | (Points method only) Sets the color and optional gradient with which the elements are filled. |


