Luxology Render Dialog
Used to add or modify Luxology rendering settings and to preview the rendering.

The Luxology Render application is modeless and coexists with the standard application view windows. Since the Luxology rendering process is multi-threaded, which means that once the preprocessing stage of a rendering is completed, you can continue to work while the rendering process is in progress.
When the configuration variable MS_LUXOLOGY_TMP is set to a valid directory, all temporary files needed for the rendering and storage of Luxology images are placed in the location specified by this variable. Since this can be a large amount of data, it is best to use a local drive for optimum performance.
| Setting | Description |
|---|---|
| Render | Starts the luxology rendering process to render a new solution of a selected view or, if a fence is present in the view, the fence contents. |
| Cancel Render | (Enabled only when a rendering is in progress) Aborts the current luxology rendering. |
| Redisplay Solution | Where the only change to a rendered scene is the camera view, lets you reuse the current solution. This greatly speeds up the rendering time. |
| Fast Preview | Gives a fast preview of the rendering as per the settings in Preview section of Preferences Dialog, Render Category. |
| Progressive Render | Refines the rendering or a selected area for refinement as per the Refinement Limit, Save Frequency, and Redisplay Existing Solution settings found in Preferences Dialog, Render Category. |
| Distributed Rendering | Creates a distributed rendering job that renders a new solution of a selected view or, if a fence is present in the view, the fence contents. |
| Open the light setup dialog | Opens the Light Manager dialog which is used to control light setups and the settings for both global and source lighting. |
| Select a light setup to render with | Opens a drop-down menu from which you can select and set the current lighting setup from the previously saved setups. |
| Open the environment setup dialog | Opens the Environment Manager dialog which contains controls for environmental settings for Luxology rendering, as well as controls the visibility of these environment settings. |
| Select an environment setup to render with | You can select predefined setups, from the drop-down menu, stored in the file LuxologyRender.dgnlib in the ..\Default\Dgnlib\Render folder in MicroStation's program directory. |
| Open the render setup dialog | Opens the Render Setup Manager dialog which is used to create custom rendering setups for use with Luxology. |
| Select a render setup to render with | You can select predefined setups, from the drop-down menu, stored in the file LuxologyRender.dgnlib in the ..\Default\Dgnlib\Render folder in MicroStation's program directory. |
| Reset Pop-up Menu to select Tone Mapping Mode | Lets you select the tone mapping modes and settings:
As long as an image is displayed in the Luxology Render dialog, the tone mapping modes synchronize with each other. |
| Brightness | (Tone Mapping Mode set to Brightness Adaptation, Brightness Multiplier) Controls the brightness for the rendering, in combination with the Brightness Adaptation/Brightness Multiplier toggle. You can type values directly, or use the slider. The allowable range depends on the selected mode: |
| Contrast | (Tone Mapping Mode set to Brightness Adaptation, Brightness Multiplier, Reinhard) Controls the overall image contrast for the rendering. You can type values directly, or use the slider. When set to Brightness Adaptation or Brightness Multiplier, the allowable contrast range is -2 to 2. When set to Reinhard, the allowable range is 0.3 to 1.0. If set to 0, the contrast is calculated automatically. |
| Exposure | (Tone Mapping Mode set to Drago) Exposure value field and slider allows you to adjust the brightness of the output image to your displaying conditions, in the range of [-8, 8]. The default value (0) means that no correction is applied. Higher values make the image lighter whereas lower values make the image darker. |
| Intensity | (Tone Mapping Mode set to Reinhard) The Intensity value and slider, in the range [-8, 8], controls the overall image intensity. The default value 0 means no correction. Higher values make the image lighter whereas lower values make the image darker. |
| View | Sets the view you want to render with Luxology. |
| Render Image Size | Controls the size of the rendering. If locked, X and Y will be constrained to a fixed aspect ratio. |
| Reset Pop-up Menu on Preview Window | |
| Previous Luxology Render | (Enabled only when a previous rendered image is available) Clicking the icon lets you view the previously rendered image. Clicking the down-arrow opens a drop-down menu from which you may select any previous history image to view. You can use the Preferences Dialog, Render Category to set the number of history images stored (default 100). |
| Next Luxology Render | (Enabled only when a latter rendered image is available) Clicking the icon lets you view the next rendered image. Clicking the down-arrow opens a drop-down menu from which you may select any latter history image to view. You can use the Preferences Dialog, Render Category to set the number of history images stored (default 100). |
| Render Output Display | Depending on your render settings, you can choose to display different render outputs. The Alpha render output option is available in the display drop-down even if Alpha or Color & Alpha is not selected in the Render Output setting. However, in such cases, when you select Alpha from the display drop-down, you will see a full opaque alpha image in the preview window. Note: The brightness levels can differ greatly between numerous render output types. You may adjust the brightness, contrast, and gamma levels for each output individually and these are stored in the BIMG file. If you want to use the Save All Image Layers to File tool, you should make all the brightness, contrast, and gamma adjustments for each layer prior to saving.
|
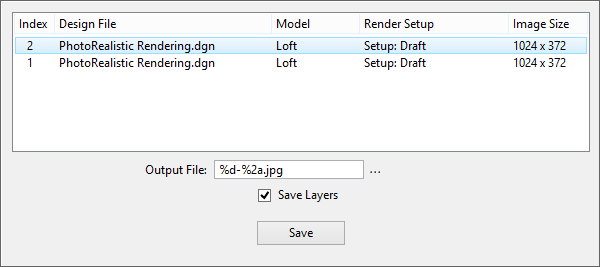
| Save Image To File |
Opens the Create Luxology File dialog, which lets you save the current Luxology rendering to an image file. Controls on this dialog are identical to those on the Save As dialog. The standard image formats are available as well as "Radiance High Dynamic Range" (HDR). The HDR format stores high-definition imagery that you can post process in other applications. If you have rendered a scene using the Piranesi Rendering Setup, you can save it as a Piranesi .epx file. Antialiasing should remain off (default) in this setting. Enabling antialiasing will produce undesirable artifacts. Clicking the down arrow allows you to select a file or multiple files to save in the required image format. The files that make up the list will depend on where you are in history. For instance, if you have 100 images in your history folder and you are currently on the 50th image, then you will only see the first 50 images. To see all 100 images use the right arrow to move to last image, then click the save image down arrow to see the entire list. Right-clicking in the Output File field presents the following options:
Save Layers — Automatically saves multiple output channels (layers). Prior to using this option you should adjust the brightness, contrast, and gamma for each layer to acceptable values. This tool works similar to the Save Image to File tool, except the output type names are automatically appended to file name. |
| Save Displayed Image to History | (Only available when rendering with progressive refinement) While progressive refinement rendering is running, you can click this icon to push the Bentley Image floating point (BIMG) to the Luxology history folder where it can be tone mapped and saved to a RGB image, such as TIFF, BMP, JPEG. |
| Select Area to Render Progressively | (Only available when rendering with progressive refinement) When on, click and drag in the image to select an area to focus progressive rendering on. |
| More image settings |
|
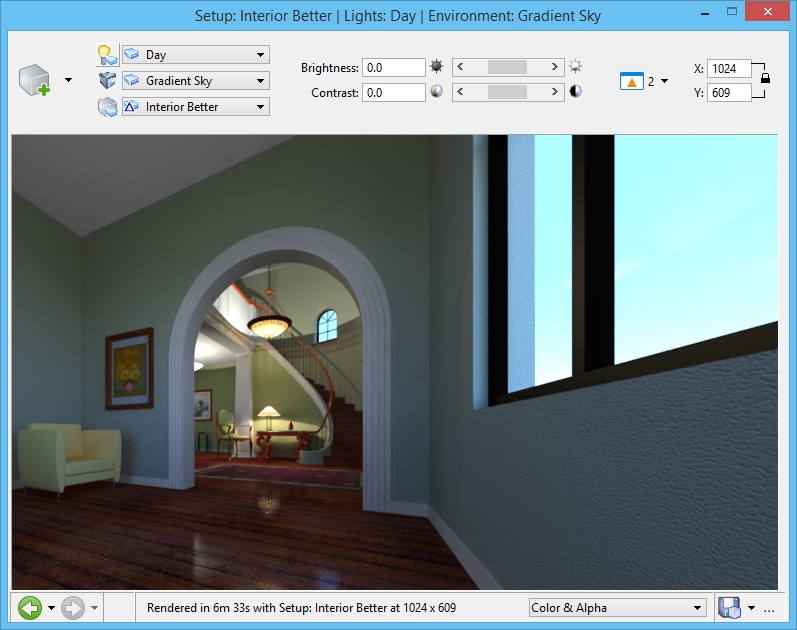
| Preview Window | Displays the Luxology rendering. |