Modifying Solids and Features
When modifying solids, interactively, you can modify, move, or copy features forming the solid, or the profiles used to create a feature.
Take, for example, the following solid, which consists of a slab with a simple "through" hole and a cut. The cut was made using the rectangle (shown dashed) as a profile.

Using the Element Selection tool to select the slab feature part of the solid displays the handles for modifying or moving the slab feature.

After selecting the slab feature, the moving/copying handle displays at the center of the slab along with handles for modifying the feature.
For a feature, such as a slab, handles appear in each corner of the (original) slab, as well as a "moving/copying" handle at the center of it. Dragging any of the handles modifies/moves the slab.

In a similar fashion, you can select a profile used to create a solid or a cut and modify it by its handles, which automatically regenerates the solid. In this example model, the corner cutout was created with a rectangular profile. To modify this, you first select an edge of the cutout area, which will display the original profile along with handles for modifying it.

Selecting an edge of the cutout region displays the profile used to create it, along with handles to move or modify it.
You can use the handles in each corner to modify the shape of the profile, or the fifth handle in the center of the profile to move/copy the cutout. To move a feature, you can click and drag the move handle. You can toggle between move and copy modes by pressing the <Alt> key. A plus sign appears at the selected handle when in copy mode.
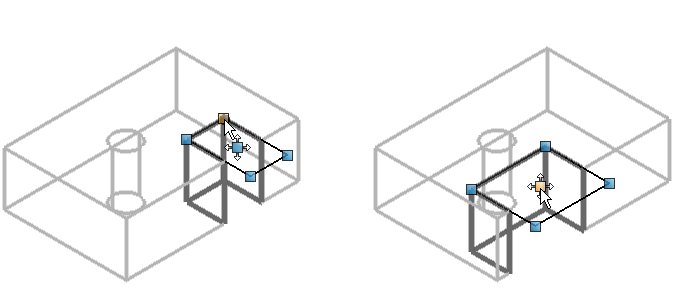
Left: Click and drag a corner handle to change the shape of the cutout. | Right: Click and drag the center handle to move the cutout region. To create a copy of the feature, press the <Alt> key to toggle to copy mode.
With a hole feature, you can use a similar procedure to change its radius, or to change its location. First you use the Element Selection tool to select the feature.

Using the handle on the edge, you can modify the radius, while the center handle can be used to move/copy the hole in the solid.

Left: Click and drag the edge handle to modify the radius of the hole. | Right: Click and drag the center handle to move the hole. To create a copy of the feature, press the <Alt> key to toggle to copy mode.
When you modify a solid/feature interactively, you can select multiple handles to modify simultaneously. This is particularly useful with more complex solids, or those with multiple edges/faces that you want to manipulate together. To select multiple handles, use <ctrl+data point> on each required handle so that it is highlighted. To modify all the selected handles simultaneously, click and drag any of the highlighted handles.
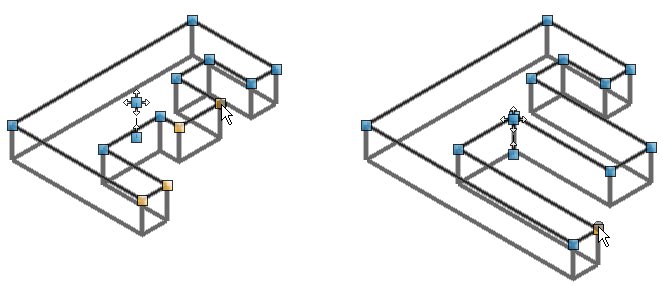
Left: Select handles required to be modified. | Right: Select a highlighted handle and drag to the new location.
In a solid that contains a cut created with a simple shape, having no parametric dimensions, for example, the cut still could be modified graphically.