Understanding the Map Interface
You can display and locate many different types of AssetWise objects on a geographical map. Objects can be arranged on layers, and turned on or off, depending on what information you want to view. You can also determine which objects can be selected, and to what degree of transparency.
For example, you can view road network assets such as bridges and culverts, street nodes, tunnels, and speed limits, each on their own map layer.
Navigating the Map
The AssetWise CONNECT Edition mapping feature has multiple tools to assist you in navigating the map.
| Tool | Icon | Purpose |
|---|---|---|

|
Navigation arrows | Select an arrow to step backward or forward to the last or previous map zoom. |
| Enable snapping | When selected, vertices of asset locations can be connected by adhering to a grid. | |

|
Zoom in | Select this icon to increase map magnification. |

|
Zoom out | Select this icon to decrease map magnification. |

|
Zoom to extent | When selected, you can drag over an area of the map to increase the magnification. |

|
Zoom to default extent | When selected, the map zoom resets to its default magnification. |

|
Home | When selected, the map reverts to its saved magnification and position. |

|
Pan | When selected, the cursor
changes into a hand icon ( ), and you can position it onto
the map and drag it to move the map view in the direction of your choosing. ), and you can position it onto
the map and drag it to move the map view in the direction of your choosing.
|
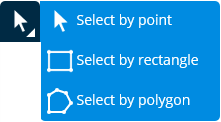
| Select | When selected, you must choose
one of the following:
For more information, see Selecting Assets on a Map |
|

|
Clear | When selected, the current action is canceled. |
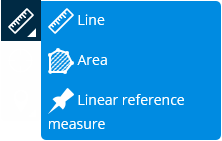
| Measurement | When selected, you must choose
one of the following:
|
|

|
Center | When selected, a dialog
appears, allowing you to enter an exact location based on coordinate system to
which the map will be centered.
|
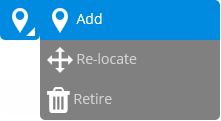
| Off network geometry | When selected, you can choose
one of the following:
Add - Select to add an asset by clicking on a location on the map. This is the default option. See Creating Asset Locations Using the Map. Relocate - Select to relocate an asset on the map. See Adjusting Asset Locations on a Map. Retire - Select to assign a date to retire the selected asset. See Retiring an Asset Location. |
|

|
Layers and legend | Invokes the Map Layers dialog
in which you can select layers to view from the Catalog, view the current
active layers on the map, and set the transparency of background objects on the
map.
|

|
Save view | Saves the current view (magnification and position) as the Home view. |

|
Invokes the Print Options dialog. You can select the paper size, resolution, scale of the printed map, as well as include a Title and Description to be printed with the map. The map is sent to your default printer. |