To apply a distributed moment on a member
To assign a uniform moment along a member or part of a member, use the following procedure.
- Select the members that will all have the same distributed load applied.
-
On the
Member ribbon tab, select the
Distributed Moment tool in the
Loads group.

The Add Member Distributed Moment dialog opens. - Select the Load group or case to which the load will be added from the drop-down list.
- Select the Moment type fro the drop-down list.
- Select the Direction in which the load acts from the drop-down list.
-
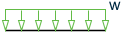
Enter the load values and distances per the Moment type selection:
- Type the moment magnitude.
- (Optional) For Partial or Ends moment types, set the As a percentage option to enter load distances as a fraction of the member length.
-
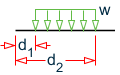
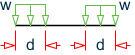
For Partial or Ends moment types, type the distance to the
loaded portion of the member:
For… Type the… Partial Initial distance – distance from the start node to the start of the uniform moment. Ends Distance from end – distance from the start and end nodes of the loaded portion of the member. - For Partial moment type, type the Final distance. This is the distance from the start node to the end of the uniform moment.
- Click OK. The dialog closes and the load is applied to the selected members.