Defining Loads
You will now define and apply the gravity loads for which the floor's gravity system will be designed. Loads must first be defined and then applied to the model.
The applied loads on a typical floor consist of surface loads, including tapered snow loads, and line loads. The gravity loads will be defined in the Load Properties dialog boxes. There are separate dialog boxes for defining surface loads, line loads, point loads and snow loads. To define the Surface Loads:
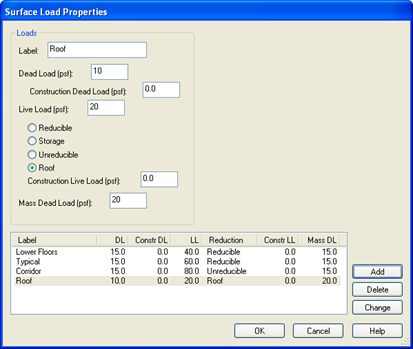
- Select .
- Type Lower Floors for Label.
- Type 15 (0.75) for Dead Load.
These are only the superimposed dead loads on the slab. The weight of the beams, and slab are already accounted for in the self weight.
- Type 40 (2) for Live Load.
- Set the Live Load Type to Reducible.
- Leave the Construction Dead Load and Construction live loads at zero. These are only used in composite steel beam design and they are only required when there are construction loads greater than the self weight.
- Type 15 (0.75) for Mass Dead Load. Mass Dead Load data is required in order to generate mass properties for lateral analysis. If you have not selected the masses in the self weight criteria (RAM Manager) enter 85 (4).
- Click [Add].
- Change the Label to Typical.
- Change the Live Load to 60 (3).
- Change the Mass Dead Load to 55 if the Mass self weight was not included.
- Click [Add].
- Change the Label to Corridor
- Change the Live load to 80 (4)
- Change the type of load to Unreducible.
- Click [Add].
- Change the Label to Roof
- Change the Dead Load to 10 (0.5)
- Change the Live Load to 20 (1)
- Change the type of load to Roof.
- Change the Mass DL to 10 (0.5) or 25(1.25) (no mass included).
- Click [Add].
- Click [OK].
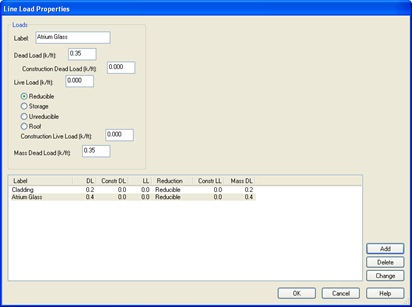
To define the Line Loads:
- Select . The Line Load Properties dialog box should appear:
- Type Cladding for Label.
- Type 0.2 (3) for Dead Load.
- Type 0.2 (3) for Mass Dead Load.
- Click [Add].
- Change the Label to Atrium Glass.
- Change Dead Load and Mass Dead Load to 0.4 (6).
- Click [Add].
- Click [OK].
To define Snow Loads:
- Select .
- Type Flat Roof for the Label.
- Set the Type to Constant.
- Enter 30 (1.5) for the Snow Load magnitude.
- Click [Add].
- Change the Label to Drift Roof
- Change the Type to Drift
- Enter the three magnitudes 45, 45 and 30 (2, 2, 1.5).
When you layout the loads you can choose which corner of the load should be associated with the values entered here. The snow loads you apply may have more than 3 corners, but only three are required to define the load plane.
- Click [Add] and click [OK].
