Defining Virtual Load Cases
To define the virtual load cases for analyzing roof drift:
- Select .
- Select . The Load Cases dialog box will open.
- Type VX in the Label edit box.
- Click the Virtual Work option button.
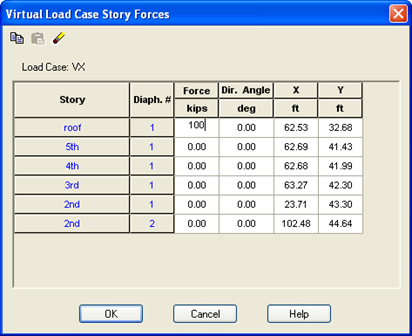
- Click [Add] and the Virtual Load Case Story Forces dialog box will open.
- For the Roof Level Type 100 in the Force column (100 can also be used for SI models).
- Leave the Dir. Angle set to 0.
- Leave the X and Y coordinates at the default. This represents the calculated center of mass for the respective level.
- Leave the forces for the other floors set to 0.
- Click [OK].
This returns you to the Load Cases dialog box.
- Type VY in the Label edit box.
- Click the Virtual Work option button.
- Click [Add].
- For the Roof Level Type 100 (100) in the Force column.
- Type 90 for Dir. Angle.
- Click [OK].
- Click [OK] to dismiss the Load Cases dialog box.
Next, you need to analyze the new virtual load cases: