Defining Load Pairs
In Order to pair the virtual loads with real load cases and perform the Drift Control Analysis, you must now enter the Drift Control Mode of RAM Frame:
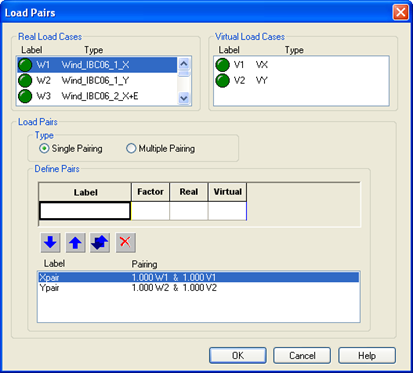
In the center portion of the box under Define Pairs:
- Type X Pair for Label.
- Type 1.0 for Factor.
- Type or select W1 for Real column.
- Type or select V1 for the Virtual column.
- Click the Blue Down Arrow to establish the pair.
- Type Y Pair for Label.
- Type 1.0 for Factor.
- Type W2 for Real.
- Type V2 for Virtual.
- Click the Blue Down Arrow to establish the pair.
- Click [OK].
This takes you back to the graphics screen. To analyze the load pairs:
The screen should now display a color coded image of the structure. Members shown in warm colors (i.e. red, orange, yellow…) are participating more in the resistance of the roof drift based on the current load pair (X Pair) and the current evaluation method (Total Displacement). In this case, you can see the beams of the north moment frame do the most work, indicated by their color.

To review the results for the other load pair:
- Click the center drop-down list in the toolbar that indicates the current load pair. Select Y Pair from this list. The screen should be updated to reflect the results of Y direction loads.
Another way of reporting participation is to divide a member's participation by its own volume. In this way you can see where increasing a member provides the most benefit.
To review the results as Total Displacement/Volume:
A dramatic change should occur in the screen output. The walls that were red or yellow are now blue. This happens because while that member does a lot to resist drift in the Y direction (even at the roof), it is also has a much larger volume than the steel members. Now the lower level braces the frames should be the highest participating members by volume.
There are several other features in the Drift Control Module as described in the Drift Control portion of the RAM Frame manual. Examine some of those options now.
To review an individual member to evaluate its participation:
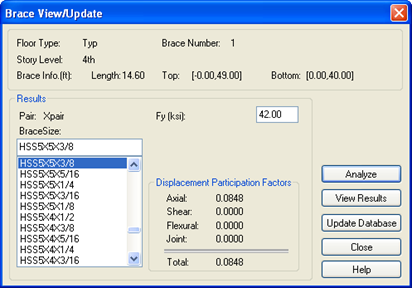
The Brace View/Update dialog box should appear. In the center of the box you can see the participation of that beam due to the current load pair.
As in the other modes, you can investigate other member sizes by selecting them from the list and clicking analyze.
- Select another brace size from the list.
- Click [Analyze].
- The participation values will change slightly.
- Click [Update Database] if you want to make the change official.
- Click [Close] to dismiss the View/Update dialog box.
The fact that one or more members are drawn red is only an indication that those members are working the hardest on a relative scale. It does not mean that they are failing in any way. An optimized structure in terms of drift is one where the majority of the members are all performing equally. If a model has a few red members and the rest are blue, that is an indication that the red members are overworked while the rest of your framing isn't helping that much with respect to drift control.
As with any Update Database command, the analysis results considered when recalculating the participation factors are from the previous analysis run, and those results are invalidated by any modification to the stiffness matrix. Another analysis run should be performed before the Drift Control results are accepted.
To rerun the analysis and review the new sizes:
- Select .
- Select .
- When the Analyze dialog box opens, make sure that all of load cases are selected and Click [OK].
- Select .
- Select .
The participation factors should be shown on screen. The colors may be a little different than they appeared before.