Member Code Check - Seismic Provisions
To check the member design against the special seismic provisions, you will follow the same steps as for standard provisions: To start the code check:
A progress bar will keep you informed of the progress of the code check. When the code check is complete, the lateral system of the model will appear color coded to indicate the design status of the members.
The View/Update command can be used to interactively modify individual member sizes to improve the design.
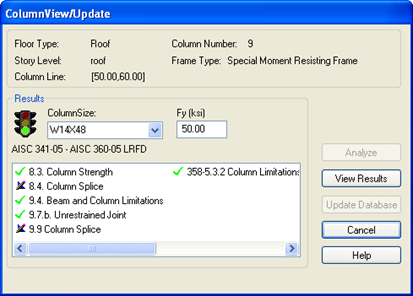
The Column View/Update dialog box should appear. In the lower box is a list of the various design provisions and an indication of which checks the member has passed, or failed. The signal light in the box will be lit red to indicate the member has failed one of these provisions.
The Seismic Provisions Member Code Check Report should come up. Review the report. For more information on the designs performed in this check refer to the technical portion of the RAM Frame - Special Seismic Provisions documentation.
- Click
 to exit the report.
 - Select the W14x43 section from the Column Size list box.
- Click [Analyze]. The design checks and signal light will be updated to reflect the results of the analysis.
- Click [Cancel] to revert to the original size.