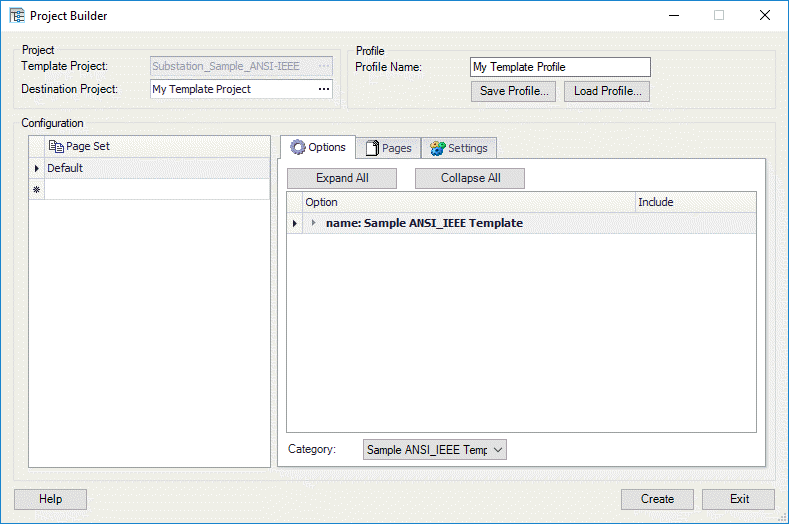
Project Builder
The Project Builder is a Promis.e plug-in that lets the user create complete or partial projects automatically by selecting options that are defined and stored in a template project.
Accessed from:
The software consists of two separate programs - the Template Manager and the Project Builder. Using the Template Manager, a template project is created that contains all portions of the schematic that are common to any variations of the project. Options are created that specify which macros are to be placed in the template project and on what pages. Options can also be defined as mutually exclusive. This eliminates the possibility of users trying to select options that cannot co-exist in the same project. The Project Builder portion of the software provides an easy interface for users having a good knowledge of the options and how they relate to building the machine, but minimal knowledge of, or time for, the drafting process.
| Setting | Description |
|---|---|
| Template Project | Select the desired template project. |
| Destination Project | Enter the name of a project that will receive the newly generated pages. You can select an existing project using the Browse button or enter the name of a new project that will be created automatically. |
| Profile Name | You can save your selected options, page sets and
settings for future work sessions as a profile. Saving profiles is useful when
certain combinations of options are required frequently. To save a profile,
press the
Save Profile button to display the
Save Project Builder Profile dialog.
Enter a filename for the profile in the File name field. The folder will default to the folder for the currently selected template project, but you can browse to a different folder if you prefer to do so. Select the Save button to save the profile in the selected folder. The file will be given a .pro extension. To load a profile, press the Load Profile button to display the Load Project Builder Profile dialog. Browse to the desired profile (.pro extension), select it, and select the Open button. The option selections and page sets saved in the profile will be displayed in the Project Builder. |
| Page Set |
You can create page sets in the Project Builder. A page set is a set of options producing a set of output pages. By having more than one page set you can: Initially, a single page set named Default will be listed in the Page Set column. You can change the name of this page set by clicking inside the Default page set name field and typing a new name. To create a new page set, click in the blank page set name field that appears at the bottom of the list of page sets. Then type the name of the new page set. Press the <Enter> key to enter the new page set name. |
| Options Tab |
The options you created in the Template Manager will appear in the Option tab. If you grouped the options into categories, you can expand the category to see the options inside by clicking on the + icon beside the category name. You can filter the listed options by selecting a category name in the Category field. Only the options in the selected category will then be shown. Depending on the exclusions you specified in your template, some options may disappear when you select another option that excludes those options. When you select an option that had a page deletion associated with it in the template, that page will not be displayed in the Pages tab of the Project Builder. To include an option in the destination project, select the check box in the Include column for that option. |
| Pages Tab |
Once you have selected the desired options, you can select the Pages tab to see the pages that will be generated in the destination project by the selected options. There are three columns in the pages tab view:
The values in the Destination Pages column default to the same values in the Template Pages column, however you can change the destination values so that different names for installations, page numbers, etc., are used in the destination project. |
| Settings Tab |
The Settings tab enables you to make settings that affect the output.
|

Completing the New Project
The completeness of the project is dependent on how complete the template project and macros were.
If part numbers, device IDs and wire numbers were included in the macros, they will be carried into the project along with symbol text and wire information such as gauge and color. Depending on the level of standardization of your project, you may modify or complete some of this information after the project is built. The user may also use all of the normal global project importing and editing techniques used in Promis.e such as:
Duplicating IDs and Wire Numbers
Creating projects with duplicate device IDs or wire numbers can be avoided if the user is careful when creating macros and combining macros into options. If an ID conflict occurs when a macro is placed, several possibilities can take place. If a general symbol duplicated, the device ID will be duplicated. For example: If PB120 already exists in a project when a macro with the same ID is added, there will be two symbols with the PB120 ID.
If a symbol belonging to a device family is duplicated, the new symbol will be appended to the existing family.
Wire numbers in a macro that duplicate an existing wire number in the project will result in duplicate wire numbers. Duplicate wire numbers can be detected by running the Review/Revise > Validate > Engineering Design Considerations function.
Although these types of situations will result in a project that will require manual editing to complete, it does allow the creation of partially complete projects. The drawing labor is not eliminated but it is greatly reduced.