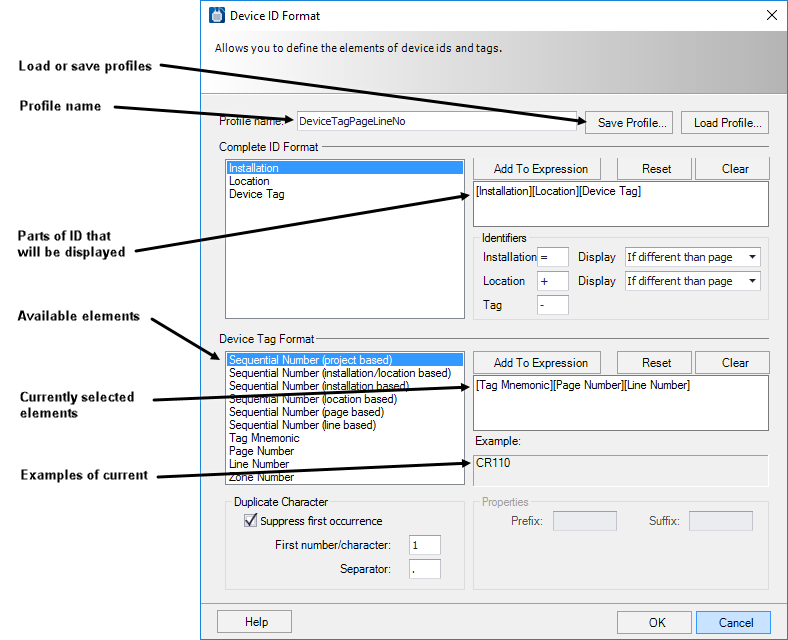
| Profile Name
|
Displays the name of the current device ID profile.
The profile is a saved device ID format. You can create new profiles, save them
and reload them as your project needs require.
|
| Save Profile
|
Save changes to the current profile. If desired, you
can change the entry in the Profile Name field and save the changed profile
under a different name.
Note: When you use
this option to save the changes to the device ID format, it saves the changes
for all future projects using the profile. If you click
OK (without saving) the changes will only
apply to the current project.
|
| Load Profile
|
Click to load a previously saved profile.
|
| Complete ID Format
|
This area of the dialog allows the user to define
the elements of the complete device ID for symbols in a drawing. The list area
displays the available elements in a complete device ID: Installation,
Location, and Device Tag.
-
Add to Expression: Click this button to add one of these elements to the
device ID. It will then appear on the right side of the dialog.
-
Clear: Click this button to empty the
field of all selected elements.
-
Reset: Click this button to reload
the combination of variables that you had when you entered the dialog.
To remove an element from the device ID, select it, then
either press the
<Delete> key or right click on the
element and select
Delete from the menu.
The Identifiers area of the
dialog allows you to define the characters that separate the device ID elements
when displayed in a drawing or report. The default is = for installations, +
for locations, and - for the device tag.
The
Display fields allow you to select whether
installation and location names will be displayed in device IDs always or only
when the installation or location is different from that of the current drawing
page.
|
| Device Tag Format
|
Use the
Device Tag Format area of the dialog to
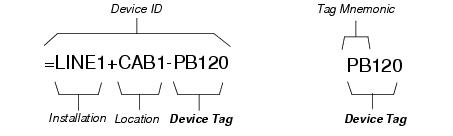
configure the device tag. The device tag is that part of the device ID that
does not include the installation and location (see the following figure). The
device tag consists of a tag mnemonic that is applied to every symbol of a
given type (such as
K or
CR for a relay) and items that are
assigned by the software individually for each instance of a symbol (such as
page/line numbers and sequential numbers). The tag mnemonic is defined when a
symbol is created.
Device Tag Elements: On
the left side of the dialog is a list of available elements that can be added
to the device tag. To add an element, select it, and then click the Add to
Expression button. It will then be shown on the right side of the dialog as
part of the device tag. The following elements are available:
-
Sequential Number [project based] - A
number incrementing from 1. Numbering is unique across the entire project.
-
Sequential Number [installation/location
based]
- A number incrementing from 1. Numbering is unique
within each installation/location.
-
Sequential Number [installation
based] - A number incrementing from 1. Numbering is unique within each
installation.
-
Sequential Number [location based] - A number incrementing from 1.
Numbering is unique within each location name. If you have two locations with
the same name in different installations, the numbering will extend across both
locations. Use installation/location based numbering if you want locations with
the same name to be numbered separately.
-
Sequential Number [page based] - A
number incrementing from 1. Numbering is unique within the same page.
-
Sequential Number [line based]
- A number incrementing from 1. Numbering is unique for
each line number.
-
Tag Mnemonic - A group of
alphanumeric characters that indicate the type of device that the device ID
represents, such as CR or K for control relay or PB for pushbutton. On the
drawing, the mnemonic that appears in the device tag will be taken from that
which is defined in the symbol.
-
Page Number
- The page number where the device ID is first used.
-
Line Number - The line number where
the device ID is first used.
-
Zone Number
- The drawing zone number where the device ID is first
used.
-
PLC Address - (Available for PLC Wired
Device ID and PLC Wired Terminal ID) The PLC I/O address to which the item is
connected will be used in the device tag.
The right side of the Device Tag Format section displays the
currently selected device tag elements. To remove an element from the device
tag, select it, then either press the
< Delete> key or right click on the
element and select Delete from the context menu. Use the Clear button to empty
the field of all selected elements. Use the Reset button to reload the
combination of elements that you had when you entered the dialog.
The Example field displays what the device tag will
look like in an actual drawing.
You can further format the device tag by selecting
(highlighting) one of the selected elements. When you do this, additional
fields become active.
|
| Duplicate Character
|
The
Duplicate Character
area of the dialog allows you to format how tags will be
labeled when more than one symbol of the same type are placed on the same line.
The
First number/character field defines how
the symbols will be labeled, numbers or letters, and what the first value will
be. The
Separator field defines the character that
will divide the value from the rest of the device tag. If you select the
Suppress first occurrence
check box, then the first item on the line will not have the
additional value, but succeeding items will. For example: PB123, PB123.1,
PB123.2.
|
| Add to Expression
|
To add a tag element to the expression, select one
from the list and click this button to add it.
Note: To delete a
tag element, select the element and either right-click and select Delete, or
press the
< Delete>key.
|
| Reset
|
Reloads the combination of elements present when the
dialog was opened.
|
| Clear
|
Clears the current expression.
|
| Example
|
The Example field displays what the device tag will
look like in an actual drawing.
|
| Properties
|
Prefix /
Suffix: These fields allow you to define a
character string that will be placed at the beginning (Prefix) or end (Suffix)
of the label element.
Width /Fill
with: These fields allow you to set the number and type of characters
that will be used for the selected tag element. These fields become available
when you select a tag element and then select the
Fixed number of characters check box. (If
you do not select this check box the software will use as many characters as
necessary for a given value.)
The entry in the
Width field sets the number of digits that
will be used for the value (more will be used if necessary).
The
Fill with field defines the character
that will be used if necessary to fill out the value to match the width value.
(Example: Page Number set to width 3, fill with 0. Device tags on page 2 will
use the value 002. Device tags on page 13 will use the value 013. Device tags
on page 3333 will use the value 3333.)
|