| New
|
Select the
New button to create a new family. A default
family structure will be created according to the currently selected family
type in the
Family Type pull-down.
|
| Open
|
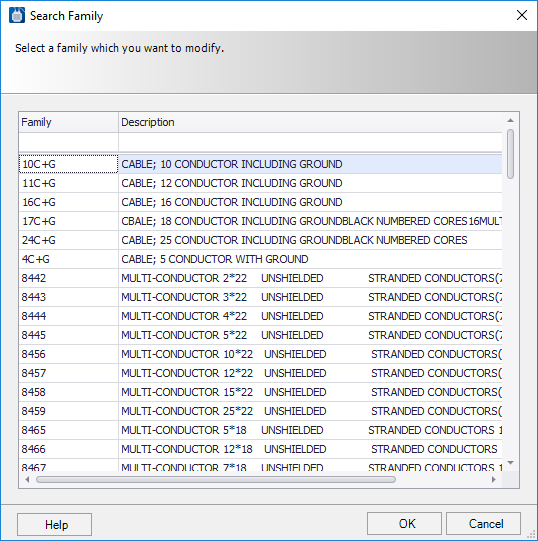
Select the
Open button to load an existing family
from any catalog that you currently have loaded in
Catalog Paths tab of the
Setup dialog. The following dialog will
be displayed for selecting a family:
Note: You can
filter the list of families as you type in either the Family or Description
fields of the first empty row in the grid.
Highlight the family you want and click
OK to load it.
|
| Save As
|
Select the
Save As button if you want to save the
current family and remain in the dialog so that you can make additional changes
and save additional families based on the current information. The following
dialog will be displayed:
Enter the desired family name or use the
Browse button to select an existing family
to overwrite.
Select the catalog that you want to save the family
to from the
Catalog Path pull-down. By default, the
local catalog path will be displayed.
If you have the Components Center functionality enabled in the
Options dialog, then paths to catalogs stored in the Components Center will be
available (as shown above). Selecting one of these paths will save the family
to the Components Center allowing it to be shared by all project participants
within an organization.
If you are working in a
ProjectWise Managed WorkSpace, the path to
the
ProjectWise directory will be displayed in
the Catalog field. When the family is created, it is saved to the
ProjectWise database.
The family type is displayed in the
Details section of the dialog. Select
the
Save button to save the family to the
catalog. If the family already exists you will be asked to confirm that you
want to overwrite the existing family.
|
| Application
|
In the Components Center the project administrator
may have uploaded catalogs from other applications. The selection from the
application list defines in which application the symbol will be available for
placement.
Note: This field is only enabled when a Components Center catalog
path is selected.
|
| Family Type
|
Select
Standard,
Cable,
Terminal/Pin-Plug or
Compound family type, depending on the
type of device that is being represented.
- Standard - Select if you wan to represent a basic parent
child relationship with cross referencing between them such as a typical relay
with a single coil and a set of contacts.
- Compound - Select if you want to represent a
multi-functional device (a single device or part that operates electrically as
more than one device such as a Smart Protective Relay). This family type adds
an additional level of hierarchy to the family structure named Core Tag which
enables you to define unique parent and child relationships under each unique
core tag.
- Terminal/Pin-Plug - Select if you want to represent either a
terminal or pin-plug. With this family type you have the option of including a
parent role if you need one.
- Cable - Select if you want to represent a cable by defining
the cores (conductors) of the cable as different roles in the family.
Note: You can change
the family type at any time while you are editing a family and the software
will attempt to convert the current information you have into the new family
type, but converting from a compound family type to another type will lose the
existing core tag information.
|
| Add
|
When you select the
Add drop down button you can choose to add
any of the following elements to your family structure:
-
Add Core Tag - This option is only
available when your family type is set to Compound. This adds a new Core Tag to
the family structure which you can rename in the Family Structure tree. You can
then add parent and child roles to this new core tag.
-
Add Parent Role - This option is not
available for Cable type families since the parent role doesn't apply to
cables. You are only allowed one parent role for each core tag in a compound
family and it will add a parent role to the core tag you currently have focus
set to in the Family Structure tree. You are only allowed one parent overall
for a standard or Terminal/Pin-Plug type family.
-
Add Child Role - This option is not
available for cable type families since the child role doesn't apply to cables.
This adds a new child role to the family structure. In the case of a compound
family it will add the child to the currently focused core tag in the Family
Structure tree.
-
Add Conductor Role - This option is only available for cable type
families. This adds a new conductor role to the Family Structure tree.
-
Add Terminal/Pin Role - This option
is only available for Terminal/Pin-Plug type families. This adds a new
Terminal/Pin role to the Family Structure tree.
-
Add Alternate Symbol - This option is
only available if you select either a Parent, Child, Conductor, or Terminal/Pin
role in the Family Structure tree. This adds a new alternate to the currently
selected role. Alternates allow you to define alternative choices of symbols or
connection points which can be placed for this role. You are only permitted to
use one alternate for a given role, but you can choose from any of the
alternates defined in the family.
|
| Renumber
|
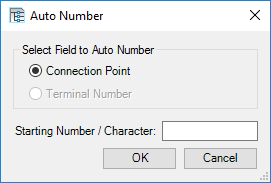
Rather than manually assigning numbers to each
connection point or terminal, you can select the
Auto Number button. When you do, the
following
Auto Number dialog will appear.
Select
Connection Point or
Terminal Number, depending on what you
wish to number, then enter the first number or character in the
Starting Number/Character field. Numbers
will be assigned automatically based on the number of connection points or
terminals that the selected symbol has.
|
| Cut
|
When you select the
Cut button it determines what data to cut to
the clipboard based on what you have focus set to in the dialog. You can cut
information in the data grid or from the Family Structure tree. Data that you
cut will be removed from the family and available for pasting from the
clipboard.
|
| Copy
|
When you select the
Copy button it determines what data to copy
to the clipboard based on what you have focus set to in the dialog. You can
copy information in the data grid or from the Family Structure tree. Data that
you copy will be available for pasting from the clipboard.
|
| Paste
|
When you select the
Paste button the software will attempt to
paste the data from the clipboard to either the data grid or the Family
Structure tree depending upon where focus is currently set in the dialog. If
you attempt to paste the wrong type of data to the currently focused control
you may receive an unable to paste message.
|
| Delete
|
When you select the
Delete button it determines what data to
delete based on what you have focus set to in the dialog. You can delete
information in the data grid or from the Family Structure tree. Data that you
delete will be removed from the family. Depending upon the family type and what
you have selected you may not be allowed to delete the information. In these
cases you will receive a message letting you know that you are not allowed to
delete the item.
|
| Family Structure
|
The Family Structure tree shows the hierarchy of
your family. Depending upon the type of family you have the levels in the
hierarchy will be different.
For Compound type families you will have the
following levels in the family structure:
For all other family types the Core Tag level will
not be present and the Xref node will not exist for a Cable Type family.
Note: The family
structure is a control that you can pin or rollup if you want to hide it
temporarily. You can mouse over the rolled up control and it will roll out
again. You can also detach it and dock it on the other side of the dialog for
example.
|
| Data Grid (Editing Roles)
|
In the case of a Compound family, the data is first
grouped by Core Tag and then by Role. For all other family types the data is
only grouped by Role since Core Tags are not present. In the data grid you can
enter the detailed information for your family such as what symbols to use and
what the CP Text should be.
The Data Grid dynamically adjusts its display based
upon the node you have selected in the Family Structure. If the root of the
tree is selected you will see all the Core tag and Role data for the entire
family at once. If, however, you select a sub level in the tree then only that
level of data will be displayed for the selected node and the other data will
be filtered out making it easier for you to focus on the information you are
interested in.
The data grid will display the following fields:
-
Role - The name of the role is
automatically created by the software based on the type of role that it is. The
role could be of type Parent, Child, Conductor, or Terminal/Pin depending upon
the family type and the specific role.
-
Role Description - You can optionally
enter a description for the role which can be useful when selecting a role to
place from the family later. The role description can also be displayed on the
drawing if the symbol you are placing for this role was created with an
attribute named FamilyRoleDesc.
-
Symbol - Enter the name of the symbol
you want to use for this role. You may also click the Browse button to browse
to the symbol in your catalog.
-
CP - Enter the connection point text
for the symbol that you have selected. Each connection point on the symbol can
have a corresponding text entry.
- You can comma
separate each connection point text and the software will match up the text
with the connection point based upon the sequence number of the connection
points and the order you list the text in.
- If you want a
portion of the text to be hidden (not displayed on the drawing) you can
surround that part of the text with @ symbols like this: A1@HOT@ where A1 will
be displayed, but HOT will not be shown on the drawing.
- You may click
the
Browse button in the CP Text field
to bring up the following advanced editor where you can see how many connection
points you have and can more easily enter the visible and hidden text.
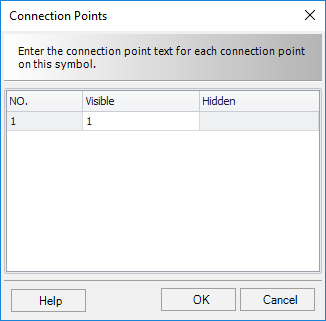
When you click
OK the CP text will be concatenated
together and displayed in the CP Text field of the data grid.
-
Terminal No. - This field will only
be displayed if the
Family Type is set to
Terminal/Pin-Plug. You can optionally
enter a terminal number that will be assigned to the symbol you want to use for
this role. If you leave the field blank you can still enter a terminal number
at the time when you place the symbol.
|
| Data Grid (Editing Cross References)
|
The
Cross Reference symbol is used to
provide cross referencing between the parent symbol and all the related
children. It's a graphical symbol that identifies the drawing and position of
all the children that have been placed which relate to the parent symbol. In a
compound family you can have a parent for every core tag and, therefore, you
are also able to specify a different cross reference symbol for each core tag.
If you select a Cross Reference node in the Family
Structure the data grid will change its display to show the following fields:
-
Cross Reference Symbol - Enter the
name of the cross reference symbol you want to appear in relationship to the
parent symbol. You may also click the Browse button to browse to the symbol in
your catalog.
-
X Offset - Enter the distance in the X
direction that you want the Cross Reference symbol to be offset from the parent
symbol's insertion point.
-
Y Offset - Enter the distance in the Y
direction that you want the Cross Reference symbol to be offset from either the
parent symbol's insertion point or the origin of the drawing depending upon the
value of the Y Offset Relative To setting.
-
Y Offset Relative To - Select Parent
from the pull-down if you want the Y Offset to be relative to the insertion
point of the parent symbol or select Origin if you want the Y Offset to be
relative to the origin of the drawing which is typically (0,0) unless otherwise
specified.
|
| Descriptions
|
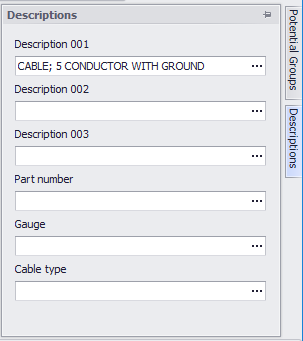
The
Descriptions panel by default is docked
to the right side of the dialog and rolled up as a tab. If you mouse over the
tab it will expand as shown here:
You can enter a description for any of the fields
shown.
Note: The Gauge and
Cable Type fields are only displayed for a Cable type family.
Note: If you want to
make use of foreign language text phrases so that the text can be translated
based on your language settings you can click the Browse button to bring up the
list of your language phrases and select one. You can add multiple phrases to
the same description if you wish by picking them one at a time.
Note: The
Descriptions panel is a control that you can pin or rollup if you want to hide
it temporarily. You can mouse over the rolled up control and it will roll out
again. You can also detach it and dock it on the other side of the dialog for
example.
|
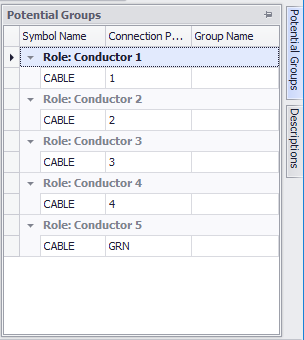
| Potential Groups
|
The
Potential Groups panel by default is
docked to the right side of the dialog and rolled up as a tab. If you mouse
over the tab it will expand as shown here:
If you wish to create potential groups within the
family, select the
Edit Group button to display the
Edit Potential Group dialog. If two or
more connection points on the symbol are given the same potential group number
and are connected to wires, the same potential (wire number) will be assigned
to these wires. In other words, the potential will carry through the symbol.
This is useful when working with flex I/Os.
When creating terminal symbols, the same potential
group number is assigned to all connection points by default.
A default potential group name is assigned to each
connection point. To create a group where the potential will pass through the
symbol, edit the Group Names so that both connection points have the same group
name. Select
OK to save the changes.
Potential groups defined in a family will override
any potential groups that were defined during symbol creation.
Note: The Potential
Groups panel is a control that you can pin or rollup if you want to hide it
temporarily. You can mouse over the rolled up control and it will roll out
again. You can also detach it and dock it on the other side of the dialog for
example.
|
| Save
|
Select the
Save button if you want to save the
current family and close out of the dialog. The following dialog will be
displayed:
Enter the desired family name or use the
Browse button to select an existing family
to overwrite.
Select the catalog that you want to save the family
to from the
Catalog Path pull-down.
The family type is displayed in the
Details section of the dialog. Select
the
Save button to save the family to the
catalog. If the family already exists you will be asked to confirm that you
want to overwrite the existing family.
|