New in ProjectWise CONNECT Edition Update 3.1
This section includes information about what's new in both Update 3.1 (initial, full release) and Update 3.1 R2 (ProjectWise Explorer-only release).
Updated Application Support
There was updated application support in both Update 3.1 and Update 3.1 R2.
Support for the following applications has been added in Update 3.1:
- MicroStation CONNECT Edition Update 8, 9 and 10
- MicroStation PowerDraft CONNECT Edition Update 8 and 9
Support for the following applications has been added in Update 3.1 R2:
- MicroStation CONNECT Edition Update 11
- MicroStation PowerDraft CONNECT Edition Update 10 and 11
- Bentley View CONNECT Edition
- AutoCAD 2019
- Revit 2019
- AutoCAD Electrical 2018, 2019
- AutoCAD Plant 3D 2017, 2018, 2019
- Adobe InDesign CC 2018
Revit Integration Enhancements
There were Revit integration enhancements in both Update 3.1 and Update 3.1 R2.
Update 3.1 enhancements:
- Bluebeam Revu 2017 support, for publishing to PDF with integrated Revit
- PDF-XChange Version 7.0 support, for publishing to PDF with integrated Revit
Update 3.1 R2 enhancements:
- Direct association to
ProjectWise projects
You can now directly associate a Revit advanced integration project to a ProjectWise cloud project.
To make the association, all you need to do is right-click your advanced integration project from the ProjectWise browser in Revit and select Associate ProjectWise Project. (Previously you had to create a standards location in the advanced integration project that was linked to a work area in a ProjectWise datasource that was associated to a ProjectWise cloud project. You can still create standards locations for other purposes, but they are no longer needed to associate advanced integration projects to ProjectWise cloud projects.)
- Attach a link to any
version of a CAD document
You can now specify which version of a CAD document you want to link to the Revit document. You can also switch the version of the link being used later, as new versions are created in ProjectWise Explorer. (Previously, you could only attach a link to the active version of a CAD document.)
- Updated PDF printer
support:
These PDF printer versions are now supported, for publishing to PDF from Revit (advanced integration):
AutoCAD Integration Enhancements
(Update 3.1 R2 only)
From integrated AutoCAD, you can now use the Publish dialog (batch plot) to publish multiple sheets to a location in ProjectWise.
In the Publish dialog (Output > Batch Plot), select a format from the Publish to list, then in the Publish Options Information section, click Publish Options. In Publish Options dialog, click the Browse button next to the Location field, then use the Select Folder dialog to select the folder in ProjectWise where you want to store the published files.

Command Line Options for Managed Configurations Added to the ProjectWise AAM Export and AAM Import Tools
(Update 3.1 R2 only)
The following options were already available on the ProjectWise Export and Import Wizards. This enhancement lets you use the same options when running these tools silently, from the command line.
Newly added PWEXPORT.EXE command line options:
- /mwcsbassoc - exports configuration settings blocks (CSB's) and associations assigned to export data
- /mwallcsb - exports all CSB's
- /mwcsbref - exports referenced managed configuration folders and documents
- /mwcsbexclusionlist - exports 'Variables to exclude from copy-out' list
Newly added PWIMPORT.EXE command line options:
- /mwicsb - imports configuration settings blocks (CSB's)
- /mwicsbreplacedup - replace content of duplicate CSB's (if specified it will automatically set the /mwicsb flag)
- /mwiassoc - imports WorkSpace associations
- /mwidslevelassoc - imports datasource level associations (if specified it will automatically set the /mwiassoc flag)
- /mwicfgfolders - imports managed configuration folders and documents referenced by CSB's (only works if work areas/folders and documents are enabled)
- /mwiexclusionlist - imports variables to 'exclude from copy-out' list
- /genname - generates document name if it is not unique
- /genfilename - generates document file name if it is not unique
Network Configuration Changes
There were network configuration changes in both Update 3.1 and Update 3.1 R2.
The following network configuration changes are for Update 3.1:
There are two changes related to network settings and the ProjectWise Network Configuration Settings dialog:
- The ProjectWise Network Configuration Settings dialog can now be opened in one of two modes: user mode, or administrator mode.
- A new tab - Insecure Login - has been added, where you can allow users to connect to any insecure server, or configure an exception list of servers that the user can connect to in insecure mode.
User and Administrator modes
Most users will open the ProjectWise Network Configuration Settings dialog in user mode as usual from ProjectWise Explorer or from the Control Panel, or simply from a desktop search.
Administrators can now also open the dialog in administrator mode (with elevated privileges) by opening the dialog normally (in user mode) and then clicking the Run as administrator button at the bottom of the dialog, or by right-clicking the underlying pwcfg811.cpl file and selecting Run as administrator. In administrator mode you can configure global auto-login settings, and you can configure whether or not users can change their own network settings.
The mode you open the dialog in also determines where the network settings (information added on the DNS Services and Datasource Listing tabs) get stored in the Windows Registry. When you open the dialog in administrator mode, the network settings you configure get stored under HKEY_LOCAL_MACHINE (this is where all network settings were stored in CONNECT Edition Update 3 and earlier; network settings configured in previous releases will also remain in this location). When you open the dialog in user mode, the network settings get stored under HKEY_CURRENT_USER (this is new).
Insecure Login tab
This tab lets you set whether or not the user can connect to servers that are not configured to use secure connections. When the Allow insecure connection to any server setting on this tab is on (default), then the user will be able to log in to any server they have access to that shows up in their datasource list (this is the same behavior as before the setting was added). When this setting is off, the user will get a warning if they attempt to log in to a server that is not configured to use a secure connection. The user can then decide whether or not they want to proceed with the log in. If they click Yes to proceed with the log in, the server gets added to the exception list (the Insecure Log in tab) and they are connected to the server.
You can also manually add insecure servers to this tab the same way you add servers to the Datasource Listing tab (specify name and hostname and click Add). If you manually add a server, make sure that same server (or a ProjectWise Gateway Service that is configured to point to that server) is also added on the Datasource Listing tab.
In a related change, the SecureRouting setting has been added to the DMSKRNL.CFG file for ProjectWise Gateway Services.
;
; Uncomment this value to control security degradation when running as gateway.
; The value of 0 allows for secure messages received from client to be routed
; over insecure connection. For allowing insecure routing *only* for insecure
; client communication use 1. The value of 2 will always require secure routing
; connection. The default behavior is to always allow insecure routing (0).
;
;SecureRouting=1
The following network configuration changes are for Update 3.1 R2:
The 'Insecure Login' tab that was added for Update 3.1 has been renamed the Security tab, and the check box setting on this tab has been renamed and now behaves slightly differently depending on whether the setting was turned on by the user or the administrator:
- When the ProjectWise Network Configuration Settings dialog is open in user mode and the user turns on the Require secure connection (SSL/TLS) to datasources setting, the user will be notified if they try to log in to a datasource that resides on a server that is not configured to use a secure connection. The user can then decide whether or not they want to proceed with the log in. If they click Yes to proceed with the log in, the server gets added to the server exception list on the Security tab (Except for datasources on these servers), and they will not be notified the next time they try to log in to any datasource on that server, unless they later remove that server from the exception list.
- When the ProjectWise Network Configuration Settings dialog is open in administrative mode and the administrator turns on the Require secure connection (SSL/TLS) to datasources setting, the user will be notified if they try to log in to a datasource that resides on a server that is not configured to use a secure connection, and they will not be allowed to log in. In this case, the server is not added to the exception list.

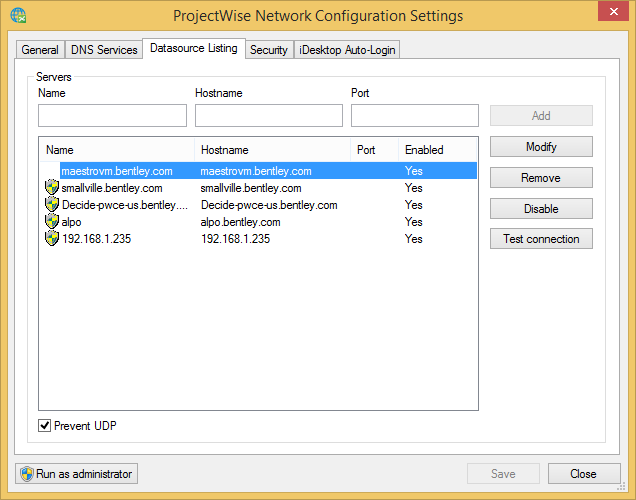
On the DNS Services and Datasource Listing tabs, you can now do the following:
- Test the server connection - Select a server in the list and click the Test connection button.
- Prevent the datasources of a particular server from appearing in the datasource list without removing the server from this dialog - Select that server in the list and click the Disable button. Click Enable when you want the datasources of that server to appear in the datasource list again.
ProjectWise Now Uses UTC (Coordinated Universal Time) for Timestamps
In previous releases, ProjectWise used the local time on the database server to determine the date and time (timestamp) that an action occurred. Starting with this release, ProjectWise now uses UTC (coordinated universal time) to determine the timestamp.
For administrators: Upgrading a datasource to the current version requires that you run the DMSCONV.EXE utility in order to update the Datetime database column so that it now uses UTC. If you are running the DMSCONV.EXE utility on a different computer than the database server, make sure the current time zone setting on your computer matches the current time zone setting on the database server (you can change it back after running the conversion).
Whenever a ProjectWise client encounters an item with a timestamp, one of the following things will happen, depending on the version of the client or server:
- For new clients (CONNECT Edition Update 3.1 or later) connecting to a new server (CONNECT Edition Update 3.1 or later), the client will automatically convert the timestamp from UTC and display it in the client's local time.
- For new clients (CONNECT Edition Update 3.1 or later) connecting to an older server (pre-CONNECT Edition Update 3.1), the client will not do any conversion, and the timestamp will display the database server local time.
- For older clients (pre-CONNECT Edition Update 3.1) connecting to a new server (CONNECT Edition Update 3.1 or later), the client will not do any conversion, and the timestamp will display the universal time (UTC).
iCS for PDF Job History
Job history is now stored in the database instead of the working directory. With this change, the Job History window will now only show job history that is stored in the database. Unless you have manually deleted them, job history from older jobs (created in CONNECT Edition Update 3 or earlier) can still be found in .HST files in the working directory.
Changes to the Delivery Set
- ProjectWise Server Setups:
These items are no longer delivered:
If you are currently using a standalone ProjectWise Indexing Service from a previous CONNECT Edition release, you can continue to use it with this release. Otherwise, if you want to perform text extractions and host the full text index catalog on a computer other than the main ProjectWise Design Integration Server, install a copy of ProjectWise Design Integration Server on another computer and set up a head / tail server configuration. See the ProjectWise Implementation Guide for details.
For ProjectWise Sync Service, you can download it separately from the Software Fulfillment Center if needed.
- ProjectWise Admin Setups and
ProjectWise Client Setups:
The ProjectWise Analytics Data Upload Service installer has been moved from ProjectWise Client Setups (ProjectWise Explorer installer) to ProjectWise Admin Setups.