Installation and Upgrades
Before you begin
- Review the End-User License Agreement (or EULA) carefully during the installation of this product. By installing this release, you agree to the terms and conditions of the agreement.
- Read through this readme prior to installation, as it contains critical information about each application and your overall ProjectWise Geospatial Management installation.
Basic Installation
These are the basic steps for installing ProjectWise Geospatial Management.
- On the client computer, install ProjectWise Explorer CONNECT Edition Update 3.3 (10.00.03.329), and optionally install ArcMap, then install ProjectWise Geospatial Explorer CONNECT Edition Update 3.3.
- On the admin computer, install ProjectWise Administrator CONNECT Edition Update 3.3 (10.00.03.329), then install ProjectWise Geospatial Administrator CONNECT Edition Update 3.3.
- On the server computer, install ProjectWise Design Integration Server CONNECT Edition Update 3.2 refresh (10.00.03.280), then install ProjectWise Geospatial Integration Server CONNECT Edition Update 3.3.
- Install Bentley Geo Web Publisher V8i (SELECT series 5) (if you need advanced background maps).
- Configure your ProjectWise datasource as usual (as described in the ProjectWise Implementation Guide).
- When the ProjectWise
Geospatial Management extension to ProjectWise Design Integration Server and
ProjectWise Geospatial Administrator are both installed and you create a new
datasource in ProjectWise Administrator, geospatial tables are automatically
created in the database.
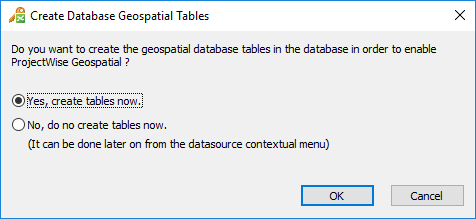
For an existing datasource, you will be prompted to create geospatial tables in the database the first time you log in to the datasource in ProjectWise Administrator:
Basic Upgrade
It is recommended that you contact Bentley Professional Services to assist you in your upgrade.
- On the client computer, uninstall the old versions of ProjectWise Geospatial Explorer and ArcMap and ProjectWise Explorer, then install the new versions.
- On the admin computer, uninstall the old versions of ProjectWise Geospatial Administrator and ProjectWise Administrator, then install the new versions.
- On the server computer, uninstall the old versions of ProjectWise Geospatial Integration Server and ProjectWise Design Integration Server, then install the new versions.
- Upgrade your geospatial map engine to Bentley Geo Web Publisher V8i (SELECT series 5) (if you need advanced background maps) - see precautions section below.
- Upgrade your ProjectWise datasource / database as usual (as described in the ProjectWise Implementation Guide).
- Open ProjectWise Administrator and log in to your datasource using your administrator account. If the datasource is not listed, create it again but using the same ODBC connection that was used in the previous version.
Precautions When Upgrading to Bentley Geo Web Publisher
The Geospatial Background Map engine is no longer delivered with ProjectWise Geospatial Integration Server, therefore you must use Bentley Geo Web Publisher V8i (SELECT series 5) if you need advanced background maps.
If you need to upgrade to Bentley Geo Web Publisher V8i (SELECT series 5), make sure that you first backup the following files and folders before uninstalling the old ProjectWise Geospatial Integration Server or the older version of Bentley Geo Web Publisher:
- ...\GeoMapEngine\Config\pubconfig.xml
- ...\GeoMapEngine\MapDefinitions\*.*
- ...\GeoMapEngine\Schemas\*.* (DO NOT COPY SchemaSeed.xml)
You can now upgrade the files manually by using the following procedure:
- Once the new version is installed, restore your old settings files by copying them back to their respective directories (see above).
- DO NOT overwrite the following files:
- From a command prompt, run the following program: ...\GeoMapEngine\upgradegwpcfg.exe
If you changed the installation path when upgrading Bentley Geo Web Publisher, the Base Cache, Automated iDPR and Map Definition directories will not point to the new installation path unless they are properly configured.
When the upgrade process is completed, the following steps must be followed to make your data and your site work as before:
- If the new installation is not on the same computer as the previous version, all passwords used in the configuration must be entered again.
- Re-generate your existing iDPR files.
- Open your maps in the Bentley Geo Web Publisher Map Author and save them. They will automatically be updated to the last schema version of the map definition.
In ProjectWise Administrator, verify the geospatial maps by previewing them from the datasource node.