Actions
Actions allow you to perform operations using the data entered into controls. Before you can use actions, you must first understand Bindings. More information about Bindings can be found here.
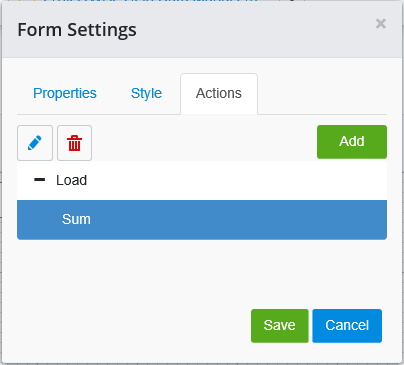
To use Actions, in Forms Designer, select the
Forms Settings button from the top panel and
select the Actions tab from the Forms Settings dialog box that opens. If there
are already Actions available, they will display under the Event which triggers
the action, such as Load. You can select an Action by expanding the Event,
selecting the Action, and selecting
Save. You can delete an Action by selecting the
Action and selecting the Delete
 icon. You can edit an Action by
selecting the Action and selecting the Edit
icon. You can edit an Action by
selecting the Action and selecting the Edit
 icon, which opens the Actions
dialog box described below.
icon, which opens the Actions
dialog box described below.
Adding Actions
 button. From the dialog box that
opens, select a Binding to assign and select
Save. For this example, we will select "Number
1," a binding which we have previously created and assigned to the first
numberbox. For more information about Bindings, click
here. The binding displays in the first field of the Rules
editor. Next, select the operator for the Rule. If you select a mathematical
operator such as "=" you will need to select another binding or enter a value
for the next field. We will select "Is Not Empty" so that the first numberbox
must have data entered before the Action can occur. Add another Rule by
selecting the Add
button. From the dialog box that
opens, select a Binding to assign and select
Save. For this example, we will select "Number
1," a binding which we have previously created and assigned to the first
numberbox. For more information about Bindings, click
here. The binding displays in the first field of the Rules
editor. Next, select the operator for the Rule. If you select a mathematical
operator such as "=" you will need to select another binding or enter a value
for the next field. We will select "Is Not Empty" so that the first numberbox
must have data entered before the Action can occur. Add another Rule by
selecting the Add
 icon. We will select the "Number
2" binding, another binding which we have previously created and which we have
assigned to the second numberbox. We will use the ">" operator and set the
Value to "0" so that the second numberbox must have a number greater than zero
entered before the Action can occur. If both Rules must be met for the Action
to occur, select "and" from the dropdown. If only one of the rules needs to be
met, select "or" from the dropdown.
icon. We will select the "Number
2" binding, another binding which we have previously created and which we have
assigned to the second numberbox. We will use the ">" operator and set the
Value to "0" so that the second numberbox must have a number greater than zero
entered before the Action can occur. If both Rules must be met for the Action
to occur, select "and" from the dropdown. If only one of the rules needs to be
met, select "or" from the dropdown.

Next, in the section titled "Then do these actions..."
set the action that you want to occur when the rules are met. Select the Add
icon where you can choose the
type of action that should occur. The types of actions available differ
depending on the control you are working with. We will select "Math." In the
Target field, we will select Numberbox3 so that the result of the sum displays
in this field. From the Action dropdown, we select "Sum." The controls that
will be added together display to the right of the Action dropdown. Select
Numberbox1 from the first dropdown, then select the + icon to choose the
control which will be added to Numberbox1. Select Numberbox2 from the dropdown
that appears. The action is now set up correctly, and you can select
Close to save the action and close the dialog
box. Now, when a user enters a number in Numberbox1, enters a number greater
than zero in Numberbox2, and clicks or taps Numberbox3, the contents of
Numberbox1 and Numberbox2 will be added together and the result will display in
Numberbox3.