Upgrading Folders to Work Areas
You can create a work area by selecting a regular folder and upgrading it to a work area.
To be able to upgrade a folder, the following must be true:
- your user setting, , must be on, and
- if you are the owner of the folder you want to upgrade, you must also have your Read and Write work area/folder security permissions turned on for that folder (Preview Pane > Access Control tab), or
- if you are not the owner of the folder you want to upgrade, you must also have your Change permissions, Create Subfolders, Delete, Read, and Write work area/folder security permissions turned on for that folder (Preview Pane > Access Control tab)
Upgrade a folder to a work area
- Select a folder.
- Select .
- When the
Work Area Creation
Wizard opens, click
Next.
The Define the work area root folder properties page displays, showing the current general properties of the folder. These are the same as those that appear on the General tab of the Folder Properties dialog.
- Either keep the existing information or change it as necessary, then click Next.
- The rest of the procedure is the same as creating a new work area.
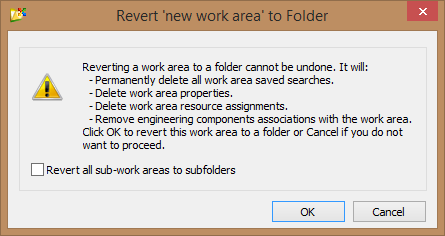
Downgrade a work area to a folder
You can also take a work area and change it into a regular folder. This will not delete any documents, subfolders, or sub-work areas in the work area, nor will it change any of the folder or document security applied to the folder, but it will remove custom work area attributes, resource assignments, the Saved Searches folder and any saved searches, and component associations.
To be able to change a work area into a folder, the following must be true:
- the participant's user setting, , must be on
- the participant performing the conversion must have either the Administrator or Leader role, or
- the participant must at least have their Delete, Read, and Write work area/folder security permissions turned on for that work area (Preview Pane > Access Control tab)