Exporting Documents and Importing Exported Documents (managed export)
When you need to send documents to someone who does not have ProjectWise, you can either email them a copy of the document(s) directly from ProjectWise Explorer, or you can export those documents from ProjectWise Explorer to a folder outside of ProjectWise.
Email may be ideal when you only need to send one or two documents, but export may be a better option if you are sending multiple documents, or if the document you are sending has attachments because export will download the master document and all its attachments. Also, export is required if you need to have those documents edited, so that you can later import the changes back to ProjectWise.
Use when you want to export individually selected documents, and use when you want to export an entire folder or work area of documents. Each method opens a wizard that walks you through the process of exporting documents.
In either wizard, there are two types of export you can perform: managed and unmanaged. Both types of export download copies of the selected documents, however a managed export (simply labeled Export in the wizard) will lock the selected documents so that no other user can check them out or export them while you have them locked, while an unmanaged export (labeled Send to Folder in the wizard) does not lock any documents. After performing a managed export, for you the document's icon changes to a diskette, while other users will see a lock icon. The document’s icon does not change after performing an unmanaged export. Once the documents are downloaded you can zip up the files on the file system and send them out for editing or review as needed.
To perform a managed export of a document, the document must have a Checked In status, and you must have Read, File Read, and File Write security permissions to that document. To perform an unmanaged export, you simply need access to the document, and it does not need to be checked in.
After performing a managed export, and the exported documents are returned from being edited, your next step is to import them back into ProjectWise. An import is essentially a check in, but for exported documents.
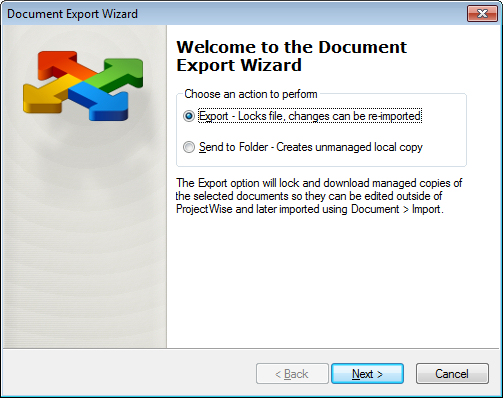
Exporting selected documents
- Select one or more documents.
- Select
.
The Document Export Wizard opens.
- Select Export and click Next.
- On the
Define the export settings page, do the
following:
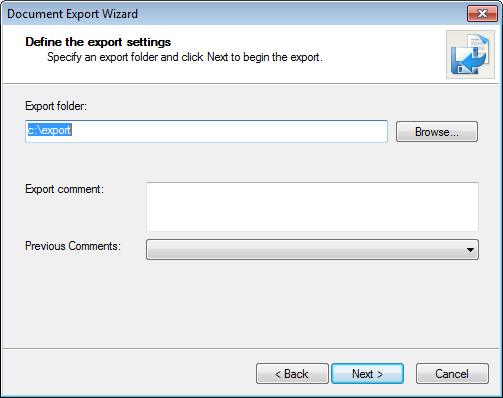
- In the
Export folder field, specify where you
want to export the documents.
You can either click Browse to select the local or network folder to which to export the documents, or enter the path to that folder in the Export folder field. If the folder you specify does not exist, it will be created upon export.
ProjectWise remembers the last location you exported to using this wizard, and displays the path to this folder in the Export folder field the next time you use the wizard. If you have deleted that folder, clicking Browse prompts you to create the folder again. Click OK to create the folder, or click Cancel to select a different export location.
- If available, enter some comment about the export in the Export comment field, or select a previous export comment from the Previous Comments list.
- Click Next.
Of the selected documents, those eligible for export are exported to the export folder, and the results are displayed in the wizard.
- In the
Export folder field, specify where you
want to export the documents.
- Click Finish.
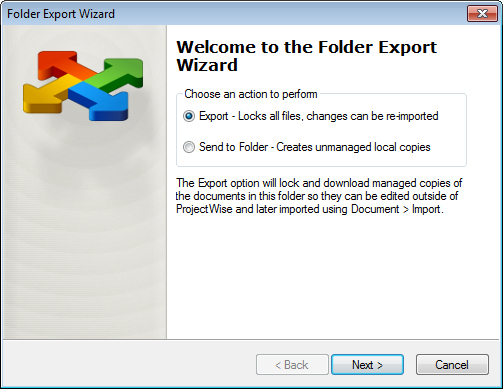
Exporting all the documents in a folder or work area
- Select a folder or work area.
- Select
.
The Folder Export Wizard opens.
- Select Export and click Next.
- On the
Define the export settings page, do the
following:
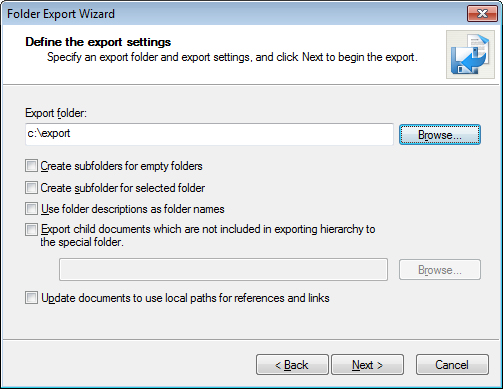
- In the
Export folder field, specify where you
want to export the documents.
You can either click Browse to select the local or network folder to which to export the documents, or enter the path to that folder in the Export folder field. If the folder you specify does not exist, it will be created upon export.
ProjectWise remembers the last location you exported to using this wizard, and displays the path to this folder in the Export folder field the next time you use the wizard. If you have deleted that folder, clicking Browse prompts you to create the folder again. Click OK to create the folder, or click Cancel to select a different export location.
- Turn on export options as needed. See Document Export Wizard.
- Click
Next.
All the documents in the selected ProjectWise folder or work area that are eligible for export are exported to the export folder, and the results are displayed in the wizard.
- In the
Export folder field, specify where you
want to export the documents.
- Click Finish.
Importing (checking in) exported documents
From the document list in ProjectWise Explorer:
- Select one or more exported documents.
- Select .
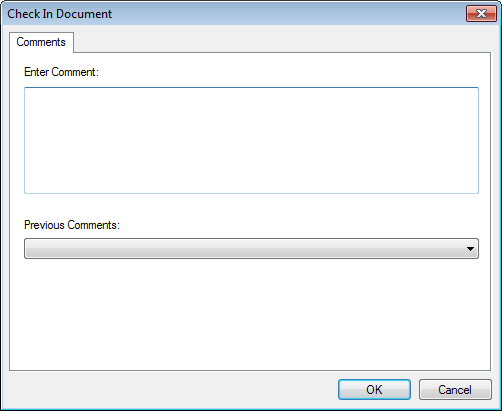
- If the Check In Document dialog opens, enter change comments and click OK.
- If there are no import issues, ProjectWise proceeds with the import of the selected documents. If there is an issue, such as the exported document is not found in its original export folder, you are prompted to locate or specify the correct local copy of the document to import.
From Local Document Organizer:
- Select View > Exports.
- Select one or more documents in the list.
- Select
Action > Import.
The Check In Document dialog opens.
- Enter a description of the changes made to the selected documents.
- Click OK.
The selected documents are imported and the local copies of the exported documents are removed from the folder to which they were exported.