Moving Documents
You can move documents by:
- dragging documents to another folder or work area, with the <Shift> key pressed
- using (<Ctrl+X>) and then (<Ctrl+V>)
- using (Move Document dialog)
Moving documents using drag and drop or cut and paste
- Select one or more
documents, drag them into the destination folder, press the <Shift>
key, then release your mouse button.
This turns drag and drop from a copy operation into a move operation. You will see the "+" symbol (which indicates a copy operation) disappear when you press the <Shift> key.
or
- Select one or more documents and select Document > Cut (<Ctrl+X>), then select the destination folder and select Document > Paste (<Ctrl+V>), and click Yes when prompted, "Do you want to move document(s) here?".
- If No Wizard is set as the default method for creating documents, and the destination folder does not already contain any documents having the same document name or file name as those being moved, the selected documents are automatically moved to the selected folder.
- If No Wizard is set as the default method for creating documents, and the destination folder already contains one or more documents having the same document name or file name as those being moved, either ProjectWise will resolve the conflict for you, or you will be prompted to resolve the conflict yourself. See Resolving Document Creation Conflicts.
- If Advanced Wizard is set as the default method for creating documents, the Advanced Document Creation Wizard opens. See To Create a Document Using the Advanced Document Creation Wizard.
- If no default method for creating documents is currently set, the Select a Wizard dialog opens. Select No Wizard or Advanced Wizard, click OK, then follow the instructions in the applicable option above.
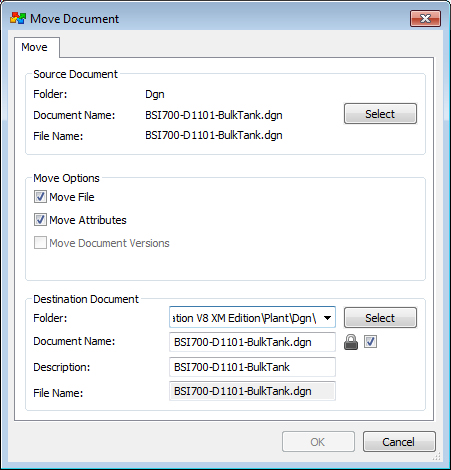
Moving a document using the Move Document dialog
can only be used to move one document at a time, and is especially recommended for situations when you want to control whether or not attributes from the source document are copied over to the new document.
- Select a document.
- Select
Document > Move To.
The Move Document dialog opens. The document you selected to move is displayed in the Source Document section. The Folder, Document Name, Description, and File Name properties in the Destination Document section are pre-populated with those of the selected document.
- In the
Move Options section, do the following:
- If you do not want the
file that is attached to the source document to be copied over to the new
document, turn off
Move File.
This option is on by default if the source document has a file attached. If there is no file attached, the option is disabled.
- If you do not want the
source document's attribute values to be copied over to the new document, turn
off
Move Attributes.
This option is on by default if the source document's folder is associated to an environment. If the source folder is not associated to an environment, the option is disabled.
When Move Attributes is on and the destination folder shares the same environment as the source folder, attribute values will be kept when the document is moved. When Move Attributes is on and the destination folder does not share the same environment as the source folder, attribute values will be kept for the attributes that are the same in both environments, otherwise the attribute values will be lost.
Note: The option, Move Document Versions, is always going to be disabled on the Move Document dialog, whether or not the datasource is configured to allow documents with versions to be moved. If you select a document with versions and the datasource allows you to move documents with versions, then when you click OK, the selected document and all its versions will be moved to the target folder. If you select a document with versions and the datasource does not allow you to move documents with versions, then when you click OK, you will receive an error message informing you that you cannot move documents that have versions.
- If you do not want the
file that is attached to the source document to be copied over to the new
document, turn off
Move File.
- In the
Destination Document section, do the
following:
- Set the destination
folder (the folder to which the document will be moved).
Click Select to change the destination folder.
- (Optional) Change the
document name, description, and file name as needed.
By default, the destination document is set to have the same document name, description, and file name of the source document.
You can keep the existing document name and file name, as long as there is not already a document in the destination folder that has the same document name or file name. A description for the document is optional.
Tip: Turn on the lock icon and check box next to the Document Name field (document name locking feature) if you want the file name to be the same as the document name (editing the document name will automatically change the file name). Turn off the check box if you want to edit the file name independently of the document name.
- Set the destination
folder (the folder to which the document will be moved).
- Click
OK.
The dialog closes and the document is moved to the destination folder.