Managing Participants and Their Permissions
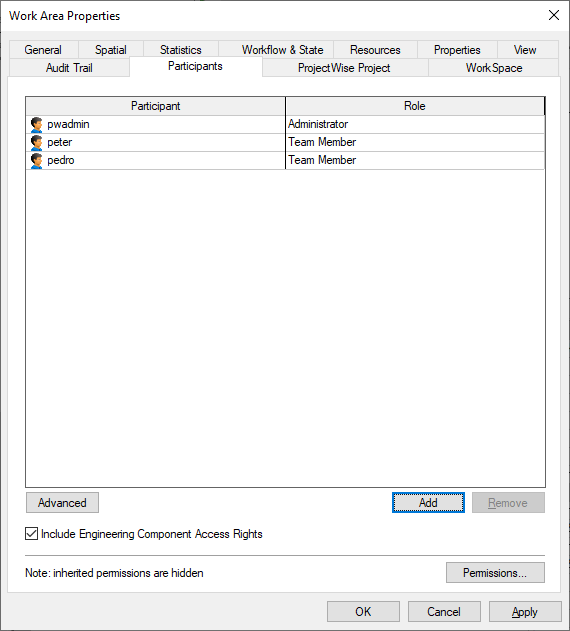
Users with access to a work area are called work area participants.
You can add or remove participants and set or change their permissions through the Participants tab of the Work Area Properties dialog.
When no participants are defined for a work area, then the work area inherits its access rights from the work area above it. If no participants are defined for a top-level work area, then all users in the datasource have access to that work area.
Add participants and set permissions
- Open the Work Area Properties dialog (right-click a work area and select Properties).
- Select the Participants tab.
- Click
Add to add users and groups to this
work area.
By default, new participants are assigned the Team Member role. The user who created the work area is automatically assigned the Administrator role.
- To change a participant's
permissions:
- Select a different
Role for the participant
(Administrator,
Leader,
Team Member,
Observer, or
No Access).
or
- Customize the
permissions of any participant:
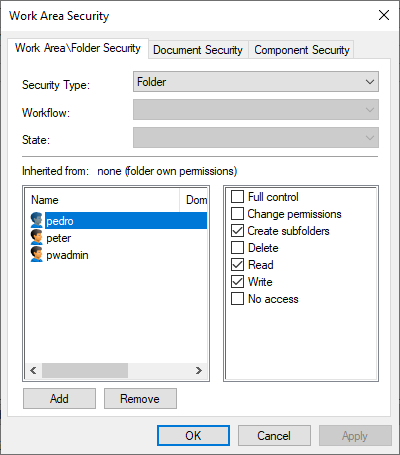
- (Optional) If you need to customize component security permissions, turn on Include Engineering Component Access Rights.
- Click
Advanced.
The Work Area Security dialog opens with three tabs for setting security - Work Area\Folder Security, Document Security, and Component Security. (The Component Security tab only displays if Include Engineering Component Access Rights is on.)
- As needed on each tab, select a user and then turn on or off the required permissions.
- If the user you want to set permissions for is not listed on a particular tab, click Add to add them to the tab and then turn on or off the required permissions.
- Click OK.
Back on the Participants tab, the role will now be set to Custom for any user whose permissions you changed. Also, any user you added through the Work Area Security dialog will be added to the Participants tab, and their role will also be set to Custom.
- Select a different
Role for the participant
(Administrator,
Leader,
Team Member,
Observer, or
No Access).
- To remove a participant, select the user or group and click Remove.
- When finished adding
users and setting permissions, click
Apply or
OK.
The Confirm Work Area Security Changes dialog opens.
- Select the appropriate option and click OK.

Default permissions per role
The Administrator role gives the participant Full control, which turns on the following permissions:
| Work Area\Folder Security | Document Security | Component Security |
|---|---|---|
| Full control | Full control | Full control |
| Change permissions | Change permissions | Create Class Instances |
| Create subfolders | Create | Delete Class Instances |
| Delete | Delete | Query Class Instances |
| Read | Read | Modify Class Instances |
| Write | Write | |
| Change Workflow State | ||
| File Read | ||
| File Write | ||
| Free |
Leader role:
| Work Area\Folder Security | Document Security | Component Security |
|---|---|---|
| Create subfolders | Create | Create Class Instances |
| Delete | Delete | Query Class Instances |
| Read | Read | Modify Class Instances |
| Write | Write | |
| Change Workflow State | ||
| File Read | ||
| File Write |
Team Member role:
| Work Area\Folder Security | Document Security | Component Security |
|---|---|---|
| Create subfolders | Create | Query Class Instances |
| Read | Read | |
| Write | Write | |
| Change Workflow State | ||
| File Read | ||
| File Write |
Observer role:
| Work Area\Folder Security | Document Security | Component Security |
|---|---|---|
| Read | Read | Query Class Instances |
| File Read |
Assign the No Access role if you want to keep a user in the participants list, but prevent them from having any access to the work area:
| Work Area\Folder Security | Document Security | Component Security |
|---|---|---|
| No access | No access | Class - No Access |
The Custom role is created when you assign one of the predefined roles to a participant, and then change any of the default permissions for that role.