Importing Files Using the Bulkload Tools
ProjectWise's bulk-loading tools are used to identify and then simultaneously import large quantities of files and folders into ProjectWise. First, you use the BulkLoad tool to scan the file system and create an ASCII file (a bulkload file) that specifies all of the folders and files that you want to import into ProjectWise. Then you can either modify your selections, or you can process the file using the Process BulkLoad File tool, which imports the specified files and folders.
To Create a Bulkload File
- In the ProjectWise Tools dialog, select Bulkload and click Execute.
-
Select a datasource, enter a valid User Name and Password for the datasource (Password is case sensitive, User Name is not), and click Log in.
The BulkLoad dialog opens.
-
In the Save Bulkload file as field, either enter the path to and including the name of the bulkload file you want to create, or click the Browse button to select a name and location.
Bulkload files are preset to be saved with the file extension, .DAT.
- In the Scan directory field, either enter the path to and including the name of the top-level directory you want to scan for files, or click the Browse button to navigate to and select the directory you want to scan.
-
To limit the scan to only find files of a certain name, partial name, or extension, enter an appropriate value in the File Filter field.
For instance, if you want to limit the scan to DGN files, enter *.dgn and press the <Tab> key.
- To scan all the subdirectories of the Scan directory entry, turn on Scan subdirectories.
-
To place all the files scanned into one folder when the bulkload file is later imported into ProjectWise, turn on Only files.
The directories scanned in the file search display in the left list, except when Only Files is on. When Only Files is on, the list is empty.
-
Click Next to create the bulkload file.
The bulkload file is created and the Process BulkLoad File dialog opens. If you are ready to process the bulkload file you just created, go to step 4 of the procedure, To Import a Group of Documents (Bulkload).
The Bulkload File field indicates the path where the bulkload file is created.
The bulkload data file identifies the files and directories which can be transferred but does not include the contents of the files. The bulkload file is composed of information about all the directories listed in the left list and all the files which are viewable in the right list. The bulkload file refers to the directories as folders and to the files as documents.


After you create a bulkload file, ProjectWise creates a data file to tell you details about your planned bulkload. You can view and edit this file with any text editor. This file lists each item to be loaded and enables you to edit fields to reflect updated information in ProjectWise. For example, you can edit an item's Description field in the text editor. When you display the document's properties in ProjectWise Explorer, you can see the updates that you made in the data file.
You can also use the Bulkload dialog to edit previously saved bulkload files.
To Import Files Specified in the Bulkload File
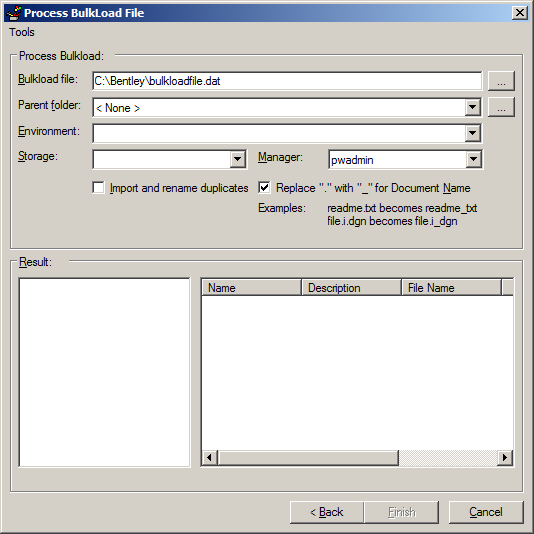
- If the Process BulkLoad File dialog is not open, select Process BulkLoad File in the ProjectWise Tools dialog and click Execute.
-
In the Process BulkLoad File dialog, click the Browse button next to Bulkload File.
The Open Bulkload File dialog opens preset to search for files with extension .DAT.
- Select the bulkload file you want to process.
- (Optional)
If you are importing files that have extensions not yet mapped to any ProjectWise application, from the Tools menu, select Extension Associations, which opens the Extension Associations dialog.
When files are first brought into ProjectWise, they are automatically associated to the applications for which an extension association has been configured. By setting this up beforehand through the Extension Associations dialog, you avoid having to modify the properties of each document after import, in order to be associated to the correct application.
- (Optional)
Either from the Parent folder list, or by clicking the Browse button, select the existing ProjectWise folder to be the parent folder of the documents and/or folders you import.
If you do not select a folder, the top (parent) folder in the bulkload file will be installed at the root of the Documents root folder.
- Select the environment to which to apply to the incoming folders and documents.
-
From the Storage list, select the name of the storage area where you want the documents and/or folders to reside.
This is only necessary when creating top-level folders.
- From the Manager list, select the name of the user to whom you want to assign responsibility for the imported documents.
-
Click Finish.
The importing of the documents described in the bulkload file begins.
When the bulkload import is complete, you can see the results of the import in the list on the lower left side of the Process Bulkload File dialog. If you go to your ProjectWise Explorer session, you will see the new folders and/or documents that you just imported using Bulkload.
- When finished, click Cancel to close the Process BulkLoad File dialog.