Adding and Associating Revit Files to the Project
For easy access, you can add the Revit project (RVT) and family (RFA) files you are working on to the project.
A working location is a location inside the project where you can add links to the Revit files you are working on. The Work in progress location is the default working location for any project. You can use the default Work in progress location exclusively, or you can create additional working locations and add Revit files to the different working locations as needed. For example, you might use one working location for local Revit files and another working location for Revit files stored in ProjectWise. You can rename any working location as needed, including the Work in progress location. To rename a working location, right-click it and select Properties, then change the name and click OK.
You can also associate a file with a project, so that whenever you open the Revit file the associated project also opens in the ProjectWise browser.
- Opening a Revit document from ProjectWise and then adding the open document to the project (Add Current Document command) automatically associates the Revit document with the project.
- Adding a non-open document to the project (Create Item or Add Local Revit Item command) does not associate the document with the project, but you can manually associate it later if needed.
- You can also associate the current open document with a project (Associate the current document command), without adding the document to the project.
Adding ProjectWise Documents to the Project
To open a Revit document from ProjectWise and add it to the project:
- Open a Revit document (RVT, RFA) from ProjectWise as you normally would.
- Open your project in the ProjectWise browser.
- Right-click the
Work in progress location and select
Add Current Document.
The document is added to the project under the Work in progress location, and also associated to the project.

To add any ProjectWise document to the project (that is not open in Revit, or already associated to the project):
- Open your project in the ProjectWise browser.
- Right-click the
Work in progress location and select
Create Item.
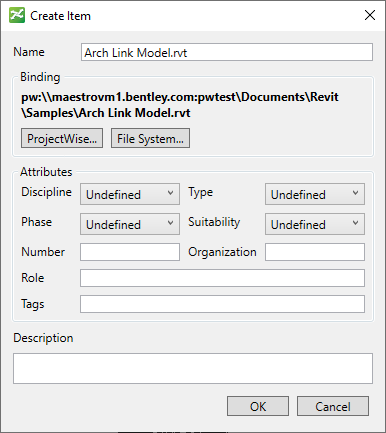
The Create Item dialog opens.
- Click the
ProjectWise button.
The Select document to open dialog opens.
You can add documents from the current datasource (the datasource your advanced integration project is stored in), or you can log in to and select documents from another datasource.
- Select any document (Revit
or otherwise) and click
Open.
The document is added to the Create Item dialog.
By default, the Name of this item is the name of the selected document, but you can change the name if needed. This is just the display name in the project for the link to the document.
The Binding field shows the full server and datasource path to the document in ProjectWise.
- Click
OK.
The document is added to the project under the Work in progress location.

Adding Local Files to the Project
To add a local Revit project file (RVT) to the project:
- Open your project in the ProjectWise browser.
- Right-click the
Work in progress location and select
Add Local Revit Document.
The Select local Revit project dialog opens.
- Select a local Revit
project file (RVT) and click
Open.
The RVT file is added to the project under the Work in progress location.

- Open your project in the ProjectWise browser.
- Right-click the
Work in progress location and select
Create Item.
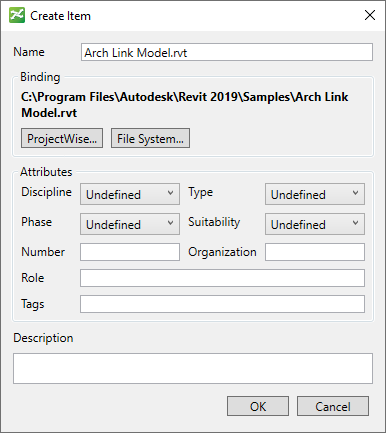
The Create Item dialog opens.
- Click the
File System button.
The Select document to link dialog opens.
- Select a file and click
Open.
The file is added to the Create Item dialog.
By default, the Name of this item is the name of the selected file, but you can change the name if needed. This is just the display name in the project for the link to the file.
The Binding field shows the path to the local file.
- Click
OK.
The file is added to the project under the Work in progress location.
Creating Additional Working Locations
The Work in progress location is the default working location for any project. You can create as many additional working locations as you need.
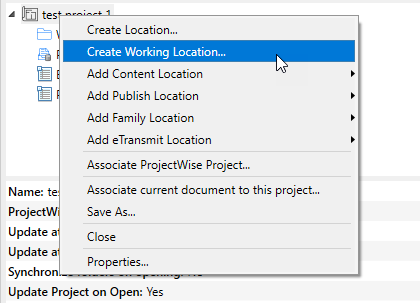
- Open your project in the ProjectWise browser.
- Right-click your project
and select
Create Working Location.
The Create Location dialog opens.
- Edit the Name as needed and click OK.
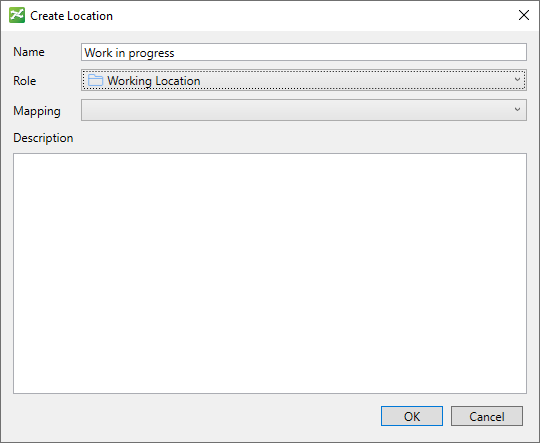
The new working location is added to the project. You can now add files to it as needed, as described in the sections above.