Attaching Links to Files in External Locations
An external content location is a location in the advanced integration project that is linked to some external (source) folder and which integrates with Revit's commands, in order to attach links to the files that are stored in the external folder. The external folder can be a folder on your file system, in a ProjectWise datasource, or in the ProjectWise Share portal of a ProjectWise project. When you go to attach a link to file that is listed in your external content location, a copy of that file is downloaded to the linked local folder (specified when the external content location was created), and the link is then made to the local copy of the file, rather than the master copy of the file in the external folder.
You can attach links to the following file types if they exist in your external folder:
If the files you want to link to are stored in ProjectWise and have multiple versions, you can attach a link to any version of the file. After attaching the link, you can later change the version being used if needed.
- Open your project in the ProjectWise browser.
- Make sure you have already created at least one external content location. (see Adding Locations to Projects)
- Open the Revit model you
want to insert a link in.
You can open the Revit file the way you normally would (for example, ), or if you have added the Revit file to your project you can open it from the ProjectWise browser by right-clicking the Revit file in the Work in progress location and selecting Open.
- In the
ProjectWise browser, expand your
external content location, then right-click a file in the list and select the
Link (File Type) option.
For example, right-click a CAD file in the list and select Link CAD.
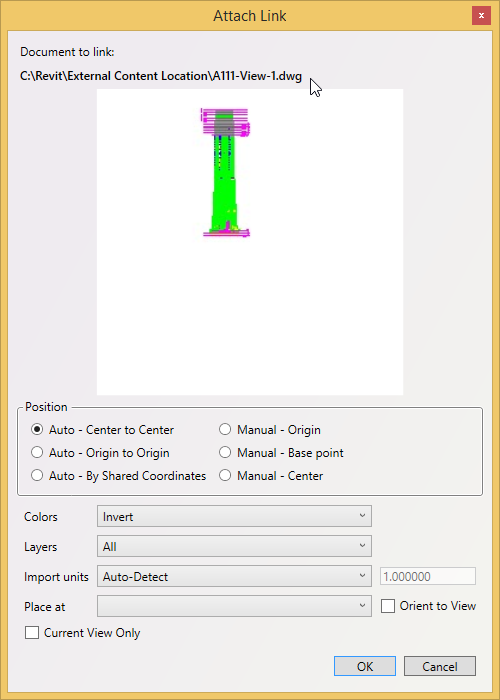
- In the
Attach Link dialog, click
OK.
In the Attach Link dialog, the Document to link field shows the location of the file you are attaching a link to. In this case, notice that the path is not to the original file in its external (source) location, but rather to the copy of the file in the linked local folder.

Changing the Version of a Linked File
If your external content location is linked to a ProjectWise folder and contains multiple versions of CAD files, you can attach a link to any version of a CAD file listed in the external content location. (Previously you could only attach a link to the active version.) In the ProjectWise browser, the active version of a file will just show the document name, and each non-active version of the file will show the document name plus the version name in parentheses - for example: A111-View-2.dwg (Initial) or A111-View-4.dwg (B)
Once you attach a link, you can later switch the version of the linked file if needed. For example, you attach a link to a file which has no versions. Later, a new version of the file is created in ProjectWise Explorer, and you want to switch from using the initial version to the active version. As another example, you attach a link to the active version of a file, and later you want to switch the link to some earlier version of the file.
- Assume that you have already attached a link to some version of a CAD file using the steps above, and now you want to switch the version that is attached.
- You can change the version
in any of the following places:
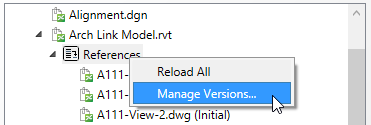
- Right-click the
external content location that contains
the linked CAD file and select
Manage Versions.
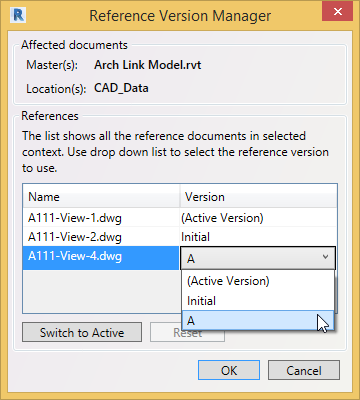
In the Reference Version Manager dialog, find the linked CAD file, then select the version of the file you want to use instead (or click Switch to Active if that is the version you want) and click OK.
- In the
Work in progress location, expand the
Revit file that contains the link to the CAD file, then right-click the
References subfolder and select
Manage Versions.
In the Reference Version Manager dialog, find the linked CAD file, then select the version of the file you want to use instead (or click Switch to Active if that is the version you want) and click OK.
- In the
Work in progress location, expand the
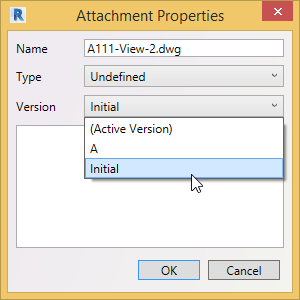
Revit file that contains the link to the CAD file, then right-click the linked
CAD file in the
References subfolder and select
Properties.
In the Attachment Properties dialog, select the version you want to use instead and click OK.
- Right-click the
external content location that contains
the linked CAD file and select
Manage Versions.