To Create a Single Document Using the Advanced Document Creation Wizard
- Open the Advanced Document Creation Wizard ().
-
Click
Next.
The Select Target Folder page opens. If you selected a folder or work area then selected to open the wizard, or if you are dragging external files or existing ProjectWise documents to a particular folder or work area, then that folder or work area will be selected on the Select Target Folder page. You can leave it selected or change it as necessary. You can also right-click inside this window to create a new folder or work area if needed.
-
Select the
work area or folder in which to create the
document(s) and click
Next.
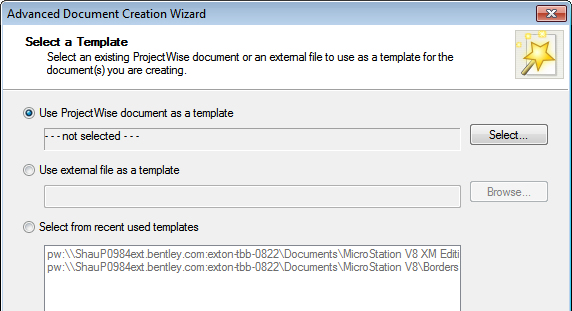
The Select a Template page opens for you to select an existing ProjectWise document, or an external file, on which the new document(s) will be based.
-
Do one of the following:
To create the new document(s) based on an existing ProjectWise document, turn on Use ProjectWise document as a template, click Select, and select a document from the Select Template Document dialog. If you are copying (by dragging) an existing ProjectWise document from one folder or work area to another, this option and the document you are dragging over will be selected by default. If you are copying (by dragging) multiple documents from one folder or work area to another, the first document in the selection set is displayed in the Use ProjectWise document as a template field.
or
To create the new document(s) based on a file not currently stored in ProjectWise, turn on Use external file as a template, click Browse, and select the external file to use as the seed file for the new document(s). If you are dragging a file in from Windows Explorer, this option and the file you are dragging in will be selected by default. If you are dragging in multiple files, the first file in the selection set is displayed in the Use external file as a template field.
or
To create the new document(s) based on one that was recently used to create another document using this wizard, turn on Select from recent used templates and select a file or document from the list of templates. This option is disabled if this is the first time using the wizard.
-
Click
Next.
If document code rules are in place for the selected environment, the Define Document Code page opens.
-
Select the required document code information and select
Show Advanced Generate Options to enter/select
advanced options. When finished on this page, click
Next.
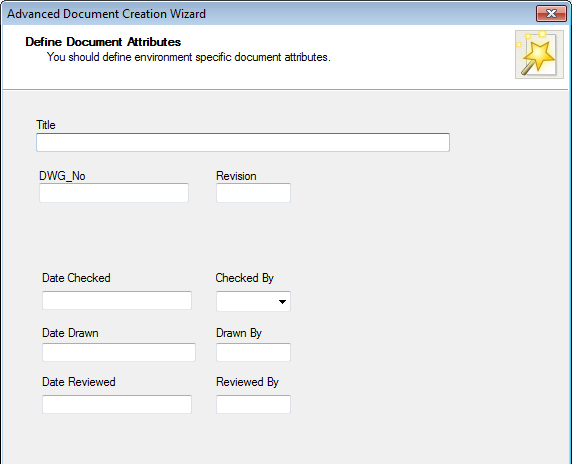
If the selected target folder is associated to an environment, the Define Document Attributes page opens, displaying the attributes presented in the active interface of the folder’s environment. These attributes will appear on the Attributes tab of the Document Properties dialog.
-
Enter the values in the attribute fields as necessary or leave
them as is, then click
Next.
If the selected target folder is associated to an environment, and the environment’s active interface has two pages of attributes, then the Define Secondary Document Attributes page opens next. These attributes will appear on the More Attributes tab of the Document Properties dialog.
-
Enter the values in the attribute fields as necessary or leave
them as is, then click
Next.
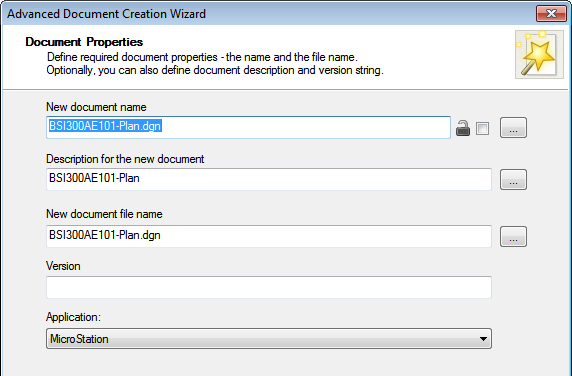
The Document Properties page opens for you to edit general properties for the new document(s).
- For the check box next to the Document Name field:
-
Edit the
Name,
Description and
File Name fields as needed.
A description for the document is optional, but the document must have a name and a file name, and both the (document) name and file name must be unique in the folder or work area in which you select to store the document.
- (Optional) Enter a label in the Version field. Depending on how default version rules are set up, you can either let ProjectWise assign a version identifier, or you can enter your own custom label for the version.
- Assign a ProjectWise application to this document from the Application list. You can also set the property to <none> if you do not need it.
-
Click
Next.
The Create a Document page opens, which displays all the document properties you entered during the document creation process.
- (Optional) If you want to open the newly created document(s) immediately upon completion, turn on Launch associated application.
- (Optional) If you want to apply all the previously selected configuration options to all the succeeding documents (if using the wizard to create multiple documents), turn on Apply selected options to succeeding documents.
-
To proceed with creating the document(s), click
Next.
If you are creating multiple documents and you turned on Apply selected options to succeeding documents, all the documents in the selection set will be created now using the criteria specified in this pass of the wizard.
-
When the Completing the Advanced Document Creation Wizard page
opens, click
Finish.
If you are creating multiple documents and you did not turn on Apply selected options to succeeding documents, then after clicking Finish, the wizard will start over from the beginning to walk you through the next document in the selection set.